


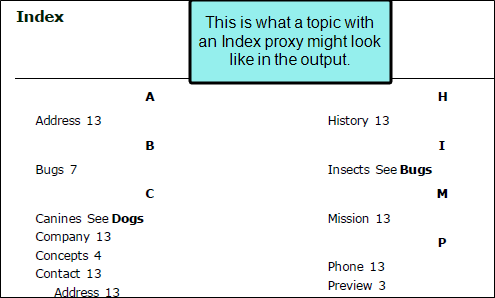
To create an index manually for print output, you need to create a unique topic and insert an Index proxy into it. Alternatively, you can let Flare auto-generate one for you.
The following explains how to use the manual method.

[Menu Proxy — Headings — Online — Depth3 ]
How to Create an Index Manually for Print
- Add a new topic as you normally would.
-
At the top of the topic, enter a title for your index.
If you apply any of Flare's h1 through h6 styles to it, the index title will be displayed in the print TOC (if you create one).
- Most likely, you will want to remove any text after the index title.
- Select Insert > Proxy > Insert Index Proxy.
The Index Proxy dialog opens.
-
Complete the options in the dialog.
-
Generate Headings Select whether you want the printed index to include headings (e.g., A, B, C).
Note You can also edit this setting using your stylesheet. The default setting is to always include index headings. But if you want headings to always be excluded from indexes, you can modify the mc-index-heading property for the MadCap|indexProxy style.
-
Column Count Select the number of columns that you want to be used in Microsoft Word output to display the index.
Note This option is for Word output only. If you are producing PDF output, you can set the number of columns for an index in the page layout.
-
(Optional) Stylesheet Class You can select a style class to associate with the proxy.
You might create and use style classes if you want to generate multiple indexes with different looks for each output. Otherwise, the index will use the style settings from the parent MadCap|indexProxy style. You can create a style class for this purpose in the Stylesheet Editor. To do this, select the MadCap|indexProxy style and in the local toolbar click Add Selector to create a class. The class will then be available from this field in the Index Proxy dialog.
Note If you want to affect the look of the individual entries in the generated index, you can use the IndexHeading and the Index1 through Index9 styles (classes of the p style) in the Stylesheet Editor. For example, if you want to use blue font for the first-level entries in the generated index, you can change the font color setting on the p.Index1 style.
-
- Click OK. The proxy is added to the topic.
- Click
") to save your work.
to save your work.
Auto-Generate vs. Manual Proxies
The auto-generate method is much quicker and easier than the manual method. The manual method is more flexible but requires you to perform a number of extra steps, such as creating topics, inserting proxies, and adding files to the outline TOC. So if you simply want to quickly create print output with generated TOCs, glossaries, or indexes, the auto-generate option might be best for you. But if you want more control over the placement and look of the generated TOCs, glossaries, and indexes, you should use the manual method.
What’s Noteworthy?
Note By default, if your index contains entries with multiple pages in a row, this will be displayed as a range with the pages separated by a dash. For example, instead of showing 10, 11, 12, 13, the index entry will display 10-13.
Note For Adobe PDF output, you can insert index-related Heading variables into page layouts. These variables let you automatically display index headings or terms at the top of pages.
Note If you are using chapter or volume autonumbers and want them to be reflected in a print index, you can do so by specifying the autonumbers at the appropriate locations in your outline TOC (instead of inserting Chapter or Volume Number variables in a page layout).
What’s Next?
In addition to creating a topic for a print index, you can create a topic for a print TOC and/or a topic for a print glossary. See Creating a TOC for Print-Based Output and Creating a Glossary Manually Using a Proxy.
Then you need to include these print topics in an outline TOC in your project. See Adding Print Topics to an Outline TOC.


