By default, micro content responses in the output look the same as the regular topic content. That's because micro content files rely on the same stylesheet(s) set at the project, target, or topic level. However, there are a couple of methods to navigate around this behavior so that you can use custom styles when content is viewed as micro content, as opposed to how it looks in the full topic. You can have a separate stylesheet for micro content responses, or you can create advanced selectors in a single stylesheet.
[Menu Proxy — Headings — Online — Depth3 ]
Choosing a Method
The following might help you decide which method to use.
|
Method 1: Separate Micro Content Stylesheet |
Method 2: Advanced Selectors |
|---|---|
|
Works for all kinds of micro content (search results, topic output, context-sensitive Help calls, etc.) |
Works only for micro content displayed in search results or topic output |
|
Requires multiple stylesheets |
Can be done in one stylesheet |
|
Probably easier for some users |
Users must know enough about CSS to create advanced selectors |
Note If you use both methods in your project, the advanced selector method will override the settings in the micro content stylesheet for featured snippets in search results.
Method 1: Separate Micro Content Stylesheet
You can create a separate stylesheet to be used specifically for micro content differences, and then associate that stylesheet with a micro content file.
How to Associate a Stylesheet With a Micro Content File
- Create a separate stylesheet intended to be used specifically for micro content.
- If you have a stylesheet set at the project or target level, make sure the option Allow local stylesheets is selected.
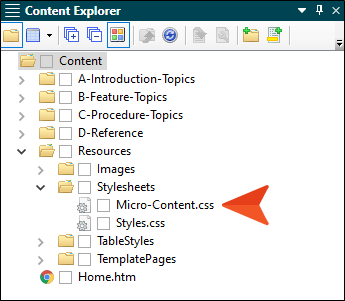
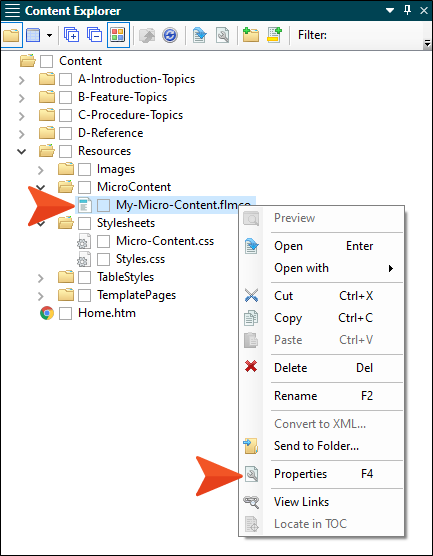
- In the Content Explorer, navigate to the folder holding the micro content file.
- Right-click the file, and from the context menu select Properties.
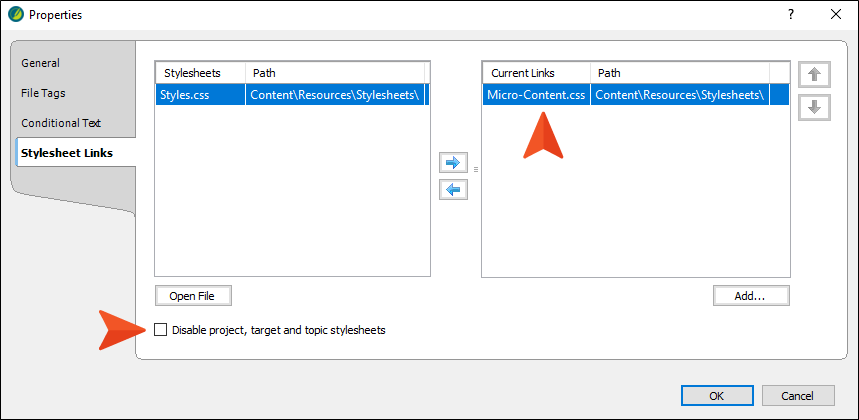
- Select the Stylesheet Links tab.
- Double-click the stylesheet(s) that you want to associate with the micro content file. The stylesheet is added to the Current Links section on the right.
Note If you associate multiple stylesheets with the content file, the last one you selected is the most recent one (the one on the bottom of the list) and therefore has precedence over the others. However, you can use the up and down arrows to change the order of the stylesheets.
Note If the stylesheet does not yet exist, you can click Add to create a new stylesheet.
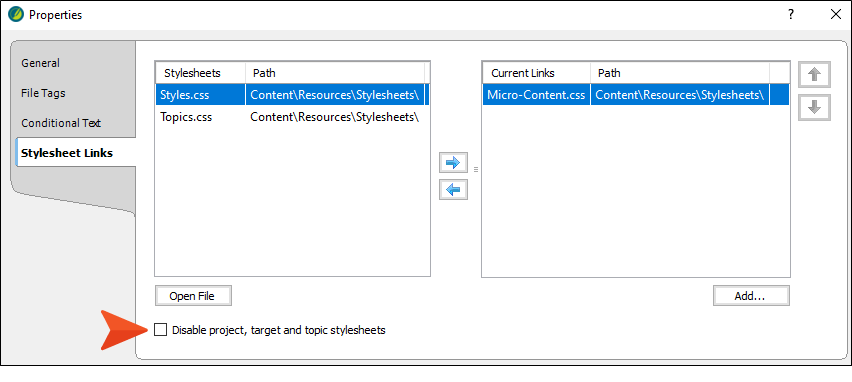
- (Optional) You can also select the option Disable project, target and topic stylesheets if you do not want to use any other stylesheets along with the micro content stylesheet.
- Click OK. The stylesheet is now associated with the file, and the look of responses in the Micro Content Editor changes accordingly.
- Click
") to save your work.
to save your work.
Example You have a topic with a set of steps that looks like this, with the list being used as micro content:
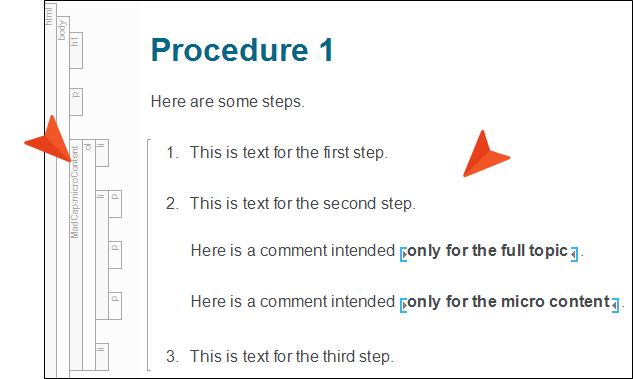
When viewed as a full topic in HTML5 output, you want the topic to look almost exactly like this. The only exception is that the second note under step 2 should not be displayed.

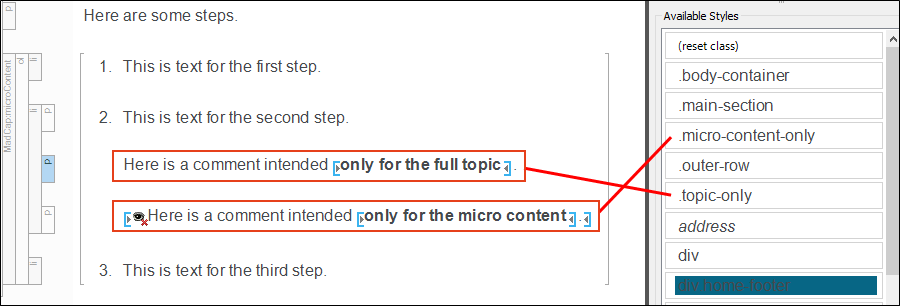
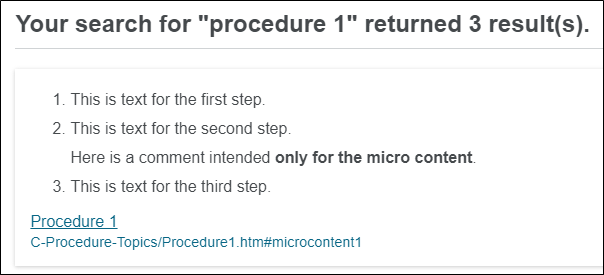
However, when a user searches for "Procedure 1," you want the steps in the micro content to look a little different. First, you want there to be less space between the list items. Second, you want the first comment to be hidden, while the second comment is shown.

In your main stylesheet, you set the following. The first two generic style classes provide a way to indicate which content should be shown in which form of output. And the other selectors provide the spacing between the items in lists.
.topic-only
{

}

.micro-content-only
{
    display: none;
}

li,
li p
{
    margin-bottom: 24px;
    margin-top: 24px;
}
You then add a second stylesheet. Its only purpose is to specify areas where content should look different when viewed as micro content.
In the second stylesheet, you set the following. Notice that the settings for the generic style classes are the opposite (hiding "topic-only" content and displaying "micro-content-only" content), and the margin settings for list items are much lower.
.topic-only
{
    display: none;
}

.micro-content-only
{
    display: block;
}

li,
li p
{
    margin-bottom: 3px;
    margin-top: 3px;
}
In the topic, you apply the topic-only class to the first comment and the micro-content-only class to the second comment.
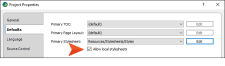
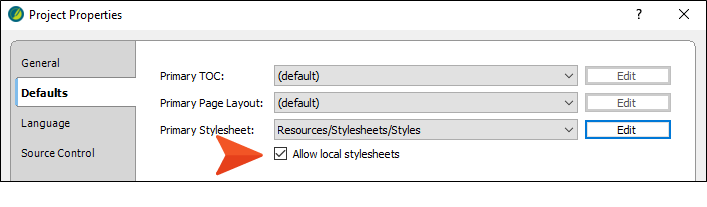
But you're not done yet. You need to make sure the correct stylesheets are used for each circumstance. First, because your main stylesheet is set at the project level, you open the Project Properties dialog (Project > Project Properties). In this dialog, you make sure that Allow local stylesheets is enabled.

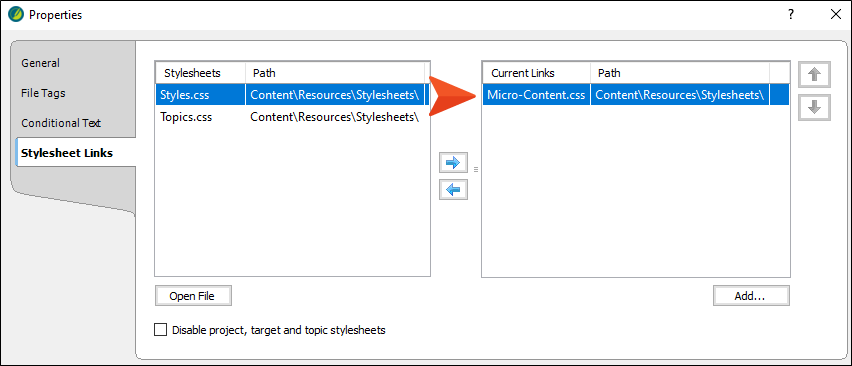
Next, you open the Properties dialog for your micro content file.
On the Stylesheet Links tab of that dialog, you move your special micro content stylesheet to the right side, which means that the responses in that micro content file will give priority to the style settings in that stylesheet. You leave the check box at the bottom disabled, because you still want to use other styles from your main stylesheet as well.
Then you build and publish the HTML5 output.
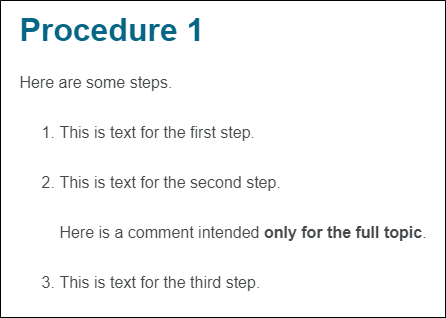
If users view the full topic in the output, it looks like this. Notice the wider spacing, and the fact that only one comment is shown under step 2.
But if they view the micro content in the search results, it looks like this. Notice the list items are closer together, and only the second comment is shown under step 2.
It's the same content, originating from the same place, but it displays differently depending on the situation.
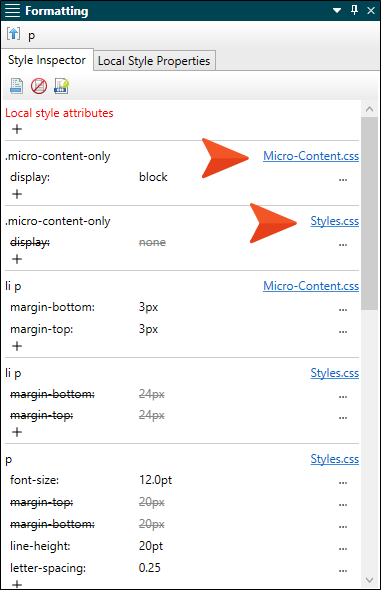
Note You can use the Style Inspector to see links to stylesheets.
What Happens With My Other Stylesheet(s)?
Your micro content can (and in most cases probably should) still use styles from your main stylesheet. However, by pointing a micro content file to a separate stylesheet, you can override certain style settings. So you do not need a completely separate set of styles in the stylesheet that you associate with a micro content file; instead, you can just provide settings for styles where there should be uniqueness.
Example All of your style settings are contained in a primary stylesheet set at the project level. At some point, you add a micro content file to your project, and you want the micro content responses to use almost all of the same style settings from that project stylesheet. The only exceptions are the h2 headings and paragraphs, where you want the font size to be slightly smaller.
Therefore, you create a separate stylesheet for your micro content, and in it you provide the smaller text sizes for the "h2" and "p" styles. You don't need to provide any other settings.
In your output, the micro content will continue to use all of styles from the project-level stylesheet, including various settings for the h2 headings and paragraphs. The only difference is that the font sizes of those headings and paragraphs will be smaller, using the settings from the micro content stylesheet and ignoring the settings from the project stylesheet.
Precedence
If you have multiple stylesheets with conflicting settings, the micro content stylesheet has highest precedence.
The order of precedence works as follows when the content is viewed in the interface (XML Editor, Micro Content Editor), as well as when it is displayed in the output.
Flare Interface
- Local stylesheet associated with micro content file
- Local stylesheet associated with topics
- Primary stylesheet (styles from only one primary stylesheet can be used)
- Primary Target
- Project
- Branding stylesheet
Output
- Local stylesheet associated with micro content file
- Local stylesheet associated with topics
- Local stylesheet associated with template pages
- Primary stylesheet (styles from only one primary stylesheet can be used)
- Any Target
- Project
- Branding stylesheet
Example You have three stylesheets in your project. Two of them are local stylesheets—one at the micro content level and the other at the topic level (for some topics). The third one is a primary stylesheet that is set at the project level. (This example does not include a branding stylesheet.)
- In the micro content stylesheet, you specify that paragraph text should be red.
- In the topic stylesheet, you specify that the paragraph text should be blue.
- In the project stylesheet, you specify that the paragraph text should be black.
What is the result in the output?
- In the micro content search results, the paragraph text will be red, overriding the other colors.
- In a full topic that is associated with the topic stylesheet, the paragraph text will be blue, because it is not being viewed as micro content and it has precedence over the project stylesheet.
- In full topics that are not associated with the topic stylesheet, the text will be black, because it is not being viewed as micro content.
Enabling and Disabling Stylesheets
If you are working with multiple stylesheets in a project, keep in mind that there are options to enable or disable stylesheets at different levels.
-
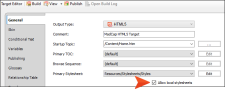
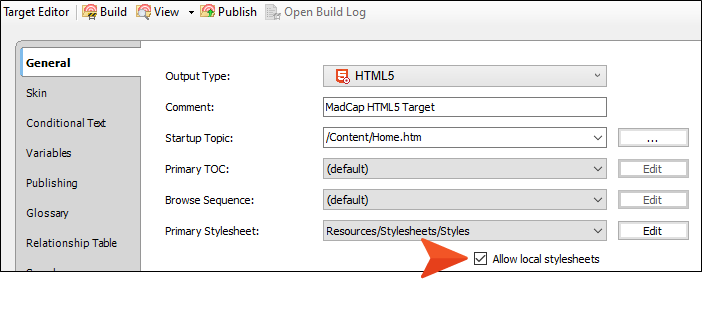
Allow local stylesheets This option is located in the Project Properties dialog and the Target Editor (where you select a primary stylesheet).
-
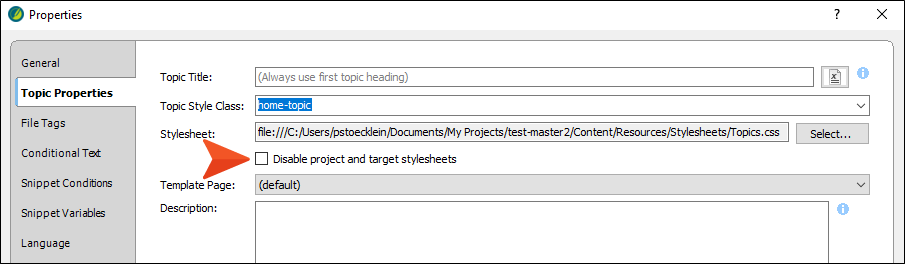
Disable project and target stylesheets This option is located in the Topic Properties dialog (where you select a topic stylesheet).

-
Disable project, target, and topic stylesheets This option is located in the Micro Content Properties dialog (where you select a micro content stylesheet).

The following explains what happens when various options in the interface are enabled or disabled.
Important Keep in mind that even when disabling some stylesheets, those styles might continue to be used in micro content search results. That's because the search results page still relies on those other stylesheets. However, when viewed independently of search results, the micro content will display as indicated below.
|
Project or Target Properties |
Topic Properties |
Micro Content Properties |
Stylesheet(s) Used for Micro Content |
|---|---|---|---|
|
|
|
|
Only uses primary stylesheet |
|
|
|
|
Only uses micro content stylesheet |
|
|
|
|
Uses topic and micro content stylesheets |
|
|
|
|
Only uses micro content stylesheet |
|
|
|
|
Uses all three stylesheets |
|
|
|
|
Only uses micro content stylesheet |
|
|
|
|
Uses topic and micro content stylesheets |
|
|
|
|
Only uses micro content stylesheet |


Method 2: Advanced Selectors in Same Stylesheet
If you do not want a separate stylesheet for micro content responses, you can use descendant advanced (complex) selectors in a single stylesheet, with the following generic classes in front of your regular selector:
.micro-content-container .micro-response
Note It might be possible to use only .micro-response when creating a complex selector, but in many cases both classes are needed: .micro-content-container and .micro-response.
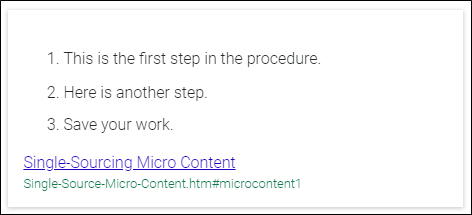
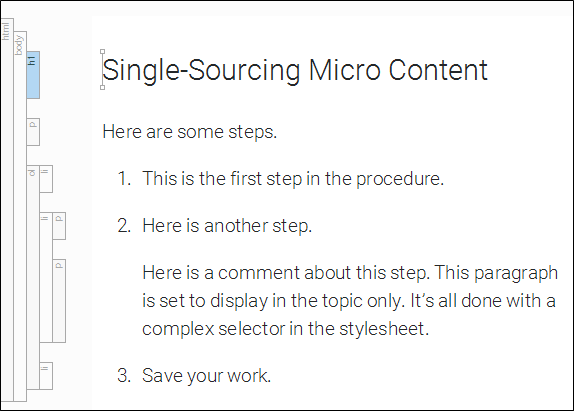
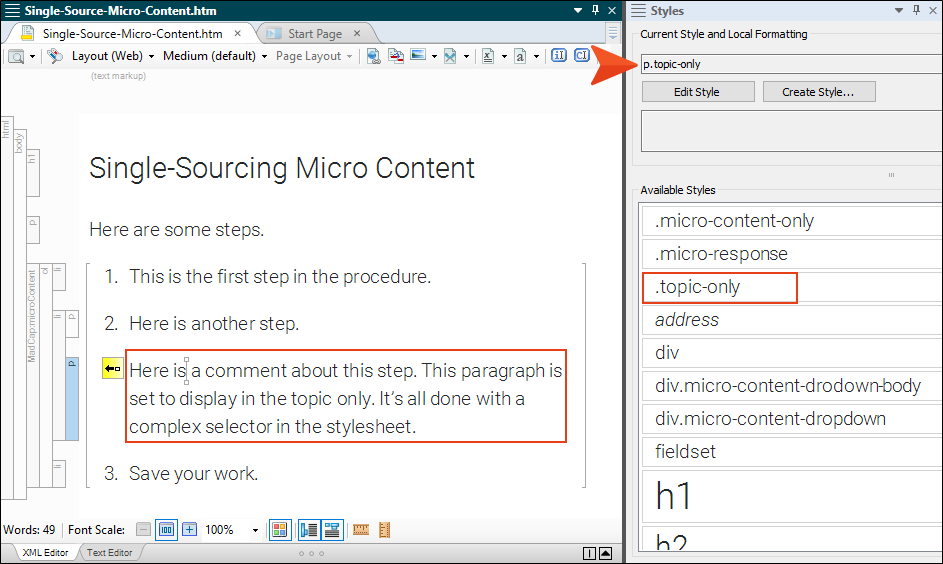
Example You have the following set of steps in a topic, and you want to create new micro content from them.
You right-click the ol structure bar and select Create Micro Content.
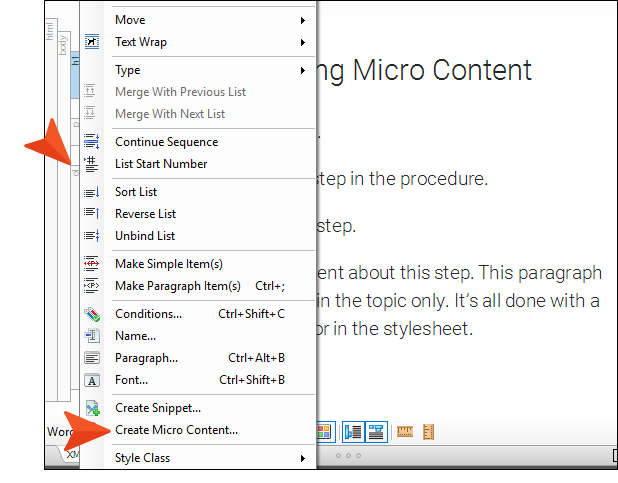
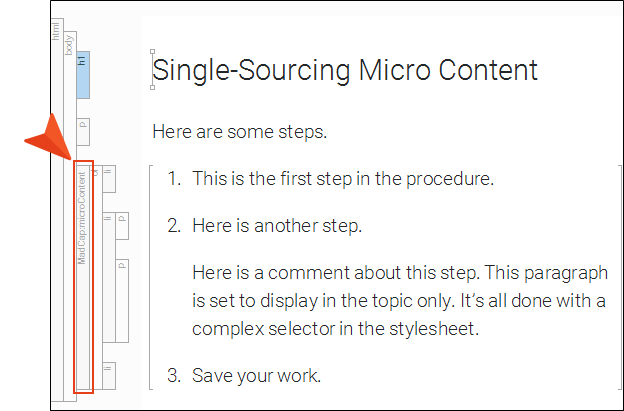
In the dialog, you enter a micro content phrase and click OK. The phrase is added to the micro content file and linked to the set of steps, as indicated by the extra structure bar in the XML Editor.
When the steps are shown in the topic in the output, you want them to look just as they do in the XML Editor. However, when the steps are shown in micro content search results, you want the comment after Step 2 to be hidden. Also, you want to use a smaller font and less space between the steps.
So in your stylesheet, you create the following complex selectors:
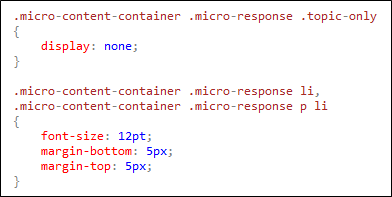
In the XML Editor, you click on the paragraph after Step 2 and apply the .topic-only class to it.
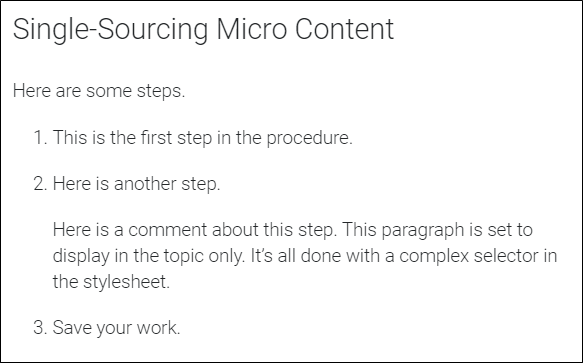
When you generate and view the output, the topic looks like this:
And the micro content search result looks like this: