


Note Only HTML5 supports all micro content features (e.g., featured snippets, Knowledge Panel, Knowledge proxy, Promotion proxy, FAQ proxy). The other output formats support only the FAQ proxy.
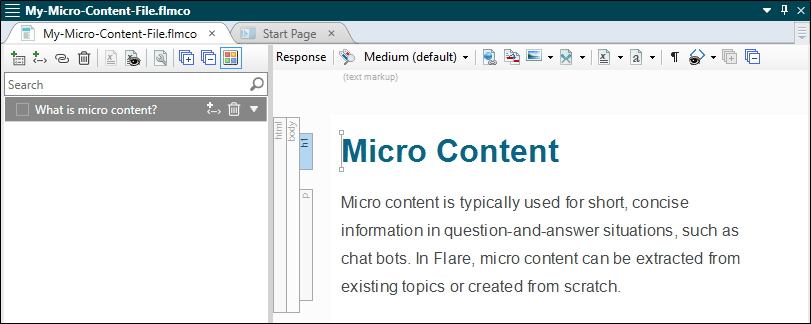
The first step in using micro content, for whatever purpose, is to create it in Flare. This entails adding a micro content file to the Content Explorer and then adding phrases and responses within it. This can be done using a few different response methods (see Micro Content Response Methods—Pros and Cons).
[Menu Proxy — Headings — Online — Depth3 ]
Adding a Micro Content File to a Project
You can add as many micro content files to your project as you need. Some authors might just need one micro content file, but others might create multiple micro content files for organizational purposes, storing different "categories" of phrase/response combinations in each one.
How to Add a Micro Content File
- (Optional) Create a subfolder to store a micro content file.
- Select View > Content Explorer.
- In the Content Explorer, select the Resources folder.
- In the local toolbar, click
 . A folder with the temporary name "NewFolder" is added.
 - Type a new name for the folder (we recommend using MicroContent as the name) and press ENTER.
-
Right-click on your Resources > MicroContent folder (or whatever you have named it) and from the context menu select New > Micro Content. The Add File dialog opens.
- In the File Name field, type a new name for the micro content file.
-
Click Add. The micro content file is added to the Content Explorer. The Micro Content Editor opens to the right, displaying micro content phrases on the left and an area to the right for the response. There is one phrase/response already added, which you can remove or rename/replace.

Creating Main Phrases in the Micro Content Editor
Each main phrase that you create should become associated with a response.
The following steps should be completed if you are using one of these methods:
- Response Method 2: Linking Phrases to Entire Topics or Snippets
- Response Method 3: Linking Phrases to Bookmarks
- Response Method 4: Entering Responses Directly in the Micro Content Editor
If you are using Response Method 1: Creating Micro Content From a Topic (recommend in most cases), you do not need to complete the following steps, because you will create the main phrase at the same time that you select the response content.
How to Create Main Phrases
- From the Content Explorer, open the micro content file.
- In the local toolbar of the Micro Content Editor, click
 . A new row is added to the phrase area on the left, with "New Phrase" shown as the default name.
 - Type your phrase and press ENTER on the keyboard.
- Click
") to save your work.
to save your work.
Note For explanations of additional phrase options in the Micro Content Editor (such as using variables), see Micro Content Phrases.
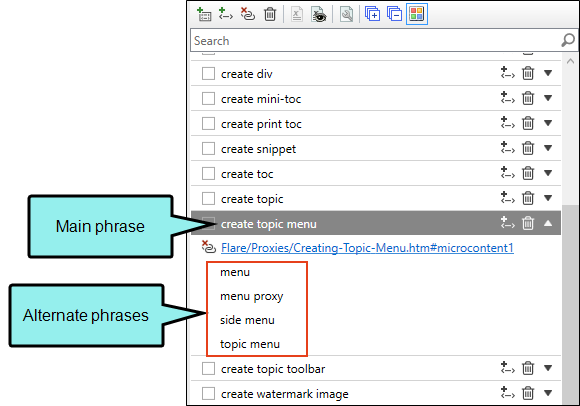
Creating Alternate Phrases in the Micro Content Editor
Not only can you create main phrases, but you can also add alternate phrases for each main phrase, regardless of the method you use. Alternate phrases are extremely useful because it is impossible to predict the phrasing a person will use. By adding alternate phrases, you are improving the odds that the matching response will display in most circumstances.
How to Create Alternate Phrases
- From the Content Explorer, open the micro content file.
- To the right of the main phrase, click
 . A new row is added below the main phrase, with "New Phrase" shown as the default name.
 - Type your phrase and press ENTER on the keyboard.
- Repeat these steps to create more alternate phrases.
- Click to save your work.
Note The main phrase does not carry more weight than any of the alternate phrases. They are simply a way to connect to the same response as the main phrase.
Response Method 1: Creating Micro Content From a Topic
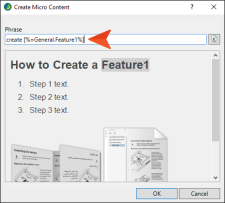
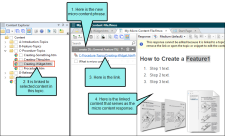
You can create micro content (both the main phrase and response) from a topic. The great benefit of using this approach is that you can choose a specific block of existing content that will be used as the response. In most cases, this is the recommended method.
How to Create Micro Content From a Topic
- Open the topic.
-
Do one of the following:
-
Select the content that you want to use as a response for a micro content phrase. Then in the Home ribbon, click Create Micro Content.

-
Right-click selected content, or the structure bar to the left of the content, that you want to use as a response for a micro content phrase. From the context menu, select Create Micro Content.

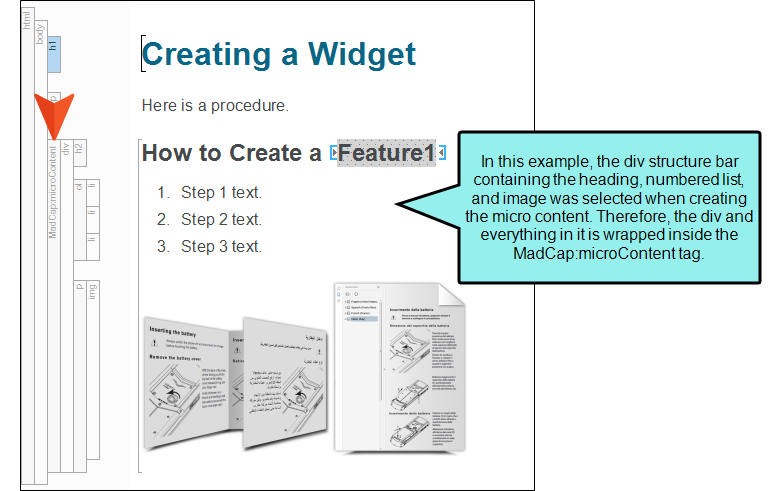
Tip If you have several different elements that you want to select (e.g., paragraph, list, image), it sometimes helps to first place all of that content in a <div> tag
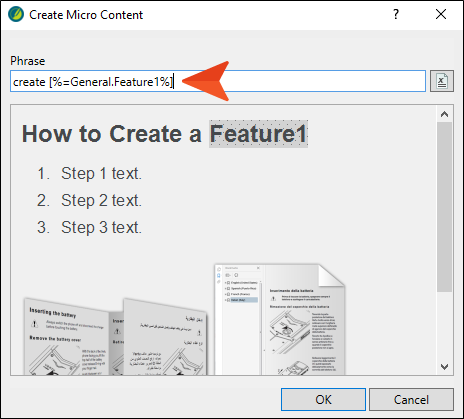
The Create Micro Content dialog opens.
-
-
In the Phrase field, enter the text that a user would enter to make the response appear as a result in the output.
Note After you have finished, you can open the Micro Content Editor and add alternative phrases to be associated with the response as well.
-
(Optional) You can also click
 if you want to insert a variable as the entire phrase, or as part of the phrase. The following syntax for the variable will be used:
-
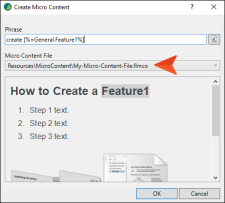
If you have more than one micro content file in your project, use the Micro Content File field to select it.
-
Click OK.
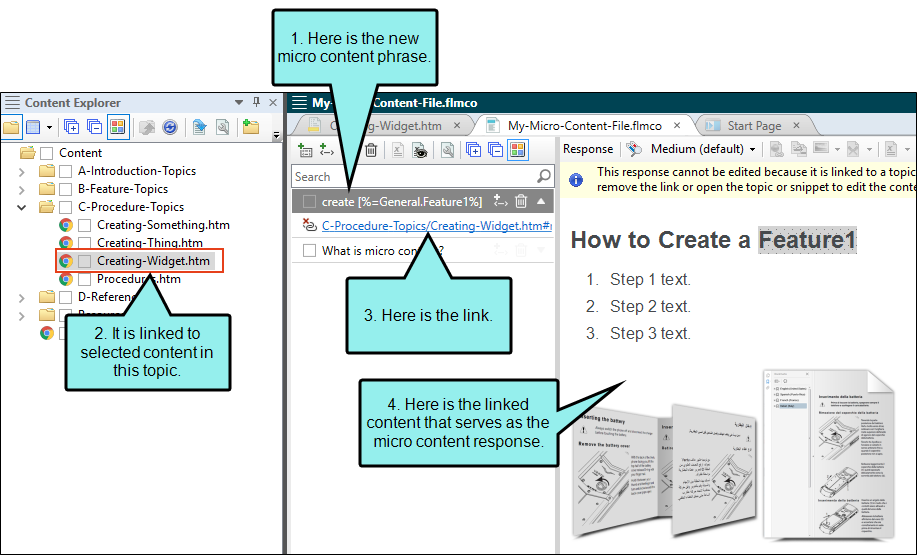
The micro content file will be updated with your new phrase linking to that content.
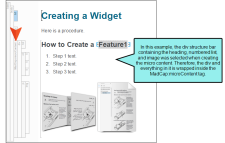
Also, you might notice that the selected content in the topic is now wrapped in a special <MadCap:microContent> tag.
- Click to save your work.


In the output, when a person uses your phrase (or something close to it) to look for information, the selected content will display by itself as a result, even if the topic has other content above or below it in the source file.
Response Method 2: Linking Phrases to Entire Topics or Snippets
You can link a phrase to a topic or snippet. This lets you reuse existing content, but often topics and snippets are larger than ideal for micro content. One solution to this dilemma is to exclude some of the content from the micro content response (
How to Link Phrases to Entire Topics or Snippets
- From the Content Explorer, open the micro content file.
- If necessary, click
 to the right of the main phrase. This expands the area below the phrase.
 - Click Add Link.
- In the Select File dialog, locate and select the topic or snippet.
- Click OK. The response content is shown to the right, but it is read-only since it is linked. In order to edit the content, you need to edit the topic or snippet.
- Click to save your work.
Response Method 3: Linking Phrases to Bookmarks
By linking a phrase to a bookmark in a topic or snippet, the micro content in the output will display all of the content that is found after that bookmark. None of the content above it will be seen.
How to Link Phrases to Bookmarks
- From the Content Explorer, open the micro content file.
- If necessary, click to the right of the main phrase. This expands the area below the phrase.
- Click Add Link.
- In the Select File dialog, locate and select the topic or snippet.
- Click
 . Then find and select the bookmark in the dialog and click OK.
 - In the Select File dialog, click OK. The response content is shown to the right, but it is read-only since it is linked. In order to edit the content, you need to edit the topic or snippet.
- Click to save your work.
Response Method 4: Entering Responses Directly in the Micro Content Editor
Single-sourcing is the best practice when working in Flare. Therefore, if you already have some content elsewhere in your project, it is not generally recommended that you re-enter that content as a response directly in the Micro Content Editor. However, it could be argued that inserting snippets or images in the Micro Content Editor is acceptable, since those files exist separately and can be managed from one location.
How to Enter Responses Directly in the Micro Content Editor
- From the Content Explorer, open the micro content file.
- On the left, select a phrase to associate with the response.
- In the area to the right, enter text, snippets, images, and other features, just as you would edit a topic or snippet.
- Click to save your work.


