You can use the Madcap|topicToolbarProxy style to change the look of the container holding generated topic toolbars, although it is not always the preferred method, especially with HTML5 output, where modifying the skin component is more common.
How to Use a Style to Edit the Look of Topic Toolbars
- From the Content Explorer, open the stylesheet that you want to modify.
-
In the local toolbar, make sure the first button displays
 . If the button displays
  instead, then click it.
Note Some of the necessary style properties can also be changed in the Simplified view in the Stylesheet Editor.
- In the upper-left corner of the editor, click in the drop-down field and select
 .
. - On the left side of the editor, select MadCap|topicToolbarProxy.
- From the Show drop-down list on the upper-right side of the editor, select
 . The most relevant properties for that style are shown on the right side of the editor.
 - (Optional) You can use the toggle button in the local toolbar to show properties below in a group view
 or an alphabetical view
  .
. - Locate the property you want to change.
-
The area to the right of the property is used for selecting and entering values. If you know how to enter the information correctly, you can click in the value field and type it directly. Otherwise, click the ellipsis button
 to the right of the property. Depending on the type of property, the appropriate controls and options display, allowing you to choose or enter values (e.g., select from a drop-down list, click a button, complete fields in a dialog or popup). If you completed values in a popup, click OK at the bottom of the box.
 Here are some of the more common properties that you might change.
- Border below To change the border line that appears at the bottom of the topic toolbar, expand the Borders property group. Then to the right of border-bottom, click , and in the popup set the border width, unit of measurement, color, and/or style. Click OK. You can also use the other cells in this property group to add borders above, to the left, or to the right of the topic toolbar.
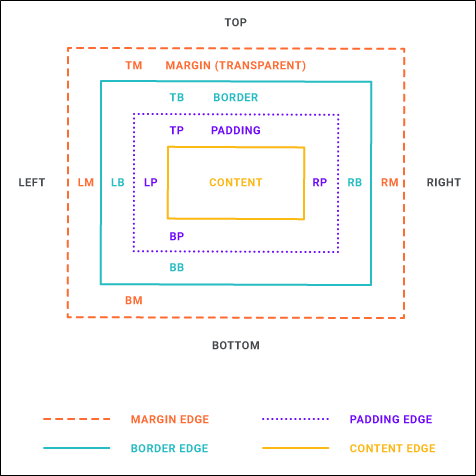
- Padding above To change the amount of empty space (padding) above the text within the topic toolbar container, expand the Box property group. Then to the right of padding-top, click , in the popup set the padding value, and click OK.
- Padding below To change the amount of empty space (padding) below the text within the topic toolbar container, expand the Box property group. Then to the right of padding-bottom, click , in the popup set the padding value, and click OK.
- Space above To change the amount of space above the topic toolbar container, expand the Box property group. Then to the right of margin-top, click , in the popup set the margin value, and click OK.
- Space below To change the amount of space below the topic toolbar container, expand the Box property group. Then to the right of margin-bottom, click , in the popup, set the margin value, and click OK.
Note For more information about the components and properties in the editor, as well as the tasks that you can perform in it, see Styles and Stylesheets, Editing Styles in a Regular Stylesheet, and Stylesheet Editor.
- Border below To change the border line that appears at the bottom of the topic toolbar, expand the Borders property group. Then to the right of border-bottom, click
- Click
") to save your work.
to save your work.