


You can use the Topic Toolbar proxy to generate a toolbar anywhere in your topics. This is an alternative (or an additional option) to the web toolbar that can be included in some online outputs.
For more about web toolbars versus topic toolbars, see Toolbars.
[Menu Proxy — Headings — Online — Depth3 ]
How to Insert a Topic Toolbar Proxy
- Do one of the following:
- Open a topic where you want the toolbar to appear. This is a good method if you only want the toolbar to be shown in one topic, or just a few topics.
- Open a template page that you will use when generating the target. This is the best method if you want the toolbar to be shown on all topics in the output.
- Place your cursor where you want the toolbar to be shown in the output (e.g., bottom or top of the topic or template page). If you are working in a template page, you may need to press the down arrow on your keyboard and then press ENTER at the correct location.
- Select Insert > Proxy > Insert Topic Toolbar Proxy. The Topic Toolbar Proxy dialog opens.
-
(Optional) If you are working with HTML5 output, you can select a skin component in the Skin File field. From the Topic Toolbar Skin Editor, you can select the buttons to be included in the toolbar
If you do not select a skin component in this field, Flare uses the first one it finds in your project (if one exists). Otherwise, Flare provides a default design.
-
(Optional) In the Stylesheet class for proxy field, you can select a class to affect the look of the entire toolbar.
You might create and use a proxy style class, for example, if you want to add a border around the toolbar. If you do not select a class from this field, the generated toolbar will use the style settings from the parent MadCap|topicToolbarProxy style. You have the option of creating a class for this proxy style in the Stylesheet Editor. To do this, select the MadCap|topicToolbarProxy style and in the local toolbar click Add Selector to create a class. The class will then be available from this field.
-
(Optional) You can select buttons for the toolbar here, rather than doing so in the skin. However, adding buttons in the skin might be preferable, especially since you can also add custom buttons there (see Adding Custom Buttons to a Toolbar).
- Click Select buttons.
-
From the Available section, select the buttons you want to include (select multiple buttons by pressing the SHIFT or CTRL key and clicking a range or individual buttons, respectively). Then click
 to move the button(s) to the Selected section.
Add Topic to Favorites
Lets users add the active topic to the Favorites pane so that they can quickly access the topic in the future.

Back
Lets users open the topic that was viewed previously.

Collapse All
Lets users collapse all elements such as togglers, drop-down effects, and expanding text effects in a topic (if they are expanded).

Current Topic Index
Lets users see the display for the current topic in the sequence. This is typically used in conjunction with the "Next Topic" and "Previous Topic" buttons when the topic in question exists in a browse sequence. Flare finds the current topic in a browse sequence and display its position in relation to the rest of the topics in that sequence. (The root node is used to determine the count; in other words, if there are "child" topics in the sequence structure under the current topic, they will be included in the count.)

Expand All
Lets users expand all elements such as togglers, drop-down effects, and expanding text effects in a topic (if they are not yet expanded).

Forward
Lets users open the next topic in a previously viewed sequence.

Home
Lets users open a designated home page (such as your company's website)

Next Topic
Lets users open the next topic in the output. If you are using a browse sequence, Flare attempts to find the current topic in a browse sequence and navigate to the next topic from there. If you are using HTML5 Side Navigation, Top Navigation, or skinless output, or if you are not using a browse sequence, Flare looks at the position of the current topic in your table of contents (TOC) and opens the next topic after it.

Previous Topic
Lets users open the previous topic in the output. If you are using a browse sequence, Flare attempts to find the current topic in a browse sequence and navigate to the previous topic from there. If you are using HTML5 Side Navigation, Top Navigation, or skinless output, or if you are not using a browse sequence, Flare looks at the position of the current topic in your table of contents (TOC) and opens the previous topic before it.

Print
Lets users open the Print dialog so that they can send the open topic to the printer.

Quick Search
Lets users initiate a search in the active topic for the word or phrase that has been typed in the field next to the button.

Refresh
Lets users update the content of the topic being viewed.

Remove Highlight
After a user performs a quick search in a topic, the search text found in the topic is highlighted. This button lets users turn the highlights off.

Select Browse Sequence
Lets users open the Browse Sequence feature.

Select Community
Lets users access their Pulse community features, if the are using MadCap Pulse

Select Favorites
Lets users open the Favorites feature.

Select Glossary
Lets users open the Glossary feature.

Select Index
Lets users open the Index feature.

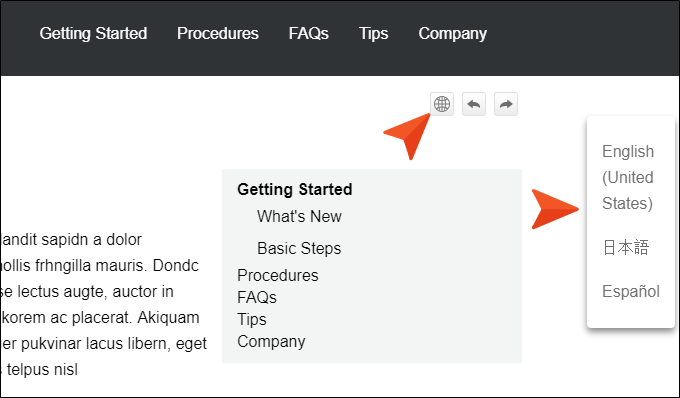
Select Language
Lets users switch between languages using a drop-down menu, if you have built multilingual output.
Example You want your users to be able to switch between US English, Spanish, and Japanese Help in your HTML5 output.
Before you can build your output, you need to make sure that each of your linked multilingual projects has the Select Language button is available in its HTML5 toolbar, and that you've added the Topic Toolbar proxy to a template page. If it the button isn't there, users won't be able to switch from one language to another in your output.
Open the Project Organizer. In the Skins folder, open the Topic Toolbar skin component. On the Setup tab, select the Select Language button, click
 to add it to your skin, and then save your work.
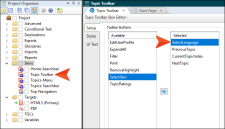
Now you can prepare and build your multilingual output.
When you open the HTML5 output, it defaults to the US English Help because that is your browser’s default setting.
However, because you added the Select Language button to your Topic Toolbar skin component, you can easily change the language setting using a drop-down menu.
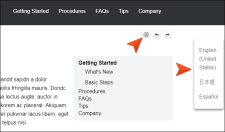
Now the Japanese project is listed before the Spanish project.
Select Search
Lets users open the Search feature.

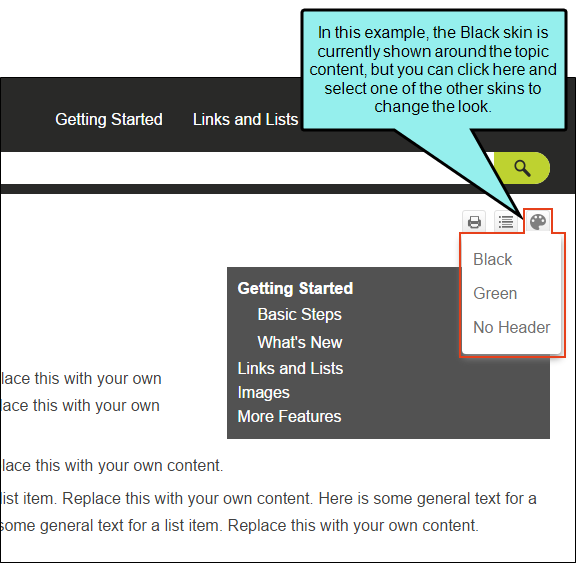
Select Skin
Lets users choose from multiple skins to change the display of the output.
Example Your main Top Navigation skin has a black header background, but you want users to be able to select a skin with a green header background and a different logo, or even a third skin that does not have a header at all. Therefore, you create the additional skins and edit them to look the way you want. Then you add the Skins button in your Topic Toolbar skin component.
In the output, a user can click the button
 in the topic toolbar and choose one of the options, which are based on the skin file name.
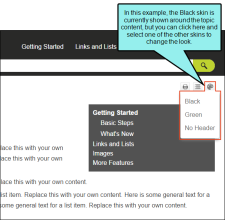
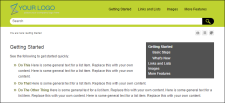
If the user selects Green, the output might look something like this:
And if the user selects NoHeader, the output might look something like this:
The name of the skin is reflected at the end of the URL in the browser.
Select TOC
Lets users open the TOC feature.

Separator
This is the divider on the side of the row of buttons.

Stop
Lets users prevent a page from downloading file information.

Toggle Navigation Pane
Lets users toggle between hiding and showing the navigation pane in the output window.

- Click OK when you are finished.
-
Click OK. The proxy is added.
- Click
") to save your work.
to save your work.


Editing a Topic Toolbar Proxy
After inserting a Topic Toolbar proxy, you can edit it. To do this, open the topic or template page where the proxy is inserted, right-click on it, and select Edit Topic Toolbar Proxy.
What’s Noteworthy?
Note Although you can insert Topic Toolbar proxies in most of the online outputs, choosing the buttons for the toolbar can be done in the skin for only some outputs. For Microsoft HTML Help output, you can select buttons in the Topic Toolbar proxy only.
Note If you are generating an Eclipse Help target that uses a Topic Toolbar proxy, Flare will automatically remove the proxy when building the output. This is because the Eclipse development platform provides its own toolbar support. See the Platform Plug-in Developer Guide from Eclipse at: help.eclipse.org
What's Next?
If you inserted the proxy into a template page, make sure the template page is associated with your target. See Associating Template Pages With Targets.

