At the target level, you can link translated Flare or Lingo projects to your current Flare project. When the target is generated, the output will consist of content in each of those languages. Also, with HTML5 output, you can include a drop-down for users to manually switch between languages.
[Menu Proxy — Headings — Online — Depth3 ]
How to Select Languages for a Target
-
From the Project Organizer, double-click a target.
-
In the Target Editor, select the Language tab.
-
From the Language drop-down, you can change the language.
-
-
Click
 . Another row is added to the grid.
 -
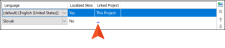
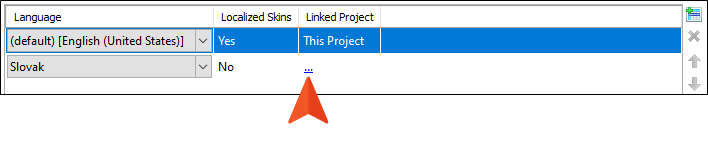
In the Linked Project column, click the link to select the Lingo or Flare project you want to link to your current project.
If you have not added a linked project yet, the link looks like an ellipsis; if you have added a linked project, the link displays the project's file name.
Note You can link to many separate Lingo projects, or you can link multiple rows in this tab to the same multilingual Lingo project, or both.
-
In the dialog, find and select the project you want to link to your current project. Click Open.
-
If necessary, select the linked project's language from the Language drop-down. Flare automatically detects the linked project's default language settings, so you only need to update this setting if you are pointing to a multilingual Lingo project, or if it is incorrect in the linked project.
Additionally, if default translations are available for the selected language’s skin, it is noted in the Localized Skins column. If you have a custom language skin for the selected language in your linked project, Flare automatically uses your custom translations. See Adding Language Skins.
Note If you link to a multilingual Lingo project, only the available languages from a multilingual project can be selected from the drop-down.
Note The default target output language in the Target Editor always shows the currently selected project language. This language updates automatically if you change the project language.
-
(Optional) Continue adding rows and linked projects for each additional target output language.
-
(Optional) Use the
 and
and  buttons to rearrange your projects. They display in the output in the order they are listed on the Language tab (e.g., if you include a drop-down for users to choose each language in HTML5 output, or if you are working in a PDF target where one language will follow another in the output).
-
-
(Optional) If you have added links to one or more Lingo projects, you can select Sync Lingo projects if you want to synchronize updates with those projects.
If this option is enabled, the application detects whether any of the Lingo and Flare source files are out of sync. If they are, the Lingo project is automatically updated and these changes are also brought into the parent Flare project. This is different from the usual process, where the translator would normally update the Lingo project manually and translate the changed or new files.
Warning You might use this feature if you want to quickly see any updated files in your parent Flare project, including non-translated content such as images. However, enabling this option is typically not recommended, because there is always the risk of updating the Lingo project (and therefore also the parent Flare project) with content that has not yet been translated.
-
(Optional) If you selected a right-to-left (RTL) language, you will see the following options at the bottom, which are enabled by default for RTL languages. Leave them selected to automatically invert the following: (1) language-related style rules locally, (2) language-related style rules in the stylesheet, (3) image callouts from MadCap Capture, and (4) page layout settings.
-
Invert left/right local styles
-
Invert left/right stylesheet rules
-
Invert Capture captions
-
Invert Page Layouts
The options that are seen depend on the output type you are using.
-
PDF/Word All four options display.
-
HTML5/HTML Help/EPUB/Eclipse Help/WebHelp/WebHelp Plus Local styles, CSS styles, and image callout options display.
-
DITA No options display.
These options are useful after you receive the project back from a translator. When you generate the output, the inversion of the styles and page layouts takes place.
Example You have a project in English, a left-to-right (LTR) language, and you need to have it translated into Arabic, a RTL language.
For your paragraph (p) style, suppose you have a left margin of 5 px and a right margin of 30 px.
Those settings work fine for targets using the LTR language. But for the RTL language, you need the settings to be flipped so that the left margin is 30 px and the right margin is 5 px.
So after you receive the project back from the translator, make sure the RTL language in Flare is set at either the project or target level.
As a result, the inversion options are automatically selected. When output is generated the paragraphs have a left margin of 30 px and a right margin of 5 px.
Note The option to invert page layouts controls every aspect of the page layout file (e.g., it inverts not only frames and content within them, but also styles applied to frame content). The other invert options have no effect on page layouts.
Note If your selected language is LTR, these options cannot be accessed in the Target Editor.
-
-
Click
") to save your work.
to save your work.
What’s Noteworthy?
Note You must link each language to a Flare or Lingo project before you can close the Target Editor. If you make changes to your linked projects and their links are no longer valid when you build the project, a warning message displays, and it will be unable to build.
Note When you build a target that is set up for multilingual output, and you link directly to a Lingo project, the export process runs automatically in Lingo so that the parent Flare project grabs the necessary translated Flare projects. If the Lingo export process encounters warnings, these will not display with the other build warnings in Flare's interface. Instead, you must open the build log to find any such warnings.
Note In order to build multilingual output that links directly to multilingual Lingo projects, you must have Lingo 10 or newer installed on the same computer.
Note Since Flare generates output from the linked targets in each of your project files, each linked project must have its own target file (e.g., if you are creating PDF output, each linked project needs its own PDF target). If you do not have a target file, a warning message displays before the build starts and you will be unable to build. Target files must be in the same relative location in each project.
Note Be sure that file names are the same for your parent project and for each of your linked projects. This is important for HTML5 targets, so you can switch between languages using the Select Language button in the output.
Note Multilingual Elasticsearch publishing
Note When generating localized HTML Help targets, it is sometimes necessary to set the Windows system locale to match the language that the project is set to. It is necessary to do this when the project contains topic file names with non-English characters. To do this in Windows: 1. Open the Control Panel; 2. select Regional and Language Settings; 3. select the Advanced tab; 4. from the drop-down in the section called Language for non-Unicode programs, choose the same language that the Flare project is set to; 5. restart Windows.
Note If you are building Eclipse Help, you will need to open your Output folder to open your desired language output.
