Managing Groups
Important Pulse is deprecated in Flare, which means that it is slated to be removed in a future version.
AVAILABLE TO: Administrators only
As an Administrator, you can manage groups in several ways.
Important The Groups menu in the dashboard deals with groups that are different from those accessed from the Administration menu.
[Menu Proxy — Headings — Online — Depth3 ]
Group Types
When you install Pulse, the system automatically creates these predefined permission groups: Administrators, Employees, and Customers.
|
Administrators |
Members of this group have the highest level of permissions. |
|
Employees |
Members of this group have fewer permissions than Administrators, but more permissions than Customers. |
|
Customers |
Members of this group have fewer permissions than Administrators and Employees |
You may want to add new groups to manage membership permissions on your server.
Example Your company develops a software product. As part of your company's sales efforts, there are individuals outside your organization who sell your products either as part of a solution or as part of a referral program. In this scenario, you may want to create separate groups named "Solution Providers" and "Referral Partners" and give each group Employee permissions.
Group Access Permissions
This table details the access permissions for the default Pulse groups:
|
User Activity |
General Public |
Customers Group |
Employees Group |
Administrators Group |
|---|---|---|---|---|
|
Register for a New Account (One Account Per Email Address) |
|
|
|
|
|
Read Access to Posting Activities in Topic Feeds |
|
|
|
|
|
Search Posts in Topic Feed |
|
|
|
|
|
Click a Star to Rate Topics |
|
|
|
|
|
Edit User Profile |
|
|
|
|
|
Upload Profile Image |
|
|
|
|
|
Update Notification Preferences |
|
|
|
|
|
Post Status Updates to Topics (Includes Options to Share a Video, Image or File) |
|
|
|
|
|
Post Questions in Topic Feeds |
|
|
|
|
|
Post Answers to Questions in Topic Feeds |
|
|
|
|
|
Like/Dislike/Vote on Answers to Questions in Topic Feeds |
|
|
|
|
|
Post Articles in Topic Feeds |
|
|
|
|
|
Add Comment, Like, Follow, and Tag User Posts |
|
|
|
|
|
Subscribe to Topics |
|
|
|
|
|
Delete and Edit Your Own Content |
|
|
|
|
|
Assign Tasks to Yourself or Other Registered Pulse Users |
|
|
|
|
|
View Task Assignments by Status |
|
|
|
|
|
Customize the Your Apps list in the Community Tab |
|
|
|
|
|
Mention and Message Other Users |
|
|
|
|
|
Designate Topics as Favorites |
|
|
|
|
|
Add Topics as Favorites |
|
|
|
|
|
Contact and Mention Other Users |
|
|
|
|
|
Filter and View Content (Including Comments, Images, and Files) |
|
|
|
|
|
Create Groups for Audiences (Employees and Customers) |
|
|
|
|
|
Delete Content Added by Other Users |
|
|
|
|
Adding and Managing Groups
After adding a group, you can update a variety of settings to control access to Pulse.
How to Add a Group
- Log in to the Pulse dashboard using an account that is a member of the Administrators group.
- Select Administration > Settings. The Settings page opens.
-
In the Settings page, click Groups.
The Groups page opens. By default, the Manage Groups tab is active in this page.
-
Below the Manage Users tab, click Add a Group. The Create a Group dialog opens.
-
In the Create a Group dialog, type the following information:Name Type a name for the group. For example, type Partners.Description Type a short description for the group. For example, type This is a group for partners.
-
Click Create Group.
How to Select a Group to Manage
- Log in to the Pulse dashboard using an account that is a member of the Administrators group.
- Select Administration > Settings. The Settings page opens.
-
In the Settings page, click Groups.The Groups page opens. By default, the Manage Groups tab is active in this page.
-
Below the Manage Users tab, click Manage Groups.
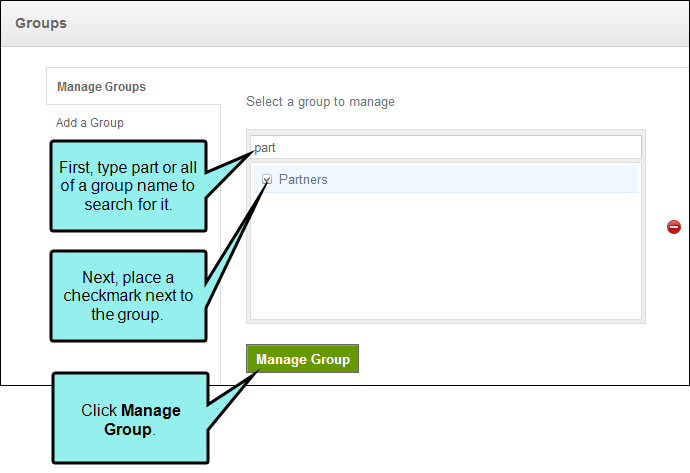
- In the Select a group to manage box, type part or all of a group name. Then press ENTER. For example, type part.
-
Place a check mark next to the group that you want to manage. For example, select Partners.

-
Click Manage Group.Information about the group appears in the Manage Groups page. There are three tabs: Basic, Membership, and Advanced.
How to Update Basic Group Settings
-
Select the group to manage (see above). In this example, we will select the Partners group that we added.
-
In the Basic tab, change the following information as desired:
- Name The name of the group. For example, Partners.
- Description A description to help identify the group. For example, This is a group for partners.
-
Group Type Sets access permission for group member. You can select either Employee or Customer.
Note Pulse only permits one Administrators group, which is created by default.
- Click Save.
How to Update Group Membership
-
Select the group to manage (see above).
Information for the selected group should now appear in the Manage Groups page. You will see three tabs: Basic, Membership, and Advanced.
-
In the Membership tab, you have these options:
-
Add a Member In the What users are members of this group? box, type a full or partial name. Then place a check mark next to the user name(s) that you want to add to the group.
Note When a user is added to multiple groups, their level of system access corresponds to group with the highest permissions. For example, if a user belongs to both the Employees and Customers group, the user will be granted all of the permissions for the Employees group.
-
Remove a Member Clear the check mark next to the appropriate user name to remove the select user(s).
Note If a registered user is not a member of any group, the system provides that user with the same permissions as members of the Customers group.
-
- Click Save.
How to Update the Advanced Group Settings
-
Select the group to manage (see above).
Information for the selected group should now appear in the Manage Groups page. You will see three tabs: Basic, Membership, and Advanced.
- Select the Advanced tab.
-
In the Host Site URL box, type the URL of the site that hosts Pulse.
Important It is strongly recommended that you do not change the default settings.
- Click Save.
How to Delete a Group
- Select the group to manage (see above).
- Place a check mark next to the group to delete.
-
Click the
 button.
Note The default Administrators, Employees, or Customers groups cannot be deleted. Members of the Administrators group have permissions to delete both the groups they create, as well as groups created by other Administrators.
- In the Confirm Delete Group dialog, click Delete Group to remove it.
The Confirm Delete Group dialog opens.