Pulse Installation Frequently Asked Questions
Pulse Installation Frequently Asked Questions
Important Pulse is deprecated in Flare, which means that it is slated to be removed in a future version.
Following are some frequent questions about the Pulse installation and administration tasks.
[Menu Proxy — Headings — Online — Depth3 ]
General
Following are general frequently asked questions about the Pulse installation.
Do I Have to Host My Flare Content on the Pulse Web Server?
No. You can host the published Flare output on any server, computer, or location that has access to your Pulse web server.
Do I Need a Separate License Code for Each Flare Target That I Publish?
No. Each Flare target can be set up to have its own Pulse community. With Pulse, you can create an unlimited number of communities using the same license code.
How Do I Integrate Pulse With My Flare Content?
If you have installed Pulse, you can now open the Flare project and enable the Pulse features using the Analytics Tab in the Flare target. See Integrating Flare and Pulse.
Windows Installer
Following are frequently asked questions about the Windows installer.
What Version of Windows Installer Do I Have?
- In the Windows Start menu, type Run in the Search Programs and Files box. Select Run from the Program menu to open the Run dialog.
- In the Open box, type system32. Then, press ENTER or click OK.
- Locate the file named "msiexec.exe."
- Right-click the file and select Properties from the context menu.
- Click the Details tab.
- In the field next to Product Version, ensure that your system is running Version 4.5 or higher. You should be running version 4.5.6001.22159 or greater. Most systems will be running version 5.0, which meets the minimum requirement.
.NET Framework
Following are frequently asked questions about the .NET framework.
How Do I Determine If the .Net Framework is Already Installed?
- In the Windows Start menu, type Run in the Search Programs and Files box. Then select Run from the Program menu to open the Run dialog.
- In the Open box, type regedit.exe. Then, press ENTER or click OK.
- If you are prompted by the following User Account Control message. Click Yes to open the Registry Editor.
-
In the Registry Editor, the following registry keys will be visible if the required versions are installed:
Important When checking the information below, always make sure you are verifying the version numbers in the in "NET Framework Setup" directory and not the ".NET Framework" directory.

-
For Version 4.0 Navigate to HKEY_LOCAL_MACHINE\SOFTWARE\Microsoft\NET Framework Setup\NDP\v4\Full. You should see 4.0 or above in the Version row.

-
For Version 4.5 Navigate to HKEY_LOCAL_MACHINE\SOFTWARE\Microsoft\NET Framework Setup\NDP\v4\Full. The existence of DWORD in the Release row indicates that .NET 4.5 or above is installed. The number shown in parentheses refers to a specific .NET version (see http://msdn.microsoft.com/en-us/library/hh925568(v=vs.110).aspx).

-


Should I Install the Full Package or Client Package?
You should always install the full package when working with server applications. The full framework provides a number of features and assemblies that are not available with the client package.
IIS
Following are frequently asked questions about IIS.
What is IIS?
Internet Information Services is a web service role that is enabled in the operating system to give the system its web server capabilities. IIS must be installed on the computer that will be acting as your Pulse web server.
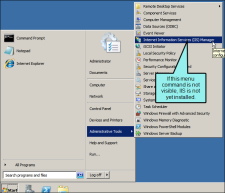
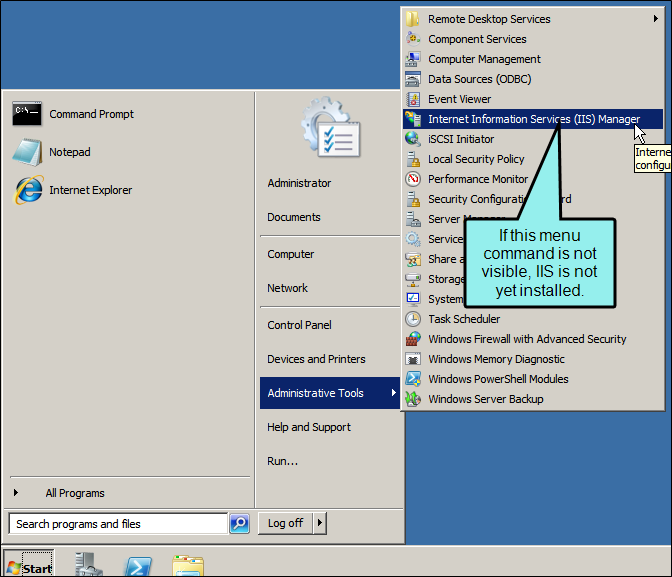
How Do I Determine If IIS is Installed?
There are two ways to determine if IIS is installed on a system:
instructions for using the windows control panel
- Open the Windows Control Panel.
-
Click Programs.Then under Programs and Features click Turn Windows features on or off.
The Windows Features On or Off dialog appears.
- Look for Internet Information Services.
instructions for using run command
- Open the Start menu and choose Run.
- In the Run dialog, type inetmgr Then, press ENTER or click OK.
- If the Internet Information Services (IIS) Manager appears, the program is installed.
IIS is Already Installed on Our Server. How Do I Create a New Website for Pulse in IIS?
When you install IIS for the first time, a "Default Web Site" is automatically created in the \inetpub\wwwroot directory on the web server. You can either use this default directory to publish the Pulse content or you can create a new directory in the IIS file system by following these steps:
-
Click Start > Administrative Tools and select the Internet Information Services (IIS) Manager.
-
In the Connections pane, right-click the Sites container and select Add Web Site.

-
In the Add Web Site dialog, type a name for your Pulse site in the Site name box. For example, type Pulse

-
In the Application pool box, make sure the desired application pool appears. In this example, the default application pool is named Pulse.
Note If you want to use a different application pool, click the Select button. Then, choose the desired Application pool from the list and click OK.
-
In the Physical path box, type the physical path to the folder that you want to use as your content directory for Pulse. In this example, we created this folder structure: %SystemDrive%\pulsepub\wwwroot.
- From the Type list, select the desired protocol. In this example, we selected http.
- In the IP address box, type a static IP address.
- Type a port number in the Port text box. The default port number is 80.
- If you want to use a host name for your URL, enter it in the Host name box. In this example, we are using pulse.example.com.
- If you do not have to make any changes to the site, and you want the web site to be immediately available, place a check mark in the Start Web site immediately box.
- Click OK.


How Do I Use a Host Name for the Pulse URL?
By default, the Default Web Site that Pulse uses to serve your dashboard content requires you type <localhost>/Pulse to gain access your dashboard content. However, you can change the localhost to a domain name, if desired.
Example To access your Pulse dashboard content users must type: http://127.0.0.1/Pulse/ in the browser address bar. Using the steps below, you can change the host name to give users the ability to type: http://pulse.example.com.
-
Click Start > Administrative Tools and select the Internet Information Services (IIS) Manager.
-
Right-click your Pulse web site and select Switch to Features View from the menu.

Note In this example, we are using the Default Web Site for Pulse.
-
In Features View, under the ASP.NET area, right-click Providers and select Bindings from the context menu.

-
In the Site Bindings dialog, highlight the appropriate protocol. In this example, we highlighted the protocol http in the Type column.Then click Edit.

-
In the Edit Site Binding box, type the host name for your Pulse URL. For example, type: pulse.example.com. Then click OK.

-
In the Site Bindings dialog, click Close.

- Select File > Exit to close IIS Manager.


Pulse Setup Program
Following are frequently asked questions about the Pulse setup program.
Do I Install the .Net Framework Before Pulse?
Yes. The .NET Framework is a prerequisite for the Pulse setup program. If you do not install the framework, a notification message similar to the following one will appear when you attempt to run the Pulse setup program on the server:

You should click Yes in the error message. This will direct you to the Microsoft .NET Framework (Web Installer) page in a new browser window, so you can download and install the framework.
Pulse Server Application
Following are frequently asked questions about the Pulse server application.
Why Am I Seeing the “Pulse was Unable to Process Your Request” Message?
This message displays when you are attempting to log in to the Pulse dashboard.

When this message appears, first try refreshing your browser content. If the message still appears, it typically means that IIS is not able to properly handle responses for the ExtensionlessURL resources. This can quickly be resolved in Internet Information Services (IIS) Manager.
- Log in to the Pulse web server as an administrator.
- Click Start > Administrative Tools and select the Internet Information Services (IIS) Manager..
-
In the left pane, double-click the appropriate connection. Then double click Handler Mappings.

-
In the Actions pane, click View Ordered List

-
Look for these mappings in the Name column:ExtensionlessUrl-ISAPI-4.0_32bitExtensionlessUrl-ISAPI-4.0_32bitExtensionlessURL-Integrated-4.0
-
Select each mapping individually. Then in the Actions pane, click Move Down until all of the mappings are near the bottom of the list, just above StaticFile.

- Close the IIS Manager.


Why Am I Seeing the “Web Site Test Failed” Message?
If you encounter the "Web site test failed" message when testing your web site setting in the Pulse Server Configuration window, it is recommended that you first ensure your Pulse web site is running in IIS.
- Log in to the Pulse web server as an administrator.
- Click Start > Administrative Tools and select the Internet Information Services (IIS) Manager..
- In the Connections pane on the left side of the window, expand the Sites container.
- Locate your Pulse web site. In this example, the Pulse web site is the "Default Web Site."
-
Right-click the website and select Manage Web Site > Start from the context menu.


If your website is running successfully, we recommend returning to the Pulse Server Configuration window in the Pulse server application. Then, test your website settings again.
RabbitMQ
Following are frequently asked questions about RabbitMQ.
What is RabbitMQ?
The Pulse setup program installs a third-party tool, RabbitMQ. This runs as a Windows service and supports communication between the Pulse web server (IIS) and the SQL Server hosting your Pulse database.
RabbitMQ monitors the amount of RAM on the server, to raise alarms and block connections until the alarm is cleared. This is helpful because it will assist you preventing the server from crashing should free disk space get low.
Where is the RabbitMQ Service Installed?
The Pulse setup program installs the RabbitMQ tool at this path where Pulse is installed: C:\Program Files (x86)\MadCap Software\MadCap Pulse\Pulse.app\Tools. Please note that this is just an example. Your files might be in different folder than C:\Program Files (x86).

Once installed, Pulse runs the RabbitMQ tool as a Windows service:

User Administration
Following are frequently asked questions about user administration.
How Do I Remove a User So They Can Reuse Their Email Address in Pulse?
Deleting a Pulse user removes all access to Pulse and keeps the user information in the Pulse database. To give a user the ability to re-use the email address in Pulse, you must first delete the user from the dbo.Users and dbo.Login tables in SQL Server. Once the entries are deleted, the email can be used to create a new Pulse account.