Pulse Server Configuration
Important Pulse is deprecated in Flare, which means that it is slated to be removed in a future version.
AVAILABLE TO: Administrators only
After the Pulse server application is installed on the Pulse web server, use the desktop shortcut or the Programs menu in Windows to start the Pulse application.
[Menu Proxy — Headings — Online — Depth3 ]
How to Configure Pulse for First Time Use
After you install and activate the Pulse server application, the Welcome page of the MadCap Pulse Configuration Wizard appears so you can perform an initial configuration. You can also open the wizard by double-clicking the MadCap Pulse desktop shortcut.
- Install and activate Pulse as described in Installing and Activating Pulse.
- If the MadCap Pulse Configuration Wizard is not already open, double-click the MadCap Pulse desktop shortcut.
- In the Welcome page of the MadCap Pulse Configuration Wizard, click Next.
-
In the Select Web Site page, do the following:
- Select the Website for the Pulse Services Select the website on the IIS Server that will be storing your Pulse data. By default, Pulse will use the "Default Web Site" in IIS.
-
Pulse Server URL This is the Site URL for the Pulse dashboard. Typically, it will consist of the protocol (http:// or https://), the IP address (or the machine name), and the Pulse directory.
Example
HTTP:
http://<ipaddress>/pulse
http://<servername>/pulse
Secure HTTP:
https://<ipaddress>/pulse
https://<servername>/pulse
- Click Next.
- Select the Website for the Pulse Services Select the website on the IIS Server that will be storing your Pulse data. By default, Pulse will use the "Default Web Site" in IIS.
-
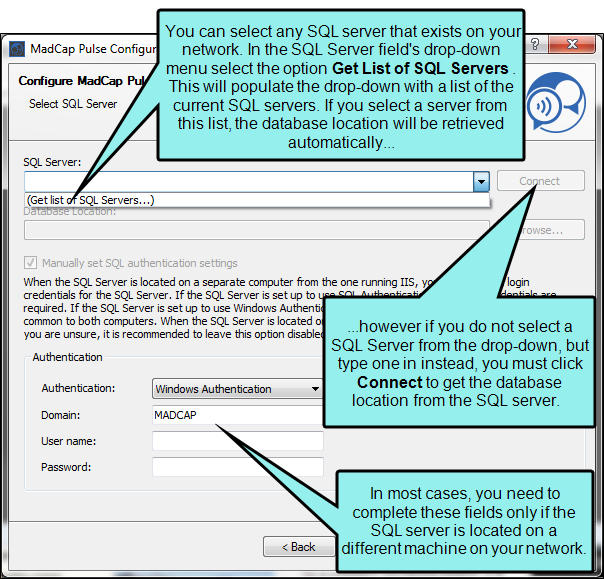
In the Select SQL Server page, do the following:
-
In the SQL Server drop-down list, select Get list of SQL Servers.
If the SQL Server Browser service is turned on, the program looks for all available SQL Servers in the Windows domain.
how to turn on the sql server browser
If SQL Server Browser service is turned off, use these steps to turn it on:
- Start the SQL Server Configuration Manager.
- Select Start > Programs. Then point to your version of SQL in the menu and select Configuration Tools > SQL Server Configuration Manager.
- In the left pane, highlight SQL Server Services.
- Right-click SQL Server Browser and select Properties from the context menu.
- On the Service tab, set the start mode to Automatic and click OK.
- Right-click the SQL Server Browser again, and select Start.
-
In the SQL Server drop-down list, select the desired server. If instead you enter a server manually, click Connect.
Note You can alternatively enter the IP Address or Computer Name of the server in the SQL Server field. Use this format: <Server Name>\<SQL Instance> or <IP Address>\<SQL Instance>

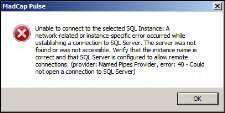
if you encounter a connection failure
If the SQL Server is not local (i.e., it resides of a different server than the Pulse web server), it is common for users who might be less familiar with networking to experience failures when the following is true:
-
The SQL Server name and/or instance was entered incorrectly. You must enter the correct server name and instance.
-
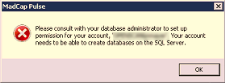
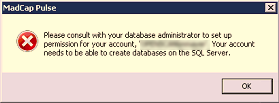
The account that you are using to perform the installation does not have sysadmin permission on the SQL Server. See your SQL Server Administrator or Network Administrator for the appropriate account to use.
-
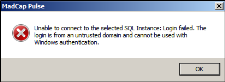
The SQL Server resides in an untrusted Windows domain. There must be a domain trust relationship between the Pulse web server and SQL server hosting the Pulse database. Make sure you selected the correct server.
-
- If necessary, complete the authentication fields at the bottom of the page.
- Click Next.
-
-
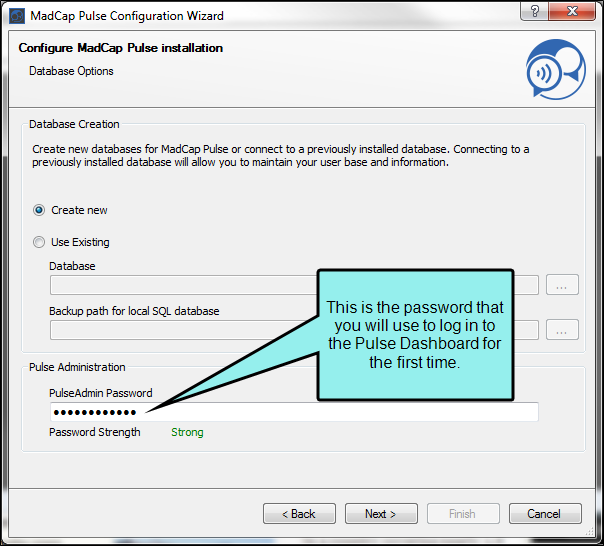
In the Database Options page, select one of the following options:
-
Create new This creates a new database instance with Pulse.
OR
-
Use existing Select this option only if you have previously installed Pulse. You may click the Browse (…) button to open the Select Database dialog. Select the desired Pulse Database ID from the list. Then click Connect. Then click OK.
-
- If necessary, in the Backup path for local SQL database field, you can click the browse button and choose a location to store a copy of the current database. This field is only enabled if the database has been using a previous version of Pulse. Also, it is not enabled if you are connecting to a database on a remote server.
-
In the PulseAdmin Password box, specify the password for the default Pulse Administrator account. Then click Next.
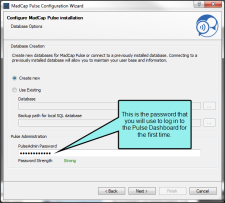
Important Record this password in a safe place. This is the default PulseAdmin account. You will need this information to log into the Pulse dashboard for the first time.
Note As you type, the program lets you know when your password meets the minimum password strength thresholds, such as Very Weak, Medium, Strong, Very Strong, and Excellent.
-
In the Configure SMTP page, enter your SMTP server settings:
Note To get your SMTP server settings, see your Email or Network Administrator.
-
SMTP Server This is the IP address of the SMTP relay that accepts incoming requests which is the host that will send outbound emails for Pulse.
- SMTP Port This is the port number of the SMTP server handing outbound emails. This is Port 25 (or the port number for your environment).
- SMTP User Name This is the user name of a valid account on the SMTP relay.
- SMTP Password This is the password for the valid account on the SMTP relay.
- From Address This is the from address for emails sent by Pulse. You must have a valid address for this account. For example, type: PulseRegistration@example.com.
- From Display Name This is the name that displays in email client applications for the email address. For example, type: Pulse Registration.
- Enable SSL A check mark in this box enables Secure Socket Layers (SSL) encryption. It is recommended that you leave this box blank.
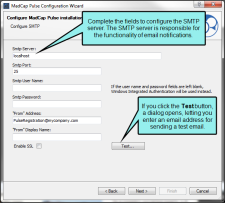
Note If you have content security requirements, purchasing an SSL certificate for your web domain is suggested. This lets you enable SSL transport security, so users can access your site via the https:// protocol. This ensures that the page content that a URL points to is encrypted while the data is being transmitted to your end user (so the content is not visible to others as it passes through the communication chain). See your Network Administrator for more information about SSL.
-
-
(Optional) Test your SMTP settings.
- In the Configure SMTP dialog, click Test.
- In the SMTP Test dialog, enter a valid address in the Email address box.
- Click Send Test Email.
-
Depending on which message you see, do the following:
- Test message has been sent Click OK. Then check the email account to ensure you received the test email.
- Error sending message Click OK. Ensure that you entered the correct SMTP settings for your environment. Then try testing the settings again.
- Click Next. The Verify Configuration page appears.
- In the Verify Configuration page, review the components list. When you are ready to proceed, click Next. A progress indicator shows you the status of the installation.
- When the Configuration Complete page appears, you can click View Log or Save Log if you want to see or save the results.
- Click Finish.


How to Start the Pulse Server Application
When you start the Pulse server application, the system opens the Pulse Server Configuration window.
- Log in to the Pulse web server as an administrator.
-
Start the Pulse application by selecting one of these options:
- Desktop Shortcut On the Windows desktop, click the MadCap Pulse shortcut. This is automatically added to the desktop at the end of the installation process.
- Start Menu In Windows, click Start > All Programs > MadCap Software > MadCap Pulse.
-
Program Files Double-click the program icon in the Program Files directory. If you installed the program using the default installation folder, it is located at one of these paths:
- On 64-bit Platforms C:\Program Files\MadCap Software\MadCap Pulse\Pulse.app\Pulse.app
- On 32-bit Platforms C:\Program Files (x86)\MadCap Software\MadCap Pulse\Pulse.app\Pulse.app
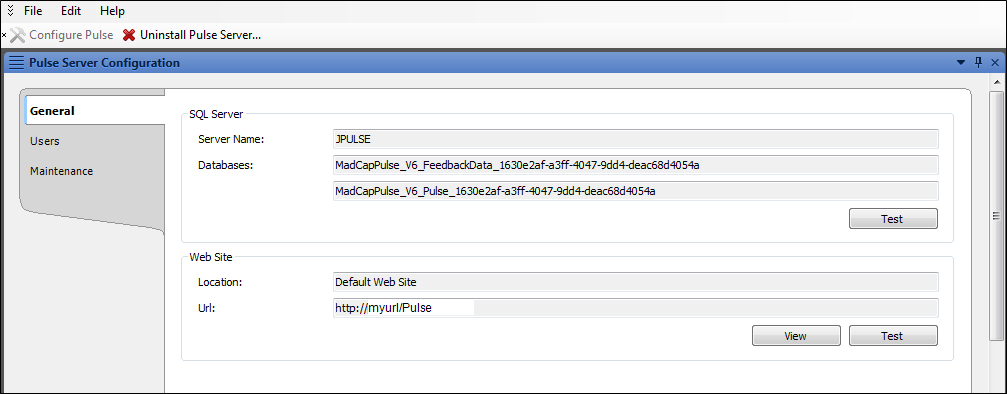
Here is the Pulse Server Configuration window:
How to Set the PulseAdmin Password
During the Pulse installation, you created a password for the default PulseAdmin account. You can reset that password at any time.
-
Log in to the Pulse web server as an administrator:
- Username The user name is always "PulseAdmin" by default.
- Password This is the password that you defined during when you installed the Pulse server application.
- Start the Pulse server application.
- Select File > Set Admin Password.
- In the Set PulseAdmin Password box, type a new password. Then click OK.
- In the configuration dialog, click OK to acknowledge that your password was updated.
Pulse Server Configuration Window
The Pulse Server Configuration window contains options that let you perform a variety of maintenance and management tasks.
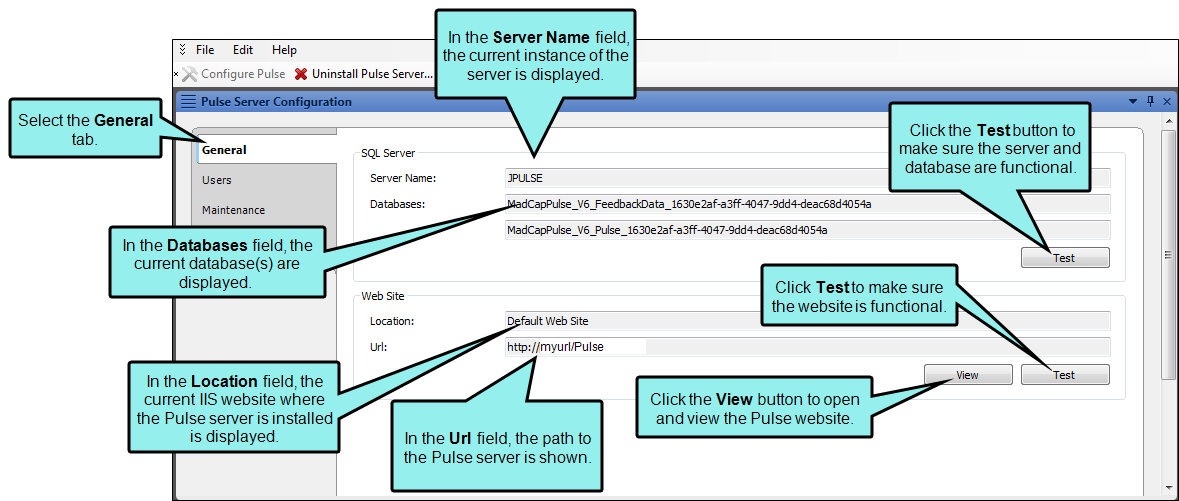
General Tab
The controls in the General tab give you the ability to view and test the general connection settings for the Pulse server application.
|
SQL Server |
Contains information about your Pulse database. |
|
Server Name |
A read-only field that shows the computer name of the SQL Server and the instance for the Pulse database. |
|
Databases |
A read-only field that shows the Database IDs for the Pulse databases. |
|
Test |
Click this button to test the database connection settings. how to test the sql server settings
|
|
Web Site |
Contains information about the site running on your Pulse web server. |
|
Location |
Typically this reads Default Web Site. |
|
URL |
The URL for the Pulse dashboard. |
|
View |
Click this button to open the Pulse dashboard in a web browser. how to view the web site settings
|
|
Test |
Click this button to test the web site settings. how to test the web site settings
|
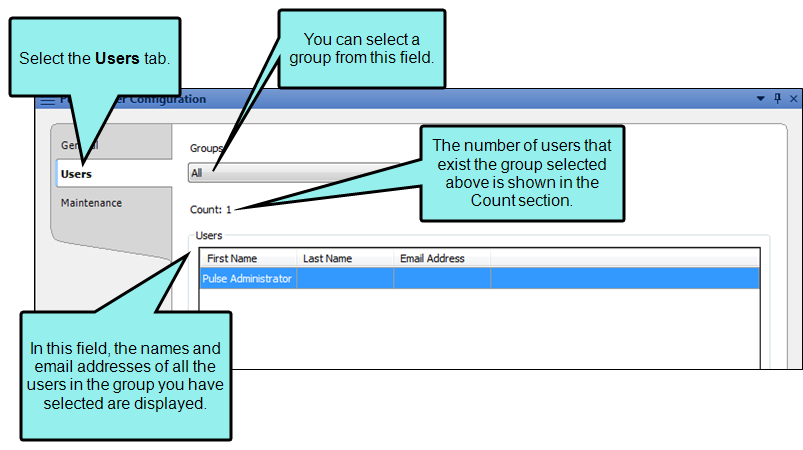
Users Tab
The controls in the Users tab provides you with user counts and name information.
|
Groups |
Select one of the listed groups from the drop-down list. how to view user counts and information
|
|
Count |
A read-only field. Shows the total number of users for the selected group. |
|
First Name |
A read-only field. The last name of the user. |
|
Last Name |
A read-only field. The first name of the user. |
|
Email Address |
A read-only field. A valid email address for the user. |
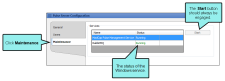
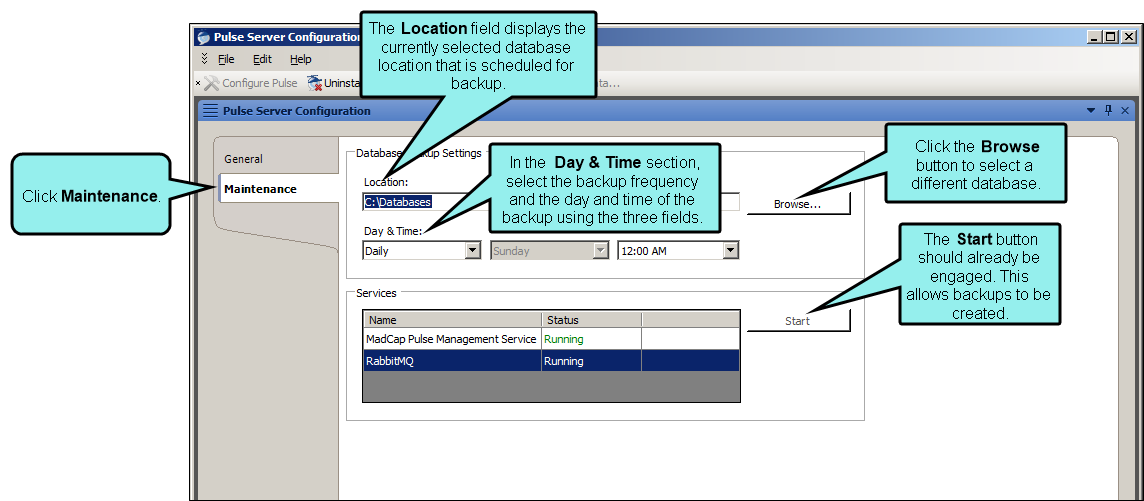
Maintenance Tab
The controls in the Maintenance tab lets you manage the Pulseserver application's services. The options that are available in this dialog depend on the version of Microsoft SQL Server being used:
-
If You are Using Microsoft SQL Server Express Edition with Advanced Services You have the ability to view and start the Pulse Server and RabbitMQ service (these are both services that run in Windows). You also have the ability to schedule database backups.

To schedule a backup
This feature is available only when the Pulse database is using Microsoft SQL Server Express Edition with Advanced Services.
Use the Maintenance tab to schedule backups of your Pulse database, whether it resides on the local server or a different server on the network.
You can schedule a backup of your Pulse database on the SQL server on a daily or weekly schedule. This saves your database information in a backup file (e.g., a file with the BAK file name extension).
In the event that a database recovery is needed, your SQL Administrator can use SQL Server Management Studio to restore your Pulse database using the latest backup file.
Important For a backup to take place at the scheduled time, the Pulse web server must be powered on and the MadCap Pulse Management Service and RabbitMQ service and must be running.
- Start the Pulse server application.
- In the Pulse Server Configuration window, select the Maintenance tab.
-
In the Location field, click Browse. Then, navigate to the directory where you want to save the backup files. Important things to keep in mind:
- Local Backup If you want to store the backup file (BAK) on the local system, the default backup folder is : C:\Databases. This is the recommended method.
-
Network Drive If you want to store the backup file (BAK) on a network drive, select the desired location.
Note If you choose this method, the Pulse web server must have permission to write to the drive. In addition, the system drive must be powered on and connected to the network at the scheduled backup time.
-
In the Day & Time fields, specify the desired backup schedule:
- Daily or Weekly Select either Daily or Weekly.
- Day of Week If you select a Weekly backup schedule, you can also select the desired day to perform the backup.
- Time Select the time of day to perform the backup.
-
As long as the listed Services are running, you will not need to click Start. In the event that services stop running,simply click Start to restart the services and backup schedule.
Warning You do not have the ability to disable the MadCap Pulse Management Service or Rabbit MQ service. To function properly, the Pulse server application requires these Services to run in the background.
-
Save your changes by selecting File > Save.
Note If you do not save your changes, you will be prompted to save them when you exit the application.
-
If You are Using a Different Edition of Microsoft SQL Server You have the ability to view the status of and start the Pulse Service and RabbitMQ service. However, backups are not supported by Pulse. This is because the full versions of SQL provide administrators with several options for creating full database backups.
To backup and restore databases in sql server
To learn how to backup and restore a database in SQL server, see the Microsoft SQL Server web site at:
-
For SQL Server 2012 http://technet.microsoft.com/en-us/library/ms187048(v=sql.110).aspx
- For SQL Server 2008 R2 http://technet.microsoft.com/en-us/library/ms187048(v=sql.105).aspx
- For SQL Server 2008 http://technet.microsoft.com/en-us/library/ms187048(v=sql.100).aspx
-

Importing Feedback Data
If your company previously used the MadCap Feedback product, you can import information from your existing Feedback database into the Pulse database.
What Gets Imported
The following describes what Feedback data is imported to the Pulse database:
- Report Data All of the report data.
- Comments All of the comments.
- User Information All of the user account information, except passwords.
Important Feedback users do not have passwords. Their email address will serve as both their user name and password (e.g., if you have a user with bob@example.com, his password will now be bob@example.com). Users can change this password by clicking the Forgot your password? link in any Pulse Account Login page.
How to Import Feedback Data
- Launch the Pulse server application.
- Click Import Feedback Data.
-
In the Select SQL Server and Database dialog, complete the following:
- SQL Server The computer name of the SQL server.
- Authentication The authentication method.
- User name The account user name.
- Password The account password.
- Database The SQL Server instance.
- Click OK.
How to Update Pulse
You may periodically wish to check to see if there are updates for the Pulse server application to download.
- Launch the Pulse server application.
- In the toolbar, select Help > Check for Updates.
-
In the dialog that opens:
- No Updates Available If not updates are available, simply click Close.
- Updates Available If updates are available, highlight the update in the Download list. Then click Download Updates.
Uninstalling Pulse
You can uninstall the Pulse server and the application.
How to Uninstall the Pulse Server
When you use this method to remove Pulse, only the configuration information for the Pulse server is removed. The existing Pulse database remains untouched by this process. It also leaves the Pulse server application on the system, so you can reconfigure it at a later time.
When prompted to decide if you want to proceed, click Yes. The system removes all of the Pulse server's configuration information.
- Log in to the Pulse web server as an administrator.
- Launch the Pulse server application.
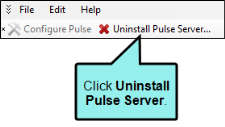
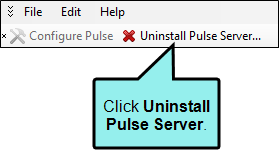
-
In the toolbar, click the Uninstall Pulse Server button.
- When prompted to decide if you want to proceed, click Yes. The system removes all of the Pulse server's configuration information.
The next time you launch Pulse, you will need to activate and configure the server for first-time use.
How to Uninstall the Pulse Server Application
If you want to completely remove the Pulse application from the server, use the Windows Control panel.
- Log in to the Pulse web server as an administrator.
- Open the Windows Control Panel.
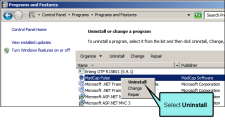
- Under Programs, click Uninstall a Program.
-
In the Uninstall or Change a Program page, right-click MadCap Pulse and select Uninstall from the context menu.
- In the Programs and Features dialog, click Yes..
- In the MadCap Pulse dialog, a list of applications related to Pulse appears. Review the list and select Automatically close applications and attempt to restart them after setup is complete. Then click OK. Windows begins removing the Pulse server application.
