You can insert a QR code in much the same way you insert an image.
How to Insert a QR Code
- Open the content file.
- In the XML Editor place your cursor where you want to insert the QR code.
- Do one of the following, depending on the part of the user interface you are using:
Ribbon Select Insert > QR Code.
- Keyboard Shortcut Press CTRL+SHIFT+Q.
The Insert QR Code dialog opens.
- Select the General tab.
-
From the Content type field, select one of the following options.
Text
Select this if you want a simple text message to display on the end user's screen. After selecting this option, complete the following.
- Content Type the text message that you want users to see after they scan the QR code.
URL
Select this if you want a web page to open in the end user's browser. After selecting this option, complete the following.
- Content Type the website path (e.g., http://mycompany.com).
Email Address
Select this if you want a particular email address to display on the end user's screen. The end user might then copy the address to the clipboard and paste it into an email. After selecting this option, complete the following.
- Content Type the email address after the text "mailto:" (e.g., mailto:technicalsupport@mycompany.com).
Contact Information
Select this if you want contact information for an individual to display on the end user's screen. The end user might then create a new contact based on that information. After selecting this option, complete the following.
- Name Type the full name of the individual.
- Company Type the company name.
- Phone number Type the phone number.
- Email Type the email address for the individual.
- Address Type the physical address.
- Website Type the website (e.g., http://mycompany.com).
- Memo Type any other relevant information.
SMS
Select this if you want to create an SMS (Short Message Service) message. After scanning the QR code, the end user will be able to quickly send a text message to the specified phone number. After selecting this option, complete the following.
- Phone number Type the phone number where the text message is to be sent.
- Message Type the text message.
- (Optional) Click in the Size field. Select one of the basic sizes for the QR code. If you select (default), the code will be the size specified in the MadCap|qrCode style in your stylesheet. If you want to use a different size, you can set the max-height or max-width value for the MadCap|qrCode style.
-
(Optional) If you want to apply a specific style class to the QR code, you can select it from the Style Class field.
Example You have created in your stylesheet a class of the MadCap|qrCode style called "RedBorder" (i.e., MadCap|qrCode.RedBorder) and you have set a red border on that style class. So if you want a QR code to have a red border, you can use that style class when inserting the QR code. If you do not want the QR code to have a red border, you can simply use the default parent MadCap|qrCode style instead.
- (Optional) In the Screen Tip field you can type a phrase that will appear when the end user hovers over the QR code. If you want to insert a variable in a field, you can click
 . The variable will appear as syntax in the field, but in the output the variable definition will be shown.
 - (Optional) In the Alternate Text field you can type alternate text to display when the QR code is not available, such as when a disabled individual is using a screen reader. Again, you can insert a variable by clicking .For more information see Accessibility.
- (Optional) Use any of the other tabs to provide additional settings for the QR code.
Position tab You can use this tab to adjust the positioning of the QR code on the page. This includes the ability to wrap text around a QR code or float a QR code outside the frame holding the regular flow of text.
Note You can also use absolute position on QR codes via the context (right-click) menu. See Using Absolute Positioning.
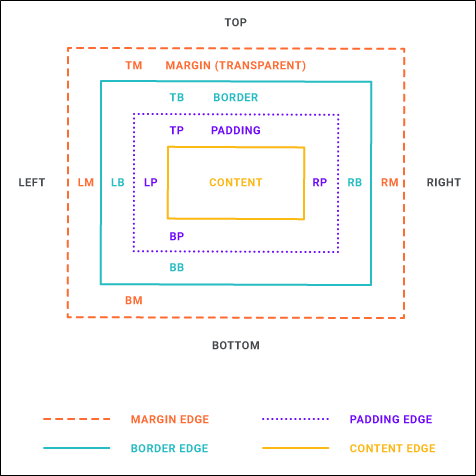
Borders & Margins tab You can use this tab to set borders, margins, or padding for the QR code.
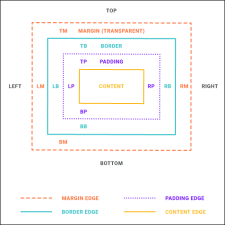
- Background tab You can use this tab to add background settings for the QR code. This includes the ability to specify a color, image, and a repeating pattern for the background image. Normally you would not see a QR code's background, but if you give the QR code a certain amount of padding, you would see the background around the edges of it.
- Click OK. The QR code is inserted.
- Click
") to save your work.
to save your work.
Note You can use a global setting in the XML Editor tab of the Options dialog (File > Options). This automatically adds an empty alt tag to images when you insert them into a topic or snippet (unless you specifically add an alt tag to an image). This also works for QR codes, which are converted to images in the output. See Applying Empty Alt Text to Images.
