If you are sending output to the Eclipse Help format, you can access Eclipse options in the Target Editor.
How to Specify Eclipse Options
- Open a target that is using the Eclipse Help format.
- Select the Eclipse Options tab.
-
Complete the options as necessary:
Set the Plug-In Options
Use the Plug-in Options area to define information for the org.eclipse.help API, which provides the core Help system for the Eclipse platform.
- Provider Name Type the desired provider name. For example, type MadCap Software.
- Plug-in Name Type a name for your plug-in. For example, name it MadCap Flare.
- Plug-in ID Type the desired identifier for your plug-in. Use the com.<your plug-in name>.<default> naming convention. For example, type com.madcapflare.help.
-
Plug-in Version Set the desired version number for the plug-in.The default value is 1.0.0.*. This corresponds to the version of Eclipse that your plug-in is targeted for. In the following example, the plug-in is being targeted for Eclipse Standard SDK version 2.0.1.20130919.

-
Help System Name Choose one of these options:
-
Use Label Choose this option to type a label for your plug-in. This corresponds to the label for the book icon in the left-navigation pane of the Help-Eclipse window.
Example If you choose the Use Label option…

… your Help system name appears as the label:

-
Use Topic Choose this option. In the Link to Topic dialog, navigate to the topic that you want to use as the Help system label.
Example If you choose the Use Topic option…

… your Help system name appears as the label:

-
- (Optional) Generate Index This check box is selected by default.
-
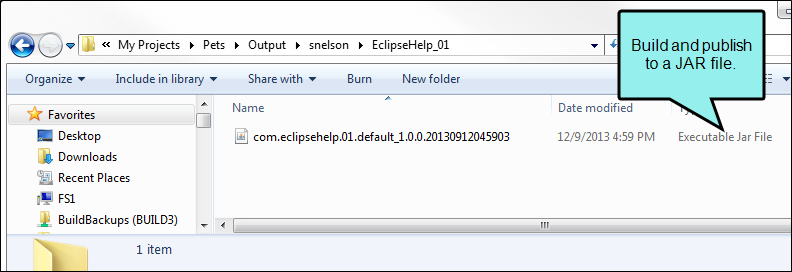
(Optional) Archive to JAR This packages the published output as a single, executable file with the Java archive (JAR) file name extension. This check box is blank by default.
Example If the Archive to JAR check box is selected, the Eclipse Help output publishes the plug-in as a single JAR file.

If the check box is not selected, the Eclipse Help output packages the plug-in as a collection of files in a folder.
Set the Viewing Options
In the Viewing Options area, do the following:
- Make sure you have completed the steps for installing Eclipse.
- After downloading the ZIP file to your computer, click the browse button. Then navigate to the Eclipse application file that you downloaded to your computer.
- Click
") to save your work.
to save your work.