When creating headings for print-based output, you have many configuration options. You can simply use the h1 through h6 styles, and you can modify the style settings to meet your needs.
Some of the advanced features available that you might use when configuring headings for print-based output include:
- Dual body frames in a page layout (one for major headings and the other for the main topic content)
- Positioning headings
- Text boxes
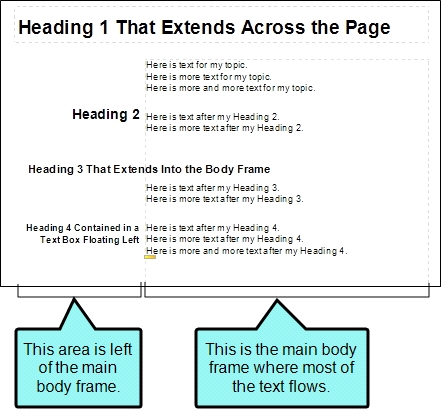
Following is a topic shown in Print Layout mode with multiple headings. Each heading was configured differently to affect how it is displayed on the page.
[Menu Proxy — Headings — Online — Depth3 ]
Heading 1 Example
The Heading 1 example was created by adding two body frames to a page layout.
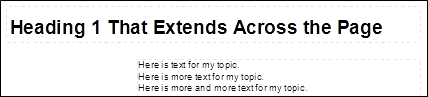
The first body frame was added to the top of the page layout and is high enough only to fit the first heading in the topic. It extends across the entire page.
The second body frame is much taller, but is not as wide. It was designed to hold the main content of the chapter, with space to the left that can hold subheadings, text boxes, notes, tips, images and so on.
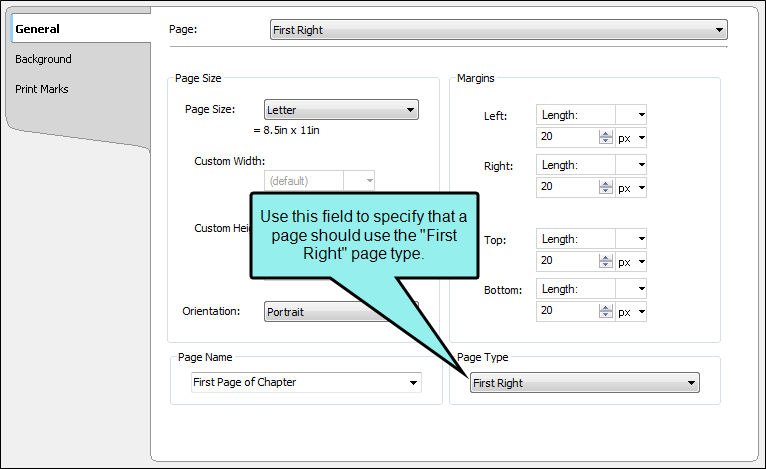
You might consider using this type of configuration if you know for certain that the content to be displayed in the first body frame is a major heading that will always display at the top of a page, rather than somewhere in the middle of it. For example, you might create a page layout with a "First Right" page type that is designed to hold the beginning of each chapter in your output. By having a dual frame configuration (such as the one described) on the initial page only, you can be assured that the first body frame is used only by the heading that begins that chapter.
On the other hand, if you want to have headings that stretch across multiple areas of a page in random locations, you probably do not want to use this method, but rather the method described for the Heading 3 example.
How Did We Create the Heading 1 Effect in This Example?
- Create or open a page layout. See Adding Page Layout Files or Opening Page Layouts.
-
Create a page in the layout using the "First Right" page type. See Adding Pages and Specifying Page Types.

- If there is not already a body frame on the page, add one. See Adding Page Layout Frames.
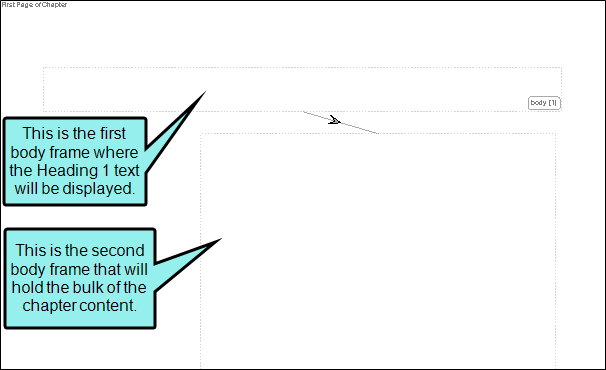
- Drag the edges of the first body frame to resize it to hold only a topic heading. Position the frame in the upper part of the page. In our example, the first body frame is located at 30 pixels on the Left and at 70 pixels on the Top. It is 700 pixels wide and 60 pixels high. See Specifying Frame Size.
-
Add a second body frame. Resize and position it below the first body frame. In our example, the second body frame is located at 250 pixels on the Left and at 160 pixels on the Top. It is 480 pixels wide and 780 pixels high.
An arrow points from the first body frame to the second, indicating the direction of content flow.

-
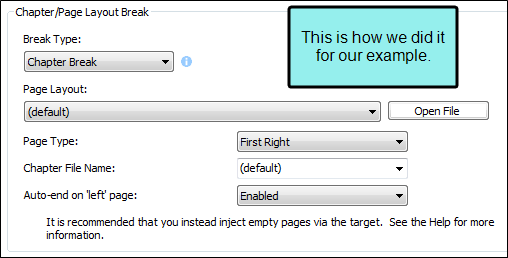
In your outline TOC, specify chapter breaks on the entries where you want new chapters to begin. When doing this, choose your page layout and specify that the chapter should begin with the "First Right" page type. See Specifying Chapter and Page Layout Breaks.

Note In the output, if the heading does not display in the first body frame, but rather below in the second body frame, you may need to make one or two adjustments. You can adjust the height of the first body frame so that it is tall enough to hold the heading. Another thing you can try is to reduce the space above or below the heading so that it fits in the frame (see Setting Paragraph Spacing Above and Below).
Heading 2 Example
The Heading 2 Example was created by simply editing the h2 style so that it appears to the left of the body frame. We also adjusted the indentation to the right of that tag, as well as the space above it. Finally, we created a new class of the p style and adjusted the space above it. We used this style class for the first paragraph following our h2 text. For paragraphs after that, we just used the parent p style.

One benefit of this method is that it is relatively simple. However, it is best when used with headings that are not very long. If you have headings that need to wrap to a second line, you should probably use a text box, which is what we used for the Heading 4 example.
How Did We Create the Heading 2 Effect in This Example?
- From the Content Explorer, open the stylesheet that you want to modify.
- In the local toolbar, make sure the first button displays
 (which means that the Simplified view is currently shown in the editor). If the button displays
  instead, then click it.
 - In the upper-left corner of the Stylesheet Editor, click in the drop-down field and select
 .
. - In the grid, select the style for the heading (in our example, it is h2).
- In the local toolbar, click
 .
. - In the Properties dialog, select the Paragraph tab.
- In the Indentation section, set the Right field to 12 px.
- In the Spacing section, set the Before field to 22 px.
- Select the Position tab.
- In the Float field, select Left of Frame.
- In the Vertical Alignment field, select Text Bottom.
- Click OK.
- In the Stylesheet Editor, select p in the grid.
- In the local toolbar, click
 .
. - Give the new class a name. We typed FirstPara in our example.
- Click OK.
- With the new style class selected, click .
- In the Properties dialog, select the Paragraph tab.
- In the Spacing section, set the Before field to 30 px.
- Click
") to save your work.
to save your work. - Open a topic and type the text for the heading, as well as the paragraph(s) following it.
- Click on the text to be used for the heading.
- Select the Home ribbon, click in the Style drop-down field, and select the style for the heading (in our example, it is h2).
- Click on the first paragraph following that heading.
- In the Home ribbon, click in the Styles drop-down field and select your new paragraph style class (e.g., p.FirstPara).
- Click to save your work.
Heading 3 Example
The Heading 3 Example was created by simply specifying a negative left indentation setting for the h3 style.

This method is extremely easy. Plus, it lets you stretch headings across multiple areas of a page in random locations.
How Did We Create the Heading 3 Effect in This Example?
- From the Content Explorer, open the stylesheet that you want to modify.
- In the local toolbar, make sure the first button displays (which means that the Simplified view is currently shown in the editor). If the button displays instead, then click it.
- In the upper-left corner of the Stylesheet Editor, click in the drop-down field and select .
- In the grid, select the style for the heading (in our example, it is h3).
- In the local toolbar, click .
- In the Properties dialog, select the Paragraph tab.
- In the Indentation section, set the Left field to a negative number. In our example, we set it to -200 pixels.
- Click OK.
- Open a topic and type the text for the heading.
- Click on the text to be used for the heading.
- Select the Home ribbon, click in the Style drop-down field, and select the style for the heading (in our example, it is h3).
- Click to save your work.
Heading 4 Example
The Heading 4 Example was configured by creating a class of the div style and using it when inserting a text box. The style class for the text box specifies that it should be floated to the left of the body frame, have text that is aligned right, and have 30 pixels of space above it. In addition, we created a new class of the p style and adjusted the space above it. We used this style class for the first paragraph following our h4 text. For paragraphs after that, we just used the parent p style.

This method takes a bit more time, but it very useful if you want the entire heading to be displayed to the left of the frame, with text wrapping around to additional lines when necessary. Meanwhile, the text after that heading flows to the right inside the body frame.
How Did We Create the Heading 4 Effect in This Example?
- From the Content Explorer, open the stylesheet that you want to modify.
- In the local toolbar, make sure the first button displays (which means that the Simplified view is currently shown in the editor). If the button displays instead, then click it.
- In the upper-left corner of the Stylesheet Editor, click in the drop-down field and select .
- In the grid, select div.
- In the local toolbar, click .
- Give the new class a name. We typed h4TextBox in our example.
- Click OK.
- With the new style class selected, click .
- In the Properties dialog, select the Paragraph tab.
- In the Alignment section, select Right.
- In the Indentation section, set the Right field to 12 px. (You may need to first click the down arrow in the upper-right corner and select Length.)
- In the Spacing section, set the Before field to 30 px. (You may need to first click the down arrow in the upper-right corner and select Length.)
- Select the Position tab.
- In the Float field, select Left of Frame.
- In the Vertical Alignment field, select Text Bottom.
- Click OK.
- In the Stylesheet Editor grid, select p.
- In the local toolbar, click .
- Give the new class a name. We typed FirstPara in our example.
- Click OK.
- With the new style class selected, click .
- In the Properties dialog, select the Paragraph tab.
- In the Spacing section, set the Before field to 30 px.
- Click to save your work.
-
Open a topic and click at the location where you want to add the heading.
Note It is often easiest if you already have some text after the location where you are inserting the text box. Therefore, type some text that you want to appear after the heading (i.e., the first paragraph or two after the heading).
- Select Insert > Text Box.
- In the dialog, select the div class (e.g., div.h4TextBox).
- Click OK.
- Unless you also added a background or border to the text box, the text box is invisible at first (since it does not contain any text). Click at the beginning of the first paragraph following the text box and press the left arrow on your keyboard a couple of times until you see the cursor to the left of the body frame. This means that the cursor is now inside the text box.
- Inside the text box, type the text for the heading.
- Click on the text to be used for the heading.
- Select the Home ribbon, click in the Style drop-down field, and select the style for the heading (in our example, it is h4).
- Click on the first paragraph following the heading in the text box.
- In the Home ribbon, click in the Style drop-down field and select your new paragraph style class (e.g., p.FirstPara).
- Click to save your work.

