


You can resize images with various methods.
[Menu Proxy — Headings — Online — Depth3 ]
How to Resize Images via Styles (Recommended)
-
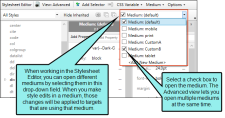
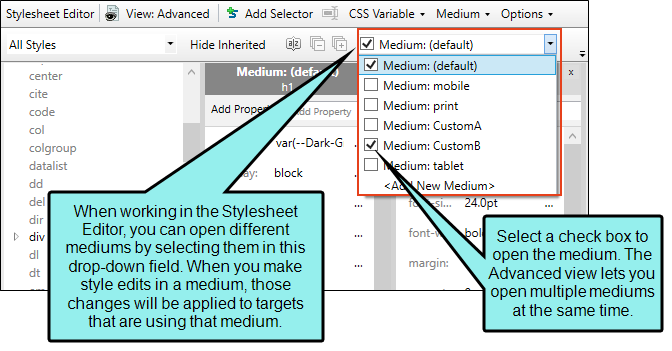
From the Medium drop-down in the Stylesheet Editor, make sure the proper medium is selected before you begin. In the Advanced view, you can open multiple mediums at once; you just need to look at the title at the top of the medium pane and make sure you are working in the correct one. If you are not using stylesheet mediums for your different outputs or if you want all mediums to have the same settings, just leave the medium set to default and continue.
Mediums can be used if you want to use one group of settings for online output types and another group of settings for print-based output types. For example, you might use the default medium for your online outputs and the print medium for your print outputs.
Please note that Flare remembers the last medium that you used when working in the stylesheet, so it may or may not be the one that you want to use the next time around.
- In the local toolbar, make sure the first button displays
 . If the button displays
  instead, then click it.
 - In the upper-left corner of the editor, click in the drop-down field and select
 .
. -
From the area below, select the img tag. If you created classes of the tag, you can expand the img style and select the class instead.
Example You are creating a PDF manual that is 8 inches wide and you want to ensure that none of your largest images are wider than 6 inches. You can create a class of the img style and name it "MaxWidth6Inches." For most of your images, you can use the parent img style, but for the large ones, you can use the img.MaxWidth6Inches style class. The large images will automatically be resized if necessary so that they are no wider than 6 inches.
- From the Show drop-down list on the upper-right side of the editor, select
 .
. - (Optional) You can use the toggle button in the local toolbar to show properties below in a group view
 or an alphabetical view
  .
. - In the Box group, you can specify a precise width or height for the style. Alternatively, in the Unclassified group, you can specify a maximum or minimum width or height (max-height, max-width, min-height, min-width).
To Set a Precise Width and/or Height
- If you are using the group view, expand the Box group.
To the right of height and/or width, click
 , and complete the fields in the popup. Enter a value in the lower-left area and choose from several different units of measurement (points, pixels, centimeters, etc.) in the lower-right area. Click OK when you are finished.
To Set the Maximum Width and/or Height
If the original image is larger than the maximum width or height that is set, it will be reduced in size so that it is no greater than the maximum value. If the original image is smaller than the maximum width or height, it will not be resized.
- If you are using the grouped view, expand the Unclassified group.
To the right of max-height and/or max-width, click
, and complete the fields in the popup. Enter a value in the lower-left area and choose from several different units of measurement (points, pixels, centimeters, etc.) in the lower-right area. Click OK when you are finished.
To Set the Minimum Width and/or Height
If the original image is smaller than the minimum width or height that is set, it will be enlarged so that it reaches the minimum value. If the original image is larger than the minimum width or height, it will not be resized.
If you are using the grouped view, expand the Unclassified group.
To the right of min-height and/or min-width, click
, and complete the fields in the popup. Enter a value in the lower-left area and choose from several different units of measurement (points, pixels, centimeters, etc.) in the lower-right area. Click OK when finished.
- Click
") to save your work.
to save your work.
To apply a particular style class to an image (after you create it in the Stylesheet Editor), simply right-click the image where it is inserted. Then from the menu, select Style Class and choose the appropriate style.
How to Resize Images via Local Properties
- Open the content file.
- Right-click on the image.
- From the context menu, select Image Properties. The Image Properties dialog opens.
-
If you want to provide only one group of settings for the image, use the Size tab. If you want to provide two groups of settings, use both the Size and Print Size tabs. When you generate a target that is using the default or a custom medium (specified on the Advanced tab in the Target Editor), the settings on the Size tab will be used; when you generate a target that is using the print medium, the settings on the Print Size tab will be used.
To Set a Precise Width and/or Height
In the Width and/or Height field of the Size section, provide the settings. First you need to select Length in the top drop-down list. You can then enter a value in the lower-left area and choose from several different units of measurement (points, pixels, centimeters, etc.) in the lower-right area.
To Set the Minimum Width and/or Height
If the original image is smaller than the minimum width or height that is set, it will be enlarged so that it reaches the minimum value. If the original image is larger than the minimum width or height, it will not be resized.
In the Width and/or Height field of the Minimum Size section, provide the settings. First you need to select Length in the top drop-down list. You can then enter a value in the lower-left area and choose from several different units of measurement (points, pixels, centimeters, etc.) in the lower-right area.
To Set the Maximum Width and/or Height
If the original image is larger than the maximum width or height that is set, it will be reduced in size so that it is no greater than the maximum value. If the original image is smaller than the maximum width or height, it will not be resized.
In the Width and/or Height field of the Maximum Size section, provide the settings. First you need to select Length in the top drop-down list. You can then enter a value in the lower-left area and choose from several different units of measurement (points, pixels, centimeters, etc.) in the lower-right area.
- Click OK.
- Click to save your work.
How to Resize Images Locally via Dragging
- Open the content file.
- Hover over the image. An icon
 displays in the lower-right corner of the image.
 - Click on the icon and drag your mouse either up and to the left (to reduce the size of the image) or down and to the right (to increase the size of the image).
- Click to save your work.
How to Reset the Size of an Image
- Open the content file.
- Right-click on the image.
- From the context menu, select Reset Size. The image returns to its original size.
- Click to save your work.
What’s Noteworthy?
Note When you click on an image file in the user interface (e.g., Content Explorer or File List window pane), its resolution and dimensions are displayed at the bottom. If you have set the online or print DPI for an image using MadCap Capture, these values are also shown.
Note You can also use show images as small thumbnails in the output (either by using styles or locally). End users can see the full size of the image by hovering over it or clicking it. See Showing Images as Thumbnails in Output.
Note When resizing objects, you can ensure the aspect ratio is maintained. For example, if you want certain objects to be resized so that each is exactly 3 inches high, you can make sure the width of each object is adjusted accordingly to stay in proportion. To do this, first set the height at 3 inches. You would not set the width property at all. In the same way, if you were to specify an exact width, you could maintain the aspect ratio by not setting the height.
Note Please be aware that if you are using percentage for the size of an object, the percentage refers to the block containing that object, not to the object itself. For example, if you have an object in a topic and set the width to 60%, this does not mean that the object will be reduced to 60% of its size. Instead, it means that the object will be resized so that its width is 60% of the "container" where it is inserted.
Note When you use Flare's resizing features to scale images, you can specify whether you want Flare to pre-compile the resized images. You can do this for the online outputs (HTML5, Clean XHTML, Eclipse Help, Microsoft HTML Help, WebHelp, WebHelp Plus), as well as for Microsoft Word output. What does this mean? It means that Flare will create new copies of images wherever you have specified resizing, rather than relying on the browser to render the new size from the original. This means better quality images, but it also means more image files in the output. It is recommended that you leave the default pre-compile setting as it is (enabled). However, if you want to disable it, you can open the Target Editor, select the Advanced tab, and select Generate resized copies of scaled images to remove the check mark. (For Adobe PDF output, the resized images will always be pre-compiled, whether this option is enabled or not.)
Note Starting with Flare


