A Body proxy, which can also be used for online output, is a placeholder that displays the content from your topics in the generated output. You can add one or more body proxies to a template page, depending on your needs. After inserting a Body proxy, you can use it to customize the size, orientation, and margins for the printed pages.
[Menu Proxy — Headings — Online — Depth3 ]
How to Add and Edit a Body Proxy in a Template Page
- From the Content Explorer, open the template page.
- Do one of the following, depending on whether you need to add a new Body proxy or simply edit an existing one.
add a new body proxy
Select Insert > Proxy > Body Proxy.
edit an existing body proxy
Right-click on the Body proxy and select Edit Body Proxy.
The Body Proxy dialog opens.
- (Optional) In the dialog, you can click the down arrow in the Stylesheet class field and make a selection if you have created a style class specifically for body proxies (e.g., MadCap|bodyProxy.mybodyproxy). You might use a style like this, for example, if you want to add a border around all topic content. You can leave this field blank if you like.
- Click Printer Page Properties.
-
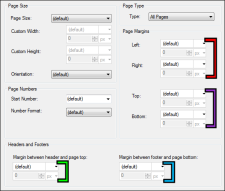
In the Printer Page Properties dialog, you can specify the size, orientation, margins, and page number settings for the printed pages.
By default, the settings will be applied to all pages. However, you can specify that the settings should be applied only to the first page, odd pages, or even pages. If so, you will want to have more than one Body proxy in your template page, one for each page configuration.
- Page Size Select a standard size for the page (e.g., Letter, Legal) or select (custom) to specify a non-standard width and height.
- Custom Width If you selected "(custom)" from the Page Size field, enter a specific width for the page. First you need to select Length in the top drop-down list. You can then enter a value in the lower-left area and choose from several different units of measurement (points, pixels, centimeters, etc.) in the lower-right area.
- Custom Height If you selected "(custom)" from the Page Size field, enter a specific height for the page. First you need to select Length in the top drop-down list. You can then enter a value in the lower-left area and choose from several different units of measurement (points, pixels, centimeters, etc.) in the lower-right area.
- Orientation Select the orientation for the page. You can either select Portrait (if you want the pages to be taller than they are wide), or you can select Landscape (if you want the pages to be wider than they are tall).
-
Start Number If you want the first printed page associated with this template page to start at a particular page number, enter that number in this field.
Note Rather than specifying page number settings in this dialog, you may find it preferable to set them from the TOC Properties dialog when you specify chapter breaks. Using that dialog provides a bit more flexibility. See Specifying Section Breaks and Template Pages.
-
Number Format If you want the page numbers for this template page to take on a particular format (e.g., numbers without dashes, numbers with dashes, uppercase alpha, lowercase alpha, uppercase Roman, lowercase Roman), select it from this field.
Note Rather than specifying page number settings in this dialog, you may find it preferable to set them from the TOC Properties dialog when you specify chapter breaks. Using that dialog provides a bit more flexibility. See Specifying Section Breaks and Template Pages.
-
Page Type Select the pages to which these settings will be applied (All Pages, Odd Pages, Even Pages, First Page). The default is to apply the settings to all pages using the template page. If you want all of the pages in your output to share the same settings (page size, margins, etc.), you only need one Body proxy in the template page. However, if you want different pages to have different settings, you can add a Body proxy page for each configuration. Then, edit the settings for a particular Body proxy for specific pages (e.g., odd pages), and use this field to specify which pages the settings pertain to.
Example You want the first page in the output to use certain margin settings, you want the odd pages to use a different set of margins, and you want the even pages to use yet another set of margins. Therefore, you would add three body proxies to the template page, and you would edit each of these proxies accordingly—one for the first page, one for odd pages, and one for even pages.
Note This feature pertains to Word output only.
- Left Enter the length of the left margin for the page. First you need to select Length in the top drop-down list. You can then enter a value in the lower-left area and choose from several different units of measurement (points, pixels, centimeters, etc.) in the lower-right area.
- Right Enter the length of the right margin for the page. First you need to select Length in the top drop-down list. You can then enter a value in the lower-left area and choose from several different units of measurement (points, pixels, centimeters, etc.) in the lower-right area.
- Top Enter the length of the top margin for the page. This is the space from the top of the body content to the top edge of the page. First you need to select Length in the top drop-down list. You can then enter a value in the lower-left area and choose from several different units of measurement (points, pixels, centimeters, etc.) in the lower-right area.
- Bottom Enter the length of the bottom margin for the page. This is the space from the bottom of the body content to the bottom edge of the page. First you need to select Length in the top drop-down list. You can then enter a value in the lower-left area and choose from several different units of measurement (points, pixels, centimeters, etc.) in the lower-right area.
- Margin between header and page top Enter the length of the margin from the top of the header to the top edge of the page. First you need to select Length in the top drop-down list. You can then enter a value in the lower-left area and choose from several different units of measurement (points, pixels, centimeters, etc.) in the lower-right area.
- Margin between footer and page bottom Enter the length of the margin from the bottom of the footer to the bottom edge of the page. First you need to select Length in the top drop-down list. You can then enter a value in the lower-left area and choose from several different units of measurement (points, pixels, centimeters, etc.) in the lower-right area.
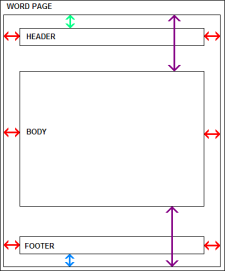
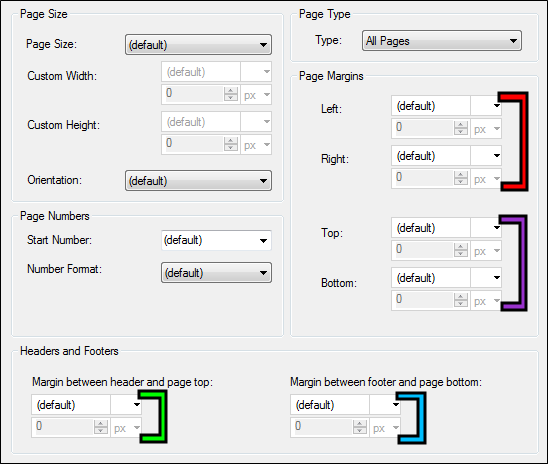
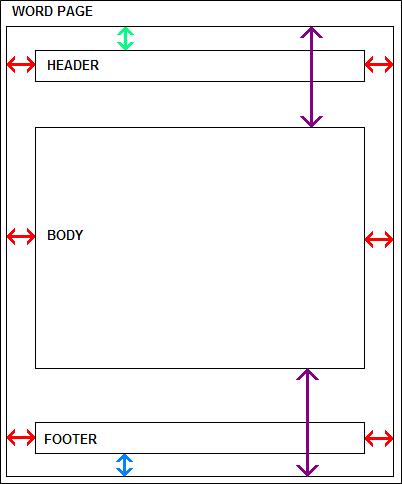
Following is the Printer Page Properties dialog. After it is a schematic of a printed page in Word. For this example, we've added colored lines in the dialog and corresponding arrows in the Word page to show you which areas of the printed page are influenced by the different sections of the dialog.
- In the Printer Page Properties dialog, click OK.
- In the Body Proxy dialog, click OK. The proxy is added to the template page.
- Click
") to save your work.
to save your work.
How to Add and Edit a Body Proxy Using Styles
- In the local toolbar, make sure the first button displays
 . If the button displays
  instead, then click it.
 - In the upper-left corner of the editor, click in the drop-down field and select
 .
. - On the left side of the editor, select MadCap|bodyProxy.
- From the Show drop-down list on the upper-right side of the editor, select
 . The most relevant properties for that style are shown on the right side of the editor.
 - (Optional) You can use the toggle button in the local toolbar to show properties below in a group view
 or an alphabetical view
  .
. -
If you are using the group view, expand a property group and change values for any of the style's properties. The area to the right of the property is used for selecting and entering values. If you know how to enter the information correctly, you can click in the value field and type it directly. Otherwise, click the ellipsis button
 to the right of the property. Depending on the type of property, the appropriate controls and options display, allowing you to choose or enter values (e.g., select from a drop-down list, click a button, complete fields in a dialog or popup). If you completed values in a popup, click OK at the bottom of the box.
Following are some of the more common properties that you might change. By default, the settings will be applied to all pages. However, you can specify that the settings should be applied only to the first page, odd pages, or even pages. If so, you will want to have more than one Body proxy in your template page, one for each page configuration.
- mc-printer-page-size Select a standard size for the page (e.g., Letter, Legal) or select (custom) to specify a non-standard width and height.
- mc-printer-page-custom-height If you selected "(custom)" from the Page Size field, enter a specific height for the page. First you need to select Length in the top drop-down list. You can then enter a value in the lower-left area and choose from several different units of measurement (points, pixels, centimeters, etc.) in the lower-right area.
- mc-printer-page-custom-width If you selected "(custom)" from the Page Size field, enter a specific width for the page. First you need to select Length in the top drop-down list. You can then enter a value in the lower-left area and choose from several different units of measurement (points, pixels, centimeters, etc.) in the lower-right area.
- mc-printer-page-orientation Select the orientation for the page. You can either select Portrait (if you want the pages to be taller than they are wide), or you can select Landscape (if you want the pages to be wider than they are tall).
-
mc-page-number-start-value If you want the first printed page associated with this template page to start at a particular page number, enter that number in this field.
Note Rather than specifying page number settings, you may find it preferable to set them from the TOC Properties dialog when you specify chapter breaks. Using that dialog provides a bit more flexibility. See Specifying Section Breaks and Template Pages.
-
mc-page-number-format If you want the page numbers for this template page to take on a particular format (e.g., numbers without dashes, numbers with dashes, uppercase alpha, lowercase alpha, uppercase Roman, lowercase Roman), select it from this field.
Note Rather than specifying page number settings, you may find it preferable to set them from the TOC Properties dialog when you specify chapter breaks. Using that dialog provides a bit more flexibility. See Specifying Section Breaks and Template Pages.
-
mc-page-type Select the pages to which these settings will be applied (All Pages, Odd Pages, Even Pages, First Page). The default is to apply the settings to all pages using the template page. If you want all of the pages in your output to share the same settings (page size, margins, etc.), you only need one Body proxy in the template page. However, if you want different pages to have different settings, you can add a Body proxy page for each configuration. Then, edit the settings for a particular Body proxy for specific pages (e.g., odd pages), and use this field to specify which pages the settings pertain to.
Example You want the first page in the output to use certain margin settings, you want the odd pages to use a different set of margins, and you want the even pages to use yet another set of margins. Therefore, you would add three body proxies to the template page, and you would edit each of these proxies accordingly—one for the first page, one for odd pages, and one for even pages.
Note This feature pertains to Word output only.
- mc-printer-page-margin-left Enter the length of the left margin for the page. First you need to select Length in the top drop-down list. You can then enter a value in the lower-left area and choose from several different units of measurement (points, pixels, centimeters, etc.) in the lower-right area.
- mc-printer-page-margin-right Enter the length of the right margin for the page. First you need to select Length in the top drop-down list. You can then enter a value in the lower-left area and choose from several different units of measurement (points, pixels, centimeters, etc.) in the lower-right area.
- mc-printer-page-margin-top Enter the length of the top margin for the page. This is the space from the top of the body content to the top edge of the page. First you need to select Length in the top drop-down list. You can then enter a value in the lower-left area and choose from several different units of measurement (points, pixels, centimeters, etc.) in the lower-right area.
- mc-printer-page-margin-bottom Enter the length of the bottom margin for the page. This is the space from the bottom of the body content to the bottom edge of the page. First you need to select Length in the top drop-down list. You can then enter a value in the lower-left area and choose from several different units of measurement (points, pixels, centimeters, etc.) in the lower-right area.
- mc-printer-page-header-margin Enter the length of the margin from the top of the header to the top edge of the page. First you need to select Length in the top drop-down list. You can then enter a value in the lower-left area and choose from several different units of measurement (points, pixels, centimeters, etc.) in the lower-right area.
- mc-printer-page-footer-marginEnter the length of the margin from the bottom of the footer to the bottom edge of the page. First you need to select Length in the top drop-down list. You can then enter a value in the lower-left area and choose from several different units of measurement (points, pixels, centimeters, etc.) in the lower-right area.
For more information see Styles and Stylesheets, as well as Editing Styles in a Regular Stylesheet.