The following prerequisites for Elasticsearch are only necessary if you do not already have the programs on your computer. Go through each section to confirm you have all the programs and correct options set, and then follow the given procedures if anything is missing.
Note When setting up a computer as a remote server, you can use a Windows Server operating system (e.g., Windows Server 2016), or a regular Windows operating system (e.g., Windows 10). Which system you use depends on your needs. A Windows Server is often used in business settings.
[Menu Proxy — Headings — Online — Depth3 ]
Elasticsearch Prerequisites
|
Prerequisite |
Description |
|---|---|
|
Operating System With Internet Connection |
Make sure your operating system is updated with the latest service packs, critical patches, and security updates from Microsoft. |
|
.NET Framework 4.6 or newer |
This is the software development framework for building and running applications on Windows. The minimum required .NET Framework version required is 4.6. It also works with newer versions of .NET Framework. |
|
ASP .NET |
ASP.NET is part of .NET Framework (it does not require a separate install from .NET). ASP.NET is the web application framework for building dynamic web pages.This feature gets “turned on” in Windows. |
|
IIS Web Server |
Microsoft Internet Information Services (IIS) is a web service role that is enabled in the operating system to give the system its web server capabilities. IIS must be installed on the computer that will act as your Elasticsearch web server. The minimum version required is IIS 6. Newer versions work as well. |
|
.NET 6.0.13 Windows Hosting Bundle |
Microsoft .NET Core is used to create server applications that run on Windows, Linux, and Mac. |
|
Java SE Development Kit |
You can install a paid Oracle (JDK) Java SE Development Kit, or a free Open JDK Java 1.8 |
Note For details about supported operating systems and hardware requirements for Microsoft programs, refer to Microsoft documentation for downloads. See the following:
https://www.microsoft.com/en-us/download/windows.aspxNote The following procedures use Windows 10. Be advised that some user interfaces might vary slightly depending on the operating system you are using.
How to Determine if Programs are on the Computer
-
Open the Control Panel.
-
Select Programs and Features.
-
Compare the listed applications with the required programs (e.g., Microsoft .NET Core 6.0.13 Windows Server Hosting). If programs for a remote server are missing, you may have to add them.
How to Install .NET Framework
It is necessary to install .NET Framework to run certain applications on Windows that were created with it. However, many versions of Windows already include .NET Framework.
Note It is important to install .NET Framework before installing the IIS web server.
-
In a browser, navigate to:
Copyhttps://dotnet.microsoft.com/download/dotnet-framework - Locate the .NET Framework version, and click the link to download the runtime installer. You can choose to install version 4.6 or newer.
- In Microsoft’s configuration dialog, follow the installation wizard.
Note If you are installing on a Windows Server operating system, you can use the Server Manager to enable .NET Framework features. See How to Set Roles and Features With the Server Manager on Windows Server.
Installing Internet Information Services
The Microsoft Internet Information Services (IIS) gives the system its web server capabilities. If the server that will act as your Elasticsearch web server does not yet have IIS, find the download on the Microsoft website and install it.
Note Since newer versions of Windows come with IIS, check to see if IIS is already on your computer. It might be installed, but you just have to enable it via the Control Panel (Turn Windows features on or off). If you want a newer version, then you might have to download and install it.
Note If working with a Windows Server operating system, the Server Manager program is available to you to manage and configure web server roles and features (see How to Set Roles and Features With the Server Manager on Windows Server). If you are working with a regular Windows operating system, use the Windows Feature dialog to manage and configure web server roles and features for .NET and IIS (see How to Set Roles and Features With Windows Desktop).
How to Set Roles and Features With the Server Manager on Windows Server
To enable roles and features on a Windows Server, you can do so via the Server Manager.
- From the Windows Server operating system, open the Server Manager.
- From the Manage menu, select Add roles and features. Click Next.
- In the Add Roles and Features wizard, select Role based or feature based installation. Click Next.
- Choose Select a server from the server pool. Click Next.
- Scroll down in the Server Roles list and select Web Server (IIS). Click Next.
-
In the Features list, expand and select .NET Framework 4.x Advanced Services, and then select ASP .NET 4.x.
-
In the Role Services list, select the following under Web Server (IIS):
- Web Server
- Common HTTP Features
- Static Content
- Default Document
- Directory Browsing
- HTTP Errors
- Security
Request Filtering
Basic Authentication
Windows Authentication
- Application Development
.NET Extensibility 4.x
ISAPI Extensions
ISAPI Filters
ASP .NET 4.x
- Health and Diagnostics
- HTTP Logging
- Performance
- Static Content Compression
- Common HTTP Features
- Tools Management
- IIS Management Console
- IIS 6 Management Capability
- IIS Metabase and IIS 6 Configuration Compatibility
- Web Server
- Click Next through to the screen with the Install button enabled, then click Install.
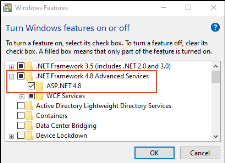
How to Set Roles and Features With Windows Desktop
To enable roles and features on a regular Windows desktop to set it up as a remote server, you can do so via the Windows Feature, Control Panel app.
- In the Windows Search bar, type turn on windows.
- Click the resulting item, Turn Windows features on or off. The Windows Features dialog opens.
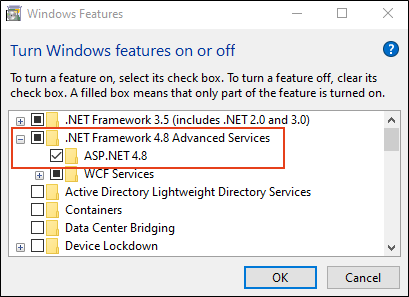
- Expand .NET Framework 4.x Advanced Services (the version number may vary depending on the original installation and updates).
-
Select the ASP.NET 4.x check box.
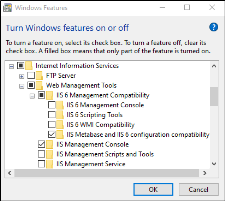
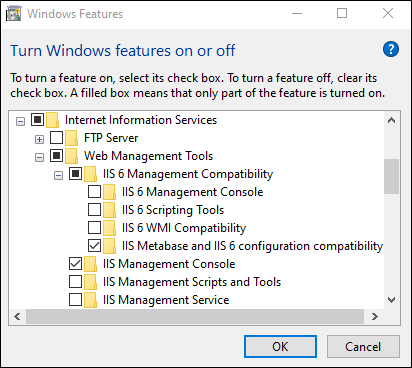
- Expand Internet Information Services.
- Expand Web Management Tools, and select IIS Management Console.
-
Expand the IIS 6 Management Compatibility folder, and select IIS Metabase and IIS 6 configuration compatibility (the version number may vary depending on original installation and updates).
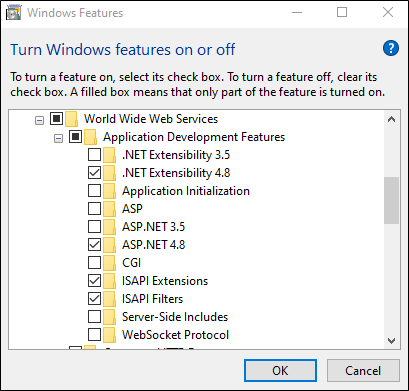
- Expand World Wide Web Services, and expand the Application Development Features folder.
-
Select items .NET Extensibility 4.x, ASP.NET 4.x, ISAPI Extensions, and ISAPI Filters.

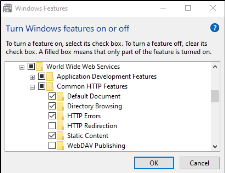
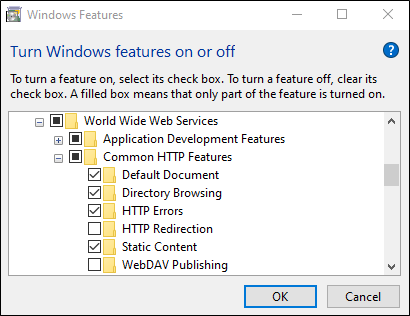
- Expand the Common HTTP Features folder.
-
Select items Default Document, Directory Browsing, HTTP Errors, and Static Content.
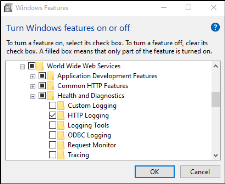
-
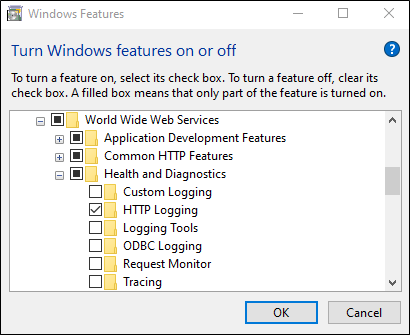
Expand the Health and Diagnostics folder, and select HTTP Logging.
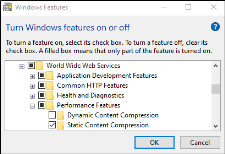
-
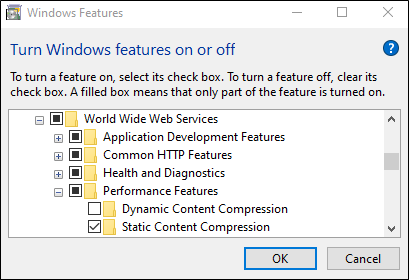
Expand the Performance Features folder, and select Static Content Compression.
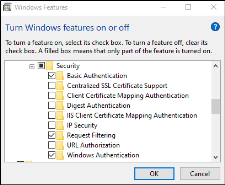
-
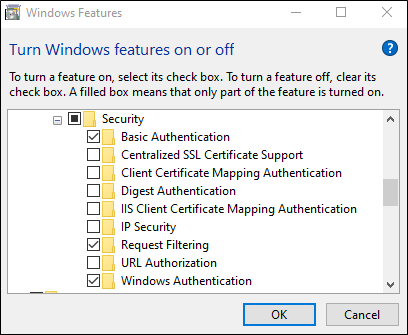
Expand the Security folder.
-
Select items Basic Authentication, Request Filtering, and Windows Authentication.
- Click OK. The installation begins.
- At the Windows completion message, click Close.
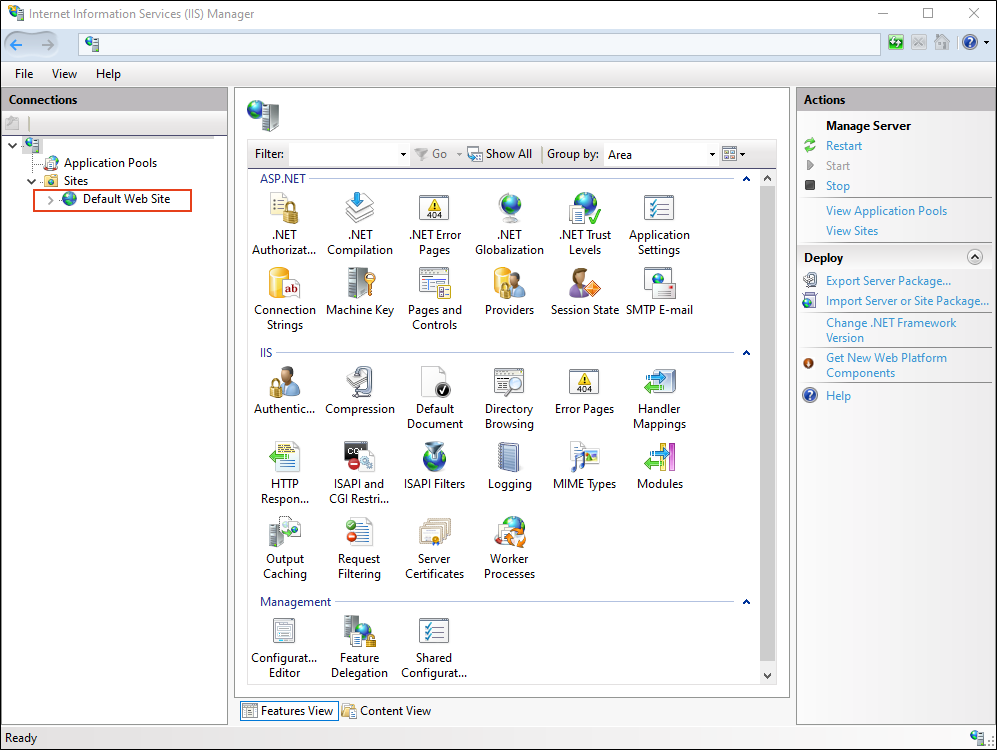
Optional—How to Verify IIS Installation
Verifying the installation of IIS is not necessary to do, but it might provide peace of mind that it got installed correctly.
- From the Windows Search bar, type IIS.
-
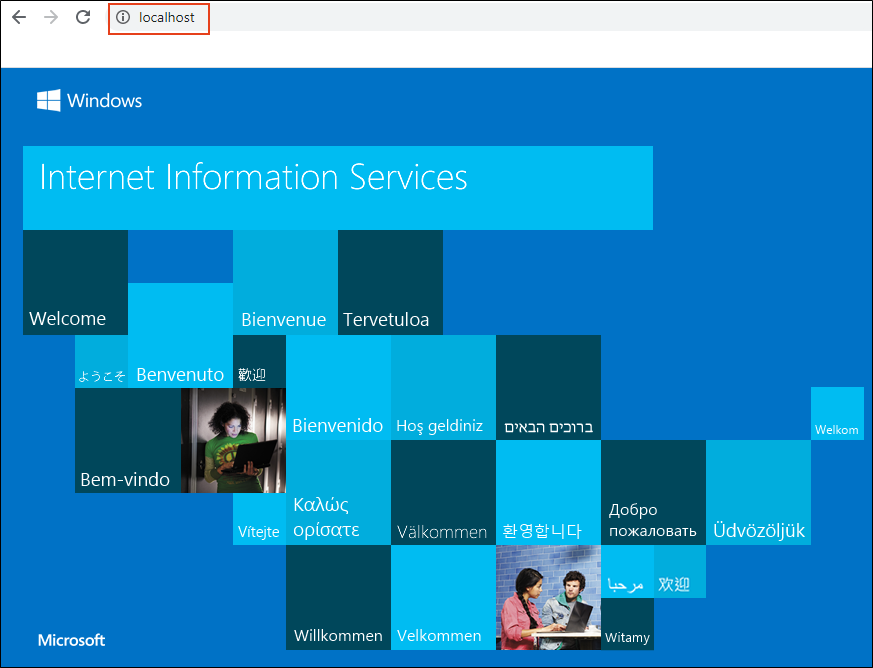
Click the resulting item, Internet Information Services (IIS) Manager app. The IIS Manager opens, and should look similar to the image below. When you install IIS for the first time, a "Default Web Site" is automatically created.

-
Open a web browser, and in the URL field type localhost. The default IIS web page displays.