You can link your
How to Link a TOC Entry
- Open the table of contents.
- Select a TOC entry.
- In the local toolbar, click
 . The Properties dialog opens.
 - Select the General tab.
-
Create one of the following link types:
To Link an Entry to a Bookmark
- Click Select Topic. The Link to Topic dialog opens, displaying all the topics in your project.
- Select the topic that contains the bookmark to which you want to link the entry and click Open.
- In the local toolbar, click
 . The Select Bookmark dialog opens, displaying all the bookmarks and styles (including classes and IDs) in the file. If necessary, a bookmark will be created at that location if one does not exist. If you want to clear a bookmark in the link, select it and click the button at the bottom of the dialog.
 - Select the bookmark to which you want to link the entry and click OK.
To Link an Entry or Book to an Existing Topic
- Click Select Topic. The Link to Topic dialog opens, displaying all the topics in your project.
- Select the topic to which you want to link the entry and click Open.
To Link an Entry or Book to an External File
In the Link field, type the path to the external file (e.g., http://www.acme.com).
Note The Eclipse Viewer cannot display PDFs opened from TOC links.
To Link an Entry or Book to Another TOC
- Click Select TOC. The Link to TOC dialog opens, displaying all the TOCs in your project.
-
Select the TOC to which you want to link the entry and click Open.
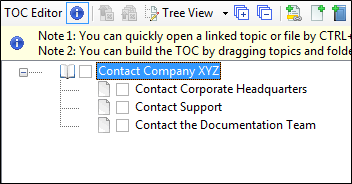
Example The documentation team where you work is creating many Help systems for different products in the company. The documentation manager has decided that each TOC in each Help system must contain the same book and topics for contacting the company. For example, it might look something like this:
Your team could create a TOC with this structure and name the TOC "Contact." Flare would create a TOC file called "Contact.fltoc" behind the scenes. Authors on the team could then share copies of that TOC file and the associated HTML Help topics. Each author adds the TOC and topic files to his or her Help system, linking that TOC to the primary TOC for that particular project.
To Link an Entry or Book to a Browse Sequence
- Click Select Browse Sequence. The Link to Browse Sequence dialog opens, displaying all the browse sequences in your project.
- Select the browse sequence to which you want to link the entry and click Open.
To Link an Entry or Book to Another Flare Project and Target
- Click Select Flare Project and Target. The Link to Flare Project and Target dialog opens.
-
Do one of the following:
-
Click Browse for Project. Then click Project File and find/select a Flare project to which you want to link.
OR
- Click Select Recent Project. Then select a recently opened Flare project from the list on the right.
-
- From the Select Target field, choose a specific target in the Flare project.
-
Click OK.
Note You can also merge Flare projects through the TOC Editor.
To Link an Entry or Book to an HTML Help System (CHM File)
- Click Select HTML Help. The Link to HTML Help dialog opens.
-
Do one of the following:
-
Select Project Files and then use the area below to navigate to the file that you want to link to and select it. By using the buttons in the local toolbar, you can view all files in a list, view files in their folder structure, and use other options.
Option
Description

Shows or hides the folders that the files are stored in.

Shows or hides the files. If you click this button when the Show Folders button
 is selected, the area splits into two. The folder is shown on the left side, and the files and subfolders within it are shown on the right.
 -
Select Import Existing. In the dialog that opens, find and double-click the CHM file. Then from the drop-down—which displays "(root folder)" by default, you can select a specific content folder in your project to place the CHM file.
-
- After the CHM file is selected, in the Topic field click
 . In the dialog that opens, find and double-click the topic that you want to link to.
 -
When you are finished, click OK in the Link to HTML Help dialog.
Note You can also merge HTML help projects through the TOC Editor.
To Link an Entry or Book to an External Help System
- Click Enter External Help System. The Link to Help System dialog opens.
-
Do one of the following:
-
Enter the name of the Help system output file to which you want to link.
OR
-
Click Browse. Then find and select the Help system output file to which you want to link.
Note If you enter a full, valid path to a Help system output file, that file is copied to your Flare project output folder when this project is compiled. If you just enter a name of the Help system output file, you will need to publish that output to the same folder as the output for the current project.
Note For merging Flare WebHelp output files, you should publish the subsystems into the "Subsystems" folder in the output folder for the parent project.
-
-
Click OK.
Note You can also merge output through the TOC Editor.
To Link an Entry or Book to a Mimic Movie
- Click Mimic Movie or Movie Collection. The Open dialog opens.
-
Find and select an individual Mimic movie or a movie collection to which you want to link the entry. You can select any of the following types of files:
- MIMOV This is an individual Mimic movie file (whether part of a collection or standalone). When you want to work on an individual movie, you open this file.
- MIPRJ This is the main Mimic collection file, which contains one or more movie (MIMOV) files. It is not required that you create a collection in Mimic; it is simply an option that you can use if you want to create a movie collection, as opposed to a standalone movie. Neither the MIPRJ nor the MIMOV files are finalized movies. They are merely the files that are used to generate the finalized movies. When you want to work on a movie collection, you open the MIPRJ file.
- MCMOVIE This is an output file that is created when you generate a movie (whether the movie is part of a collection or standalone). A Mimic collection can contain several movies. When you generate the finalized movies in Mimic, an MCMOVIE file is created for each movie in the collection (e.g., myfirstmovie.mcmovie, mysecondmovie.mcmovie). The output plays in the MadCap Movie Viewer.
- MCMV This is an optional output file that lets you view the movie(s) in the MadCap Movie Viewer, rather than in a browser window.
- MCMOVIESYS This is an output file that is created when you generate a movie collection. The file is named after your collection (e.g., mycollection.mcmoviesys) and can be used as an entry point to view the movie collection. The output plays in the MadCap Movie Viewer.
- Click Open.
-
(Optional) You can click in the drop-down field to the right and specify an output format.
If You Have Mimic 8 or Newer
- (default) If you build a Microsoft HTML Help, WebHelp, HTML5, or WebHelp Plus target, the movie uses the HTML5 movie format.
- HTML5 The movie is generated in the HTML5 movie format.
If You Have Mimic 7 or Older
- (default) The most appropriate movie format is used, based on the Flare output type that you generate. If you build a Microsoft HTML Help, WebHelp, HTML5, or WebHelp Plus target, the movie uses the HTML5 movie format. If you want to override these settings, select one of the specific movie types below.
- MadCap Movie Player The movie is generated in MMF and displays in the MadCap Movie Viewer.
- Adobe Flash The movie is generated in a Flash SWF file.
- Microsoft Silverlight The movie is generated in the Microsoft Silverlight format.
- HTML5 The movie is generated in the HTML5 movie format.
- In the Properties dialog, click OK.
- Click
") to save your work.
to save your work.