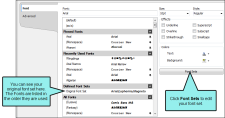
You can edit any font sets you have created.
[Menu Proxy — Headings — Online — Depth3 ]
How to Edit a Font Set
- Open the content file.
- Do one of the following, depending on the part of the user interface you are using:
Ribbon Select Home >
 (at the bottom of the Font section). The Font Properties dialog opens. Click Font Sets.
- Keyboard Shortcut Press CTRL+SHIFT+B. The Font Properties dialog opens. Click Font Sets.
- Stylesheet Editor In the local toolbar of the Stylesheet Editor, click
 and select Manage Font Sets.
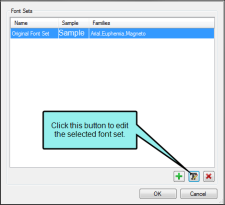
The Font Set Manager opens.
- Select the font set you want to edit.
- Click
 . The Define Font Set dialog opens, where you can see the fonts that are currently in your font set.
 - To edit your font set, do the following:
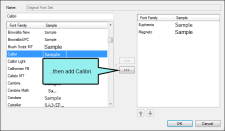
- If you want to add a font family to the font set, double-click each font family that you want to add, or select a font family and click
 to add it to the set. Fonts you have selected appear in the list on the right side of the dialog.
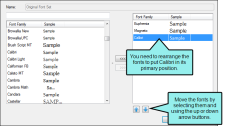
 - If you want to reorder the font families in your font set, select it from the list of selected font families on the right side of the dialog, then use the
 and
and  buttons to rearrange their order. When you are finished, the first font family should be the preferred font family that you want to be used, then the second, then the third, and so on.
 - If you want to remove a font family from the list of selected font families, select it and click
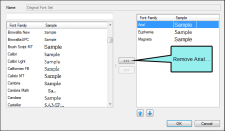
 . You can also double-click a font family to remove it from the font set.
- If you want to add a font family to the font set, double-click each font family that you want to add, or select a font family and click
- Click OK.
- Click OK in the Font Set Manager dialog.
- Click OK in the Font Properties dialog.
- Click
 to save your work.
Example Your original font set used Arial as its primary font. However, your company has decided to redesign its documentation, so you need to change your primary font to Calibri. The other fonts in the set should remain the same.
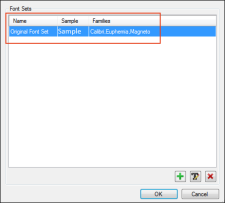
Instead of creating an entirely new font set, you can edit the existing font set. You open the Font Properties dialog and click Font Sets to open the Font Set Manager.
In the Font Set Manager, select your original font set, then click  to open the Define Font Set dialog. Here, you can make changes to the font set to change Arial to Calibri.
In the Define Font Set dialog, edit the fonts in the set. On the right side of the dialog, select Arial and click  to move it out of the font set. Then select Calibri from the font list on the left side of the dialog and click
  to add it to the set.
Use the  and
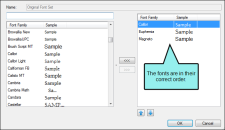
and  buttons under the list on the right side of the dialog to rearrange the fonts. Since Calibri is going to be the new primary font, that should be first in the list.
Click OK when you are finished, and close the other dialogs. You will notice that your original font set—with Arial in the primary position—now shows Calibri in the primary spot.
When you use the font set in the future, it will now use the new fonts.
Note You cannot edit the name of a font set after you create it.
Note Editing a font set does not automatically update styles or local formatting that use the original font set. You will need to reapply the font set if you want to use the new fonts in existing documentation.
Note There is no need to link a font set to a stylesheet. After you create a new font set in a project, it is automatically available for use in any stylesheet you add to the project. See Selecting Fonts.
What’s Next?
After you create or edit a font set, you can select that font set when applying fonts to content. You can also select that font set from the Defined Font Sets group in the Font Family field in the Font section of the Home ribbon. See Selecting Fonts.
