
Following are some steps you should complete and information you should know before you publish from Flare to ServiceNow®.
Note Keep in mind that the ServiceNow® interface can change periodically, so the labels and directions described below might not always match the most current ServiceNow® interface. For full steps on ServiceNow® tasks, please refer to the ServiceNow® documentation.
[Menu Proxy — Headings — Online — Depth3 ]
ServiceNow® Side
Following are settings and considerations on the ServiceNow® side of this process.
Knowledge Base
You must have a Knowledge Base in ServiceNow®. This is where your Flare output will be published.
-
Navigate to Administration > Knowledge Bases.
-
Click New.
-
Give the new Knowledge Base a name and owner, and select any other options you want.
-
Click Submit.
Categories
You have different options when it comes to publishing Flare output to your ServiceNow® categories. Depending on your situation, you might even be using a combination of these options when you publish to ServiceNow®.
- You can choose not to publish to any categories at all.
- You can publish output to a default category. If so, you should create that category on ServiceNow® before editing your destination file in Flare.
- You can create other categories in ServiceNow® to better align with your Flare TOC. Flare will then populate those categories with articles if it finds they match your TOC.
- You can create categories on the fly during the publishing process from Flare. New categories will automatically be added to ServiceNow® based on your settings and the structure of the Flare TOC.
Note If you make changes in Flare (e.g., rename a TOC book that previously created a category in ServiceNow®) and then republish, you might then have an empty category remaining on ServiceNow®. That empty category would need to be manually removed through ServiceNow®.
Note ServiceNow® lets you limit the number of category levels, as well as the number of characters used for a category name. If you are mapping your TOC to ServiceNow® to create categories, make sure your Flare TOC meets those settings. If not, you can increase the limits on ServiceNow® so that new categories can be created to match your TOC appropriately.
Knowledge Admin Role
Any users who will be publishing from Flare to ServiceNow® must be set up with the knowledge_admin role on ServiceNow®.
Note Theoretically, you could set up users with a different, custom role. However, knowledge_admin is typically already configured to have the correct permissions for user access tables (see Access Control Levels).
-
Navigate to System Security > Users and Groups > Users.
-
Click on the user.
-
On the page that opens, select the Roles tab.
-
Click Edit.
-
Filter list by entering knowledge.
-
Add knowledge_admin to the right side. (You can also add knowledge_manager to give the user additional permissions.)
Adding these will also add the knowledge role automatically because it is inherited.
-
Click Save.
-
Click Update.
Access Control Levels
Flare uses the ServiceNow® API to publish articles to ServiceNow®. The ability to do just about anything on ServiceNow® is dependent on the access control levels (ACLs) provided to the user who is logged in. You might not need to make any changes to the ACLs since the knowledge_admin role should already be connected to the appropriate permissions. But if you want to use a different role, you need to make sure that role is configured as described below (in place of knowledge_admin).
-
Navigate to System Definition > Tables. However, only an administrator with elevated security admin permissions can do this. Following are the required settings (some settings might already be enabled by default).
-
Search for the kind of permissions you want to work with (e.g., kb).
-
Click the system definition label that you want to edit (e.g., Knowledge Category).
-
On the page that opens, scroll down to the Access Controls tab.
-
Click the name for the operation that you want to edit (e.g., kb_category for delete).
-
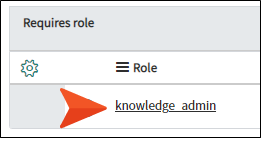
Make sure knowledge_admin is added as a role.
These are just the general steps. The sections below describe the specific permissions that the author must have for the tasks involved with publishing from Flare to ServiceNow®.
To Manage Knowledge Bases, Categories, and Articles
Add the knowledge_admin role to:
-
kb_knowledge
-
kb_knowledge: create (see example below)
-
kb_knowledge: read
-
kb_knowledge: write
Note You might need to edit the script to change the else statement to "answer = true;” then click Update to save the changes. This might be necessary to correct an issue where you publish to ServiceNow® in draft mode, and then the publishing process subsequently fails when you try to republish.
-
kb_knowledge: delete
-
kb_knowledge.workflow_state: create
-
kb_knowledge.workflow_state: read
-
kb_knowledge.workflow_state: write
-
kb_knowledge.workflow_state: delete
Note For ServiceNow® instances Rome and beyond (later versions), ACL permission changes are needed to ensure topics from a Flare project publish to the ServiceNow® "Published" state, rather than to a "Draft" state.
Keep in mind that each instance (e.g., Rome, San Diego) takes on a different UI experience, but changing permissions for each instance is basically the same. The following are the general steps.
-
In the filter navigator search for Tables.
-
Select System Definition > Tables.
-
Search by Name for kb_knowledge.
-
Select the Knowledge label.
-
In the Table Columns record, search by Column label for Workflow.
-
Select the Workflow label.
-
From the Access Controls, select kb_knowledge.workflow_state.
-
Notice the Requires role table might have the role “nobody” applied. If you are unable to edit the table, click your login (upper-right). From the drop-down select Elevate role, and then select security_admin. This allows you to modify Access Controls.
-
Insert a new row to the table, and add the role applicable to the user attempting publish (e.g., knowledge_admin).
-
Save the ACL.
-
-
-
kb_category
-
kb_category: create
-
kb_category: read
-
kb_category: write
-
kb_category: delete
Note ServiceNow® has a default configuration where you cannot delete categories that have nested categories. To avoid having to delete each nested category individually, you can override this by enabling Admin overrides for the kb_category:delete permission.
-
-
kb_knowledge_base
-
kb_knowledge_base: read
-
kb_knowledge_base: write
-
To Manage Keywords
If you want your index keywords or concepts in Flare to be converted to keywords on ServiceNow®, add the knowledge_admin role to:
-
kb_keyword
-
kb_keyword: create
-
kb_keyword: read
-
kb_keyword: write
-
kb_keyword: delete
-
-
kb_knowledge_keyword
-
kb_knowledge_keyword: create
-
kb_knowledge_keyword: read
-
kb_knowledge_keyword: write
-
kb_knowledge_keyword: delete
-
To Manage Tags
If you want your index keywords or concepts in Flare to be converted to tags on ServiceNow®, add the knowledge_admin role to:
-
label
-
label: create
-
label: read
-
label: write
-
label: delete
-
label*: read
-
label*: write
-
-
label_entry
-
label_entry: create
-
label_entry: read
-
label_entry: write
-
label_entry: delete
-
label_entry*: read
-
label_entry*: write
-
-
label_entry.table
-
label_entry: create
-
label_entry: read
-
label_entry: write
-
label_entry: delete
-
label_entry*: read
-
label_entry*: write
-
-
label_entry.table_key
-
label_entry: create
-
label_entry: read
-
label_entry: write
-
label_entry: delete
-
label_entry*: read
-
label_entry*: write
-
Note By default, tags added in ServiceNow® are visible only to the user who created them. However, you can set tags to have different visibility levels. For more details, please refer to the ServiceNow® documentation.
To Publish and Manage Multilingual Output
Add the knowledge_admin role to:
-
v_plugin
-
v_plugin: read
-
v_plugin: write
-
v_plugin*: read
-
-
sys_translated_text
-
sys_translated_text: create
-
sys_translated_text: read
-
sys_translated_text: write
-
sys_translated_text: delete
-
sys_translated_text*: read
-
sys_translated_text*: write
-
Example You want to add the knowledge_admin role to kb_knowledge: create.
First, navigate to System Definition > Tables > kb_knowledge. (The screenshots in this example are from the Rome instance.)
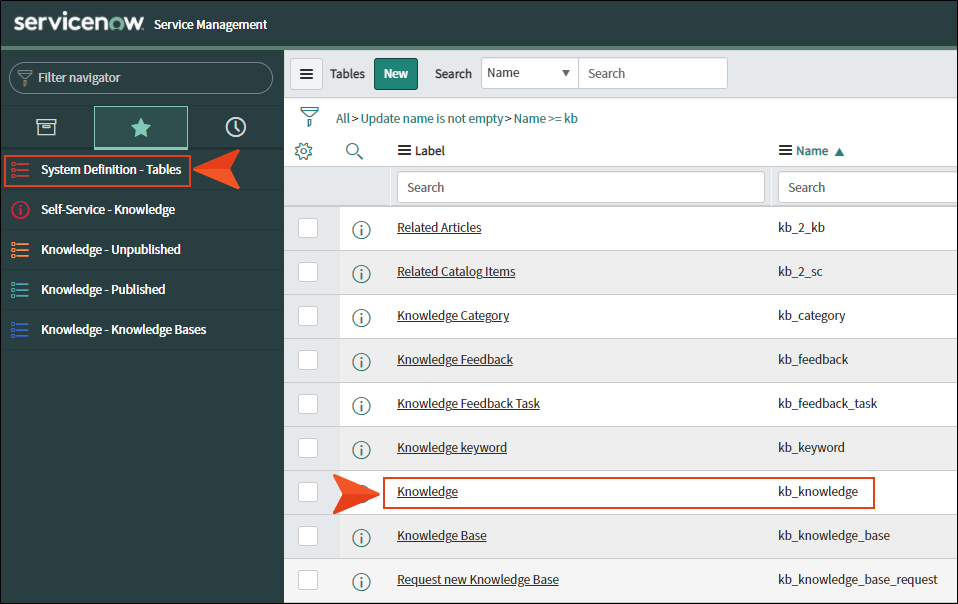
Scroll to the bottom of the page to the Access Controls tab.
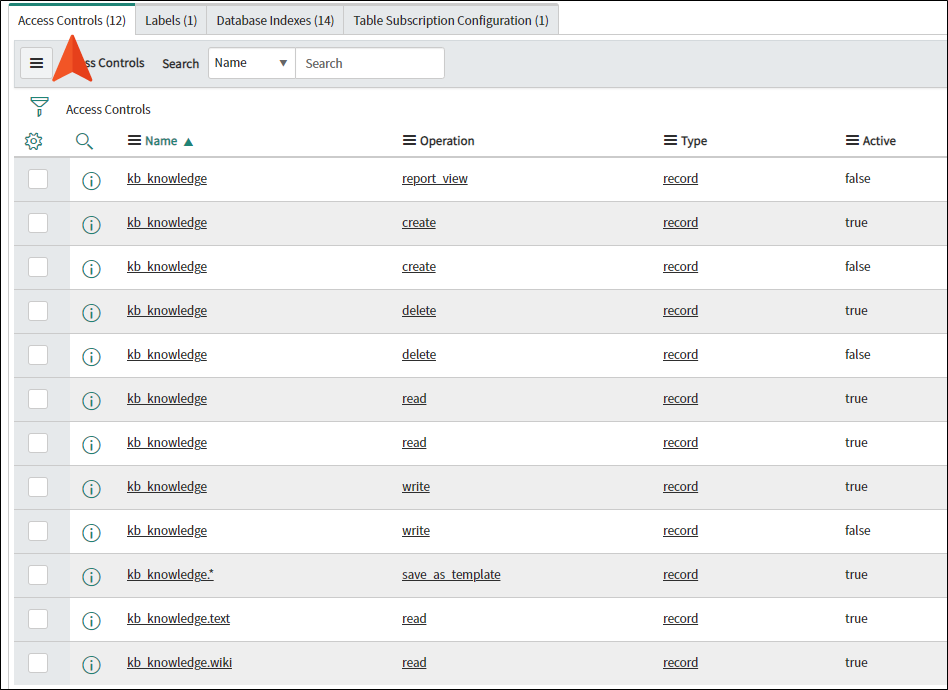
Click kb_knowledge (with create in the Operation column, and true in the Active column).

In the Require roles table, make sure knowledge_admin is shown.
Setting Up Additional Languages for Multilingual Output
If you are publishing multilingual output to ServiceNow®, you must first add the relevant languages to the ServiceNow® instance.
-
Navigate to System Definition > Plugins.
-
Search for "i18n."
-
Next to any languages you want to add, click Install. Each language can take up to 2 hours to complete installation.
For information on creating multilingual output from Flare, see Translation and Localization and Multilingual Support for ServiceNow®.
Client ID and Secret (via Oauth API Endpoint)
ServiceNow® requires an OAuth API endpoint to be created for external clients to log in to the instance. Therefore, this endpoint must be created in ServiceNow® by a system administrator before you can publish from Flare to ServiceNow®. See Retrieving ServiceNow® Credentials.
After you obtain the client ID and secret from your system administrator, you can enter them into your destination file. See Creating Destination Files for ServiceNow®.
Flare Side
Following are some settings and considerations on the Flare side of this process.
Clean XHTML
Only the Clean XHTML format is fully supported when publishing from Flare to ServiceNow®.
Targets, TOCs, and Destination Files
If you want to publish multiple groups of content to ServiceNow®, it is best not to do so from the same target (e.g., switching the TOC in the target file each time you want to publish different content). Otherwise, the most recently published content will replace the content published earlier. Instead, it is best to use a different target, destination file, and table of contents (TOC) for each distinct group of content.
Index Keywords and Concepts
If you have created index keywords and/or concepts in your Flare project and want them to be converted to keywords in ServiceNow®, make sure that the index keywords and concepts do not contain spaces between words.
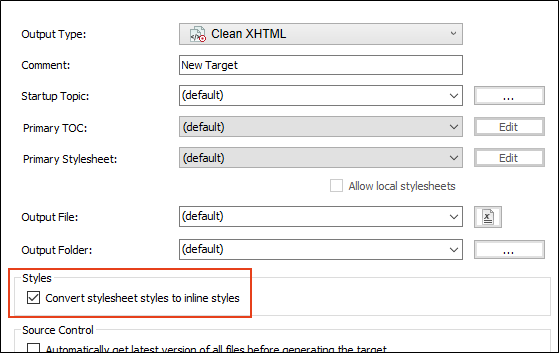
Converting to Inline Styles
In Flare, it is recommended that you enable the option Convert stylesheet styles to inline styles, which can be found on the General tab of the Target Editor. This will ensure that your styling is maintained when you publish the Clean XHTML output to ServiceNow®. This is necessary because ServiceNow® does not support external stylesheets.
Body Style
Normally, we recommended that you set certain global properties (e.g., font size and type) on the body style in your stylesheet. That way, the settings trickle down to all of your other styles. However, the <body> tag will not be retained when you publish to ServiceNow®. Therefore, anything that you have originally set on your body style will need to instead be set on lower styles in the hierarchy (e.g., p, ul, div).
Multimedia
Multimedia files, such as MP4 videos, are not published to ServiceNow®. However, links to YouTube and Vimeo videos will work.
Flare to ServiceNow® Only
Flare supports sending output to ServiceNow®, but not importing content from it. Therefore, after publishing topics from Flare, you should not edit the resulting articles in ServiceNow® if you plan to republish from Flare in the future. Otherwise, any changes you make in ServiceNow® will be overwritten by the newly published topics.
Limiting Content Published
You have different options when it comes to limiting the content that is published to ServiceNow®:
- There is an Exclusions field in the Destination Editor where you can enter specific files to be held back from the publishing process. This is particularly useful to exclude files such as Default.htm.
- You can use conditions on topic files in Flare, then include or exclude them appropriately in the Target Editor.
- In the Target Editor, you can select the Advanced tab and choose an option in the Content to include drop-down. You can include files linked directly or indirectly from the target, or you can include only files linked directly from the TOC.
Server Limitations
You should avoid publishing multiple targets to ServiceNow® from a batch at the same time in order to avoid any server limitations during the upload process. You can still publish targets in a batch, but you probably want to open the Options dialog (File > Options), select the Build tab, and set the Maximum Concurrent Builds to 1.
Practice Publishing
Since you have many options for publishing content to ServiceNow®, you might find it helpful to practice publishing output to a test development instance using different settings in Flare. Once you identify results that you like in ServiceNow®, you can than publish output to production.

