Note This feature is supported in HTML5 skinless output, but not in HTML5 Side Navigation, Top Navigation, or Tripane outputs.
When your output is published to Zendesk, a zip file is created that contains all of the styles and JavaScript files needed to support your theme in Zendesk. The easiest way to export the theme created in the Zendesk output is to drag and drop it from Windows Explorer into your Zendesk Help Center dashboard.
[Menu Proxy — Headings — Online — Depth3 ]
How to Install Zendesk Themes
- Build and publish your target.
-
In Windows Explorer, copy the theme's zip file that is created during publishing. This file is found in the same location as the target's output folder. The naming convention of this zip file is MadCap.[target_name].Theme.zip.
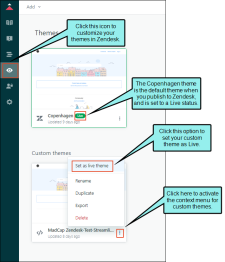
- From your Zendesk Help Center, select Guide admin, and click the icon to customize the design. The Themes page is displayed.
- Drag your theme's zip file from Windows Explorer, and drop it into the Zendesk themes page. Your project theme is added to Zendesk.
-
Set the theme that was just added to a Live status.