 GETTING STARTED TUTORIAL
Let's create a table of contents (TOC) to organize the topics that will go into our targets.
But as you do this, keep something very important in mind. A TOC file in online output acts as your online navigation. But for print-based outputs, a TOC file acts more like an outline; it's simply used to tell Flare Desktop which topics should be included in the print output and in what order. The actual generated TOC in print-based outputs is done a bit differently. It uses something called a "TOC Proxy."
In the San Diego template, there are two TOC files already created for you—one for printed output and one for online output. Since we added a topic to this project earlier (Famous-San-Diegans.htm; see Creating Topics), we need to add that topic to these TOCs before we can build our outputs.
[Menu Proxy — Headings — Online — Depth3 ]
How to Add a Topic to the Online TOC
- In the Project Organizer, expand the TOCs folder.
- Double-click Online-TOC. The TOC Editor opens to the right.
- Open the Content Explorer.
-
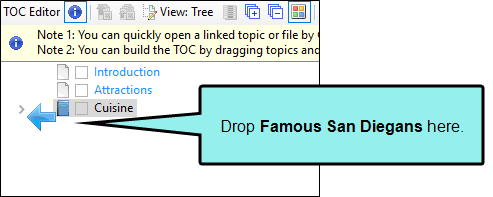
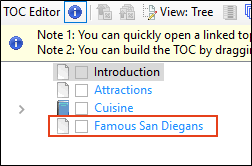
In the Content Explorer, select Famous-San-Diegans.htm and drag it to the TOC Editor on the right. You will see a blue arrow when you can drop it. Drop the topic under Cuisine.
If you click elsewhere in the TOC, you’ll see that your new TOC entry is blue, like the others. This doesn’t mean that the text will show up as blue in the output. Instead, what it means is that the TOC entry contains a system variable
Note You don’t need to use system variables for your TOC entries. Instead, you can override a system variable by simply typing whatever text you want in place of the blue variable text. If you do that, the text will display as black in the TOC Editor.
Note This topic should appear under Cuisine, but not on the same level as Food and Beer. If Famous San Diegans drops on the same level as Food and Beer, use the blue arrow
 in the local toolbar of the TOC Editor to move it to the same level as Cuisine.
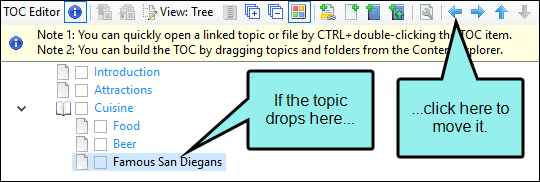
-
Click
") to save your work.
to save your work.
How to Add a Topic to the Print TOC
Adding a topic to the Print TOC follows basically the same steps. However, there are a few additional steps because you must set printed output settings for the new topic.
- In the Project Organizer, expand the TOCs folder.
- Double-click Print-TOC. The TOC Editor opens to the right.
-
In the Content Explorer, select Famous-San-Diegans.htm and drag it to the Print TOC. You will see a blue arrow when you can drop it. Drop the topic under Cuisine and before Resources.

Note Remember that the Print TOC will function as an outline, rather than a true TOC. So even though the TOC entries are blue (linked to a system variable), this doesn’t really matter. This TOC only determines which topics will be included in the output, but the labels on the TOC entries will not be used in the output; they are simply for your information.
-
In the TOC Editor, double-click Famous San Diegans. The Properties dialog opens.
Note If double-clicking a TOC entry opens the topic instead of the Properties dialog, click
 in the local toolbar of the TOC Editor to toggle the double-click behavior.
 -
Select the Printed Output tab.
Famous San Diegans should be a new chapter in our PDF guide, so we will set it up to use these settings.
- In the Break Type field, select Chapter Break.
-
In the Page Layout field, select Chapters. This is a page layout that is included with the San Diego template.
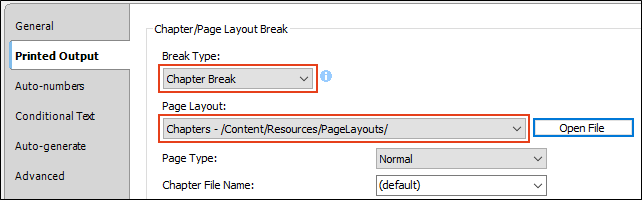
- Click OK. When you build the PDF output, you will notice these settings.
-
Click
to save your work.
Note There's more to preparing a project for print-based output than what we're showing you here. How much is involved depends on how intricate you want to get with your output.
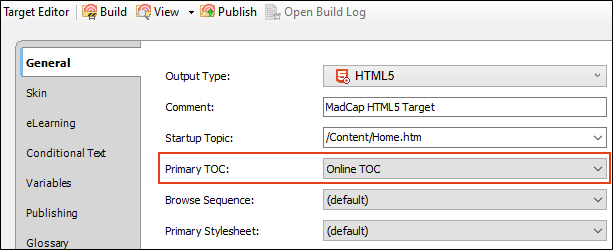
How to Assign a TOC to a Target
The Print TOC file is already associated with our PDF target. But we still need to assign the Online TOC file to our new HTML5 target.
- In the Project Organizer, expand the Targets folder.
- Double-click the All-About-San-Diego-HTML5 target. The Target Editor opens to the right.
- Select the General tab.
-
In the Primary TOC field, select Online TOC.
-
Click
to save your work.

