
Following are some steps you should complete and information you should know before you publish from Flare Desktop to ServiceNow®.
Note Keep in mind that the ServiceNow® interface can change periodically, so the labels and directions described below might not always match the most current ServiceNow® interface. For full steps on ServiceNow® tasks, please refer to the ServiceNow® documentation.
[Menu Proxy — Headings — Online — Depth3 ]
ServiceNow® Side
Following are settings and considerations on the ServiceNow® side of this process.
Knowledge Base
You must have a Knowledge Base in ServiceNow®. This is where your Flare output will be published.
-
Navigate to Administration > Knowledge Bases.
-
Click New.
-
Give the new Knowledge Base a name and owner, and select any other options you want.
-
In the Can Contribute tab, add the role assigned to the publishing user.
-
Click Submit.
Categories
You have different options when it comes to publishing Flare output to your ServiceNow® categories. Depending on your situation, you might even be using a combination of these options when you publish to ServiceNow®.
- You can choose not to publish to any categories at all.
- You can publish output to a default category. If so, you should create that category on ServiceNow® before editing your destination file in Flare Desktop.
- You can create other categories in ServiceNow® to better align with your Flare TOC. Flare Desktop will then populate those categories with articles if it finds they match your TOC.
- You can create categories on the fly during the publishing process from Flare Desktop. New categories will automatically be added to ServiceNow® based on your settings and the structure of the Flare TOC.
Note If you make changes in Flare Desktop (e.g., rename a TOC book that previously created a category in ServiceNow®) and then republish, you might then have an empty category remaining on ServiceNow®. That empty category would need to be manually removed through ServiceNow®.
Note ServiceNow® lets you limit the number of category levels, as well as the number of characters used for a category name. If you are mapping your TOC to ServiceNow® to create categories, make sure your Flare TOC meets those settings. If not, you can increase the limits on ServiceNow® so that new categories can be created to match your TOC appropriately.
Creating and Assigning a Role to the Publishing User
-
Navigate to User Administration > Roles.
-
Select New. In the record, provide the Name MadCap Connect, and select Submit.
-
Navigate to System Security > Users and Groups > Users.
-
Click on the user.
-
On the page that opens, select the Roles tab.
-
Click Edit.
-
Filter list by entering MadCap Publishing role.
-
Add MadCap Connect to the right side.
-
Click Save.
-
Click Update.
Note The Knowledge Admin role does not need to be assigned to a publishing user. Instead, use a MadCap Connect role. Initially, this role does not have access to anything, but you can give it access to certain tables as needed.
Access Control Levels
Flare Desktop uses the ServiceNow® API to publish articles to ServiceNow®. The ability to do just about anything on ServiceNow® is dependent on the access control levels (ACLs) provided to the user who is logged in. You need to make sure the MadCap Connect role is configured as described below.
-
Navigate to System Definition > Tables. However, only an administrator with elevated security admin permissions can do this. Following are the required settings (some settings might already be enabled by default).
-
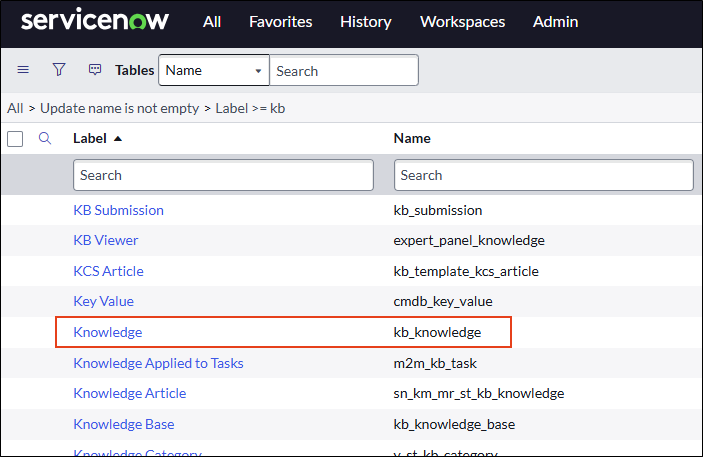
Search for the kind of permissions you want to work with (e.g., kb).
-
Click the system definition label that you want to edit (e.g., Knowledge Category).
-
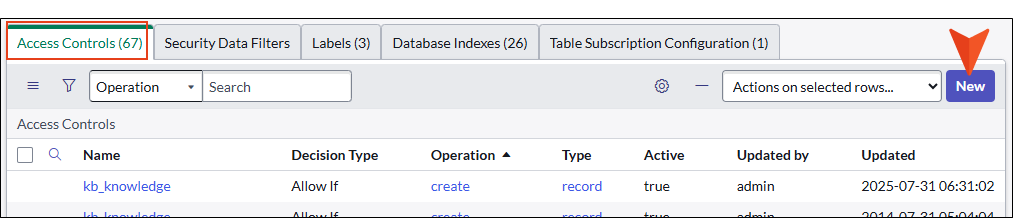
On the page that opens, scroll down to the Access Controls tab.
-
Click New to create a new ACL entry.
-
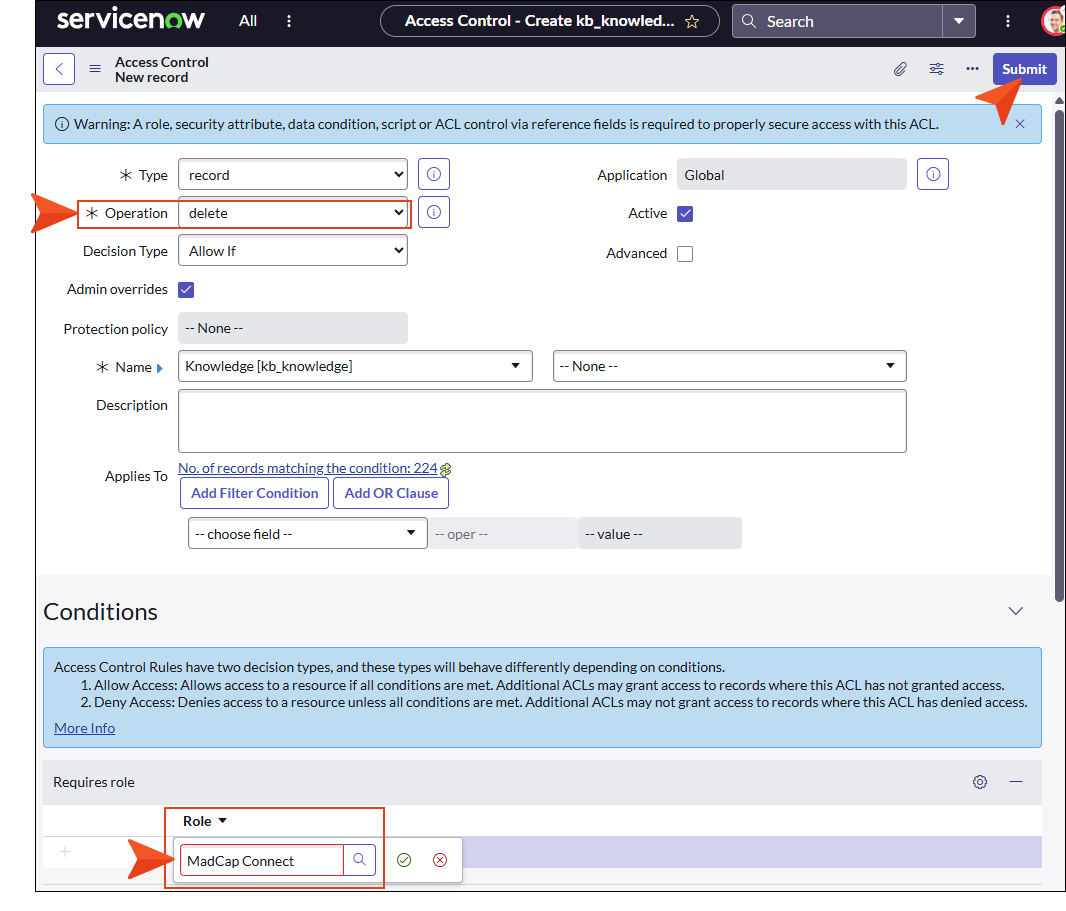
Set the Operation field to Delete.
-
Make sure MadCap Connect is added as a role.
-
Submit.
These are just the general steps. The sections below describe the specific permissions that the author must have for the tasks involved with publishing from Flare Desktop to ServiceNow®.
In each table mentioned below, create the following Access Control Records with the MadCap Connect role added to them:
-
kb_knowledge (to publish and delete stale topics)
-
kb_knowledge: create (see example below)
-
kb_knowledge: read
-
kb_knowledge: write
-
kb_knowledge: delete
-
kb_knowledge.workflow_state: write
-
-
kb_category (to create categories when the "Use TOC to define categories" destination option is enabled)
-
kb_category: create
-
kb_category: read
-
kb_category: write
-
kb_category.parent_id: write
-
kb_category.parent_table: write
-
-
kb_knowledge_base (to read available knowledge bases on the ServiceNow instance and populate them in the Default Knowledge base destination options)
-
kb_knowledge_base: read
-
-
kb_keyword (to generate and remove stale ServiceNow keywords)
-
kb_keyword: create
-
kb_keyword: read
-
kb_keyword: write
-
kb_keyword: delete
-
-
kb_knowledge_keyword (this is necessary for ServiceNow keywords with article association)
-
kb_knowledge_keyword: create
-
kb_knowledge_keyword: read
-
kb_knowledge_keyword: write
-
kb_knowledge_keyword: delete
-
-
label (to generate and remove stale ServiceNow tags)
-
label: create
-
label: read
-
label: delete
-
-
label_entry (to generate and remove stale ServiceNow tags and their association with articles)
-
label_entry: create
-
label_entry: read
-
label_entry: write
-
label_entry: delete
-
label_entry.table: write
-
label_entry.table_key: write
-
-
v_plugin (multilingual output publishing and article versioning)
-
v_plugin: read
-
-
sys_translated_text (multilingual output publishing)
-
sys_translated_text: create
-
sys_translated_text: read
-
sys_translated_text: write
-
-
sys_ws_definition (article versioning)
-
sys_ws_definition: read
-
Example You want to add the MadCap Connect role to kb_knowledge. (The screenshots in this example are from the Yokohama instance.)
First, navigate to System Definition > Tables > kb_knowledge. Click the system definition label Knowledge.
Scroll to the bottom of the page to the Access Controls tab, and click New. (If you do not see the New button, check your elevated security admin permissions.)
Create a new access control record entry, setting the Operation at delete and adding the MadCap Connect as the Role before clicking Submit.
The record is added to the access controls.
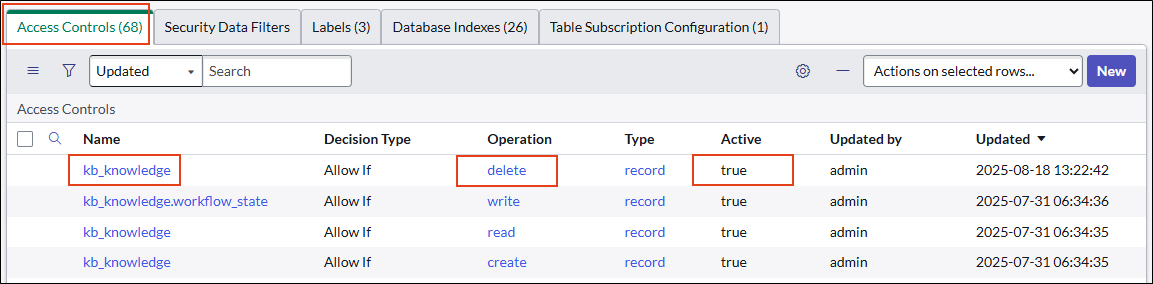
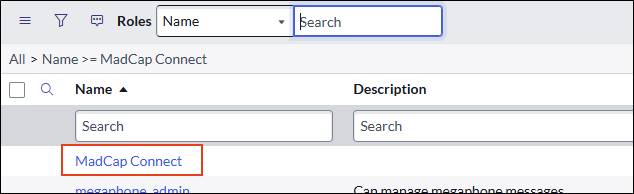
The new role of MadCap Connect displays in the Roles table.
Note You can create roles with a script.
If you have multiple roles to set up and need to create different access controls it can be time-consuming to do that manually for each one. You can optionally run a JavaScript to 1) create a role with your specified name, 2) generate all required access control lists (ACLs) for the role, and 3) easily identify the ACL with an added description.
Since the following instructions take place on the ServiceNow side, they are intended to be a guide in getting you started. Be aware that the user interface and items such as labels, links, and options are subject to change over time. Please see ServiceNow documentation.
-
In the ServiceNow application, navigate to All > Scripts (i.e., System Definition - Scripts - Background).
-
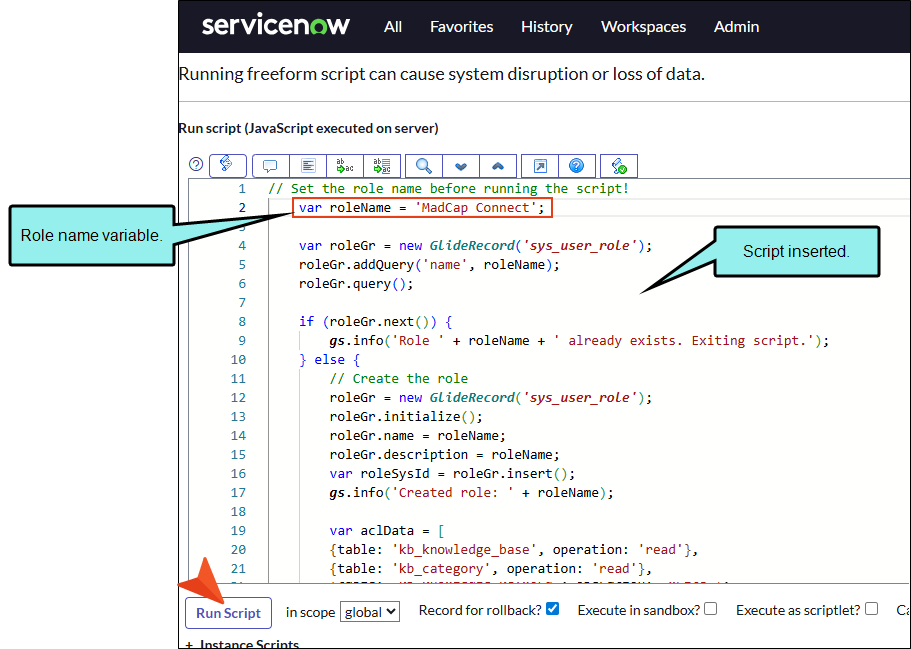
In the Script field, paste the following code. Be sure to edit role name variable with the correct name (e.g., MadCap Connect).
Copy// Set the role name before running the script!
var roleName = 'MadCap Connect';
var roleGr = new GlideRecord('sys_user_role');
roleGr.addQuery('name', roleName);
roleGr.query();
if (roleGr.next()) {
gs.info('Role ' + roleName + ' already exists. Exiting script.');
} else {
// Create the role
roleGr = new GlideRecord('sys_user_role');
roleGr.initialize();
roleGr.name = roleName;
roleGr.description = roleName;
var roleSysId = roleGr.insert();
gs.info('Created role: ' + roleName);
var aclData = [
{table: 'kb_knowledge_base', operation: 'read'},
{table: 'kb_category', operation: 'read'},
{table: 'kb_category', operation: 'create'},
{table: 'kb_category', operation: 'write'},
{table: 'kb_category', field: 'parent_table', operation: 'write'},
{table: 'kb_category', field: 'parent_id', operation: 'write'},
{table: 'kb_knowledge', operation: 'read'},
{table: 'kb_knowledge', operation: 'create'},
{table: 'kb_knowledge', operation: 'write'},
{table: 'kb_knowledge', operation: 'delete'},
{table: 'kb_knowledge', field: 'workflow_state', operation: 'write'},
{table: 'kb_keyword', operation: 'read'},
{table: 'kb_keyword', operation: 'create'},
{table: 'kb_keyword', operation: 'write'},
{table: 'kb_keyword', operation: 'delete'},
{table: 'kb_knowledge_keyword', operation: 'read'},
{table: 'kb_knowledge_keyword', operation: 'create'},
{table: 'kb_knowledge_keyword', operation: 'write'},
{table: 'kb_knowledge_keyword', operation: 'delete'},
{table: 'label', operation: 'read'},
{table: 'label', operation: 'create'},
{table: 'label', operation: 'delete'},
{table: 'label_entry', operation: 'read'},
{table: 'label_entry', operation: 'create'},
{table: 'label_entry', operation: 'write'},
{table: 'label_entry', operation: 'delete'},
{table: 'label_entry', field: 'table', operation: 'write'},
{table: 'label_entry', field: 'table_key', operation: 'write'},
{table: 'v_plugin', operation: 'read'},
{table: 'sys_ws_definition', operation: 'read'},
{table: 'sys_translated_text', operation: 'read'},
{table: 'sys_translated_text', operation: 'create'},
{table: 'sys_translated_text', operation: 'write'}
];
// Create ACLs
aclData.forEach(function(acl) {
var gr = new GlideRecord('sys_security_acl');
gr.initialize();
gr.name = acl.table + (acl.field ? '.' + acl.field : '');
gr.operation = acl.operation;
gr.type = 'record';
gr.description = roleName;
var aclId = gr.insert();
gs.info('Created ACL: ' + gr.name + ' (' + gr.operation + ')');
// Add role to ACL
var aclRoleGr = new GlideRecord('sys_security_acl_role');
aclRoleGr.initialize();
aclRoleGr.sys_security_acl = aclId;
aclRoleGr.sys_user_role = roleSysId;
aclRoleGr.insert();
});
gs.info('Completed creating role and ' + aclData.length + ' ACL records');
} -
Click Run Script.
If you run the above script, it replaces two "manual" steps:
-
Creating a user role.
-
Creating required access records in different tables and assigning a user role to them.
Setting Up Additional Languages for Multilingual Output
If you are publishing multilingual output to ServiceNow®, you must first add the relevant languages to the ServiceNow® instance.
-
Navigate to System Definition > Plugins.
-
Search for "i18n."
-
Next to any languages you want to add, click Install. Each language can take up to 2 hours to complete installation.
For information on creating multilingual output from Flare Desktop, see Translation and Localization and Multilingual Support for ServiceNow®.
Client ID and Secret (via Oauth API Endpoint)
ServiceNow® requires an OAuth API endpoint to be created for external clients to log in to the instance. Therefore, this endpoint must be created in ServiceNow® by a system administrator before you can publish from Flare Desktop to ServiceNow®. See Retrieving ServiceNow® Credentials.
After you obtain the client ID and secret from your system administrator, you can enter them into your destination file. See Creating Destination Files for ServiceNow®.
Enable Versioning
To enable the Use Versioning option, you must add a custom scripted REST API in ServiceNow. Consult with your ServiceNow administrator to help you, particularly for the step that inserts JavaScript code to create a custom endpoint.
Note Flare Desktop uses a REST API to communicate with ServiceNow instances. If you are using versioning in ServiceNow, the standard REST API does not work due to the JavaScript that is necessary for such functionality. Instead, add a custom scripted REST API.
-
Install the Knowledge Management Advanced plugin.
Note This plugin is installed by default since the Xanadu ServiceNow instance. For older instances you will have to install the plugin for article versioning to work.
-
In the ServiceNow application, navigate to Knowledge > Administration > Properties, and from Knowledge Management Properties, select Enable article versioning feature (set it to Yes).
Note This option in ServiceNow properties will not display unless the Knowledge Management Advanced plugin is installed.
-
Create a custom endpoint with the name “MadCap Connect API” in a new REST API.
Note This step is required for the Flare Desktop side to support article versioning. As the Flare Desktop user, you need to provide the JavaScript code to your ServiceNow administrator to complete on the ServiceNow side.
-
From System Web Services, click REST, and Scripted REST APIs.
-
Click New.
-
Provide a name for the REST API. It must be MadCap Connect API.
-
In the new REST API, navigate to Resources related list, and click New.
-
Ensure the following fields are set:
- Name MadCap Connect API
Note This will associate the custom endpoint with the JavaScript function.
-
Relative Path /{action}/{sys_id}
-
HTTP Method POST
- Name MadCap Connect API
-
In the Script field of the resource, paste the following code. (Provide this code to your administrator.)
Copy(function process(request, response) {
var action = request.pathParams.action;
if (!action)
return new sn_ws_err.BadRequestError('Missing action parameter');
action = action.toLowerCase();
if (action === 'status') {
var plugin = new GlideRecord('v_plugin');
var pluginFound = plugin.get('id', 'com.snc.knowledge_advanced');
// {plugin_active: active|inactive|unknown, feature_enabled: true|false|unknown}
return {
plugin_active: pluginFound ? plugin.getValue('active') : 'unknown',
feature_enabled: gs.getProperty('glide.knowman.versioning.enabled', 'unknown')
};
}
var sysId = request.pathParams.sys_id;
if (!sysId)
return new sn_ws_err.BadRequestError('Missing sys_id parameter');
var topic = new GlideRecord('kb_knowledge');
if (!topic.get(sysId))
return new sn_ws_err.NotFoundError('No record found');
var kbVersioning = new KBVersioningSNC();
var result;
switch (action) {
case 'checkout':
result = kbVersioning.checkout(topic, false);
if (result)
return { "sys_id": result.sys_id.toString() };
return new sn_ws_err.ServiceError('Checkout operation failed');
case 'recall':
kbVersioning.recall(topic);
return { "sys_id": topic.sys_id.toString() };
default:
return new sn_ws_err.BadRequestError('Invalid action. Supported methods are: status, checkout and recall');
}
})(request, response); -
Save.
-
Flare Desktop Side
Following are some settings and considerations on the Flare Desktop side of this process.
Clean XHTML
Only the Clean XHTML format is fully supported when publishing from Flare Desktop to ServiceNow®.
Targets, TOCs, and Destination Files
If you want to publish multiple groups of content to ServiceNow®, it is best not to do so from the same target (e.g., switching the TOC in the target file each time you want to publish different content). Otherwise, the most recently published content will replace the content published earlier. Instead, it is best to use a different target, destination file, and table of contents (TOC) for each distinct group of content.
Index Keywords and Concepts
If you have created index keywords and/or concepts in your Flare project and want them to be converted to keywords in ServiceNow®, make sure that the index keywords and concepts do not contain spaces between words.
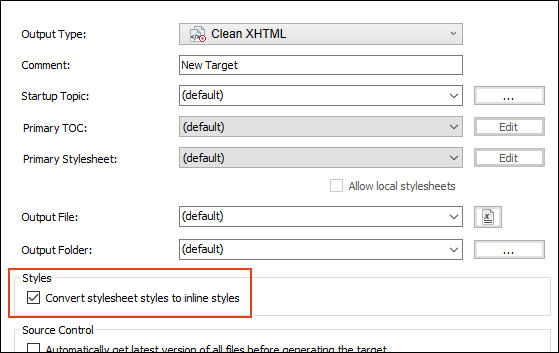
Converting to Inline Styles
In Flare Desktop, it is recommended that you enable the option Convert stylesheet styles to inline styles, which can be found on the General tab of the Target Editor. This will ensure that your styling is maintained when you publish the Clean XHTML output to ServiceNow®. This is necessary because ServiceNow® does not support external stylesheets.
Body Style
Normally, we recommend that you set certain global properties (e.g., font size and type) on the body style in your stylesheet. That way, the settings trickle down to all of your other styles. However, the <body> tag will not be retained when you publish to ServiceNow®. Anything that you have originally set on your body style will need to instead be set on lower styles in the hierarchy (e.g., p, ul, div).
Multimedia
Multimedia files, such as MP4 videos, are not published to ServiceNow®. However, links to YouTube and Vimeo videos will work.
Flare Desktop to ServiceNow® Only
Flare Desktop supports sending output to ServiceNow®, but not importing content from it. Therefore, after publishing topics from Flare Desktop, you should not edit the resulting articles in ServiceNow® if you plan to republish from Flare Desktop in the future. Otherwise, any changes you make in ServiceNow® will be overwritten by the newly published topics.
Limiting Content Published
You have different options when it comes to limiting the content that is published to ServiceNow®:
- There is an Exclusions field in the Destination Editor where you can enter specific files to be held back from the publishing process. This is particularly useful to exclude files such as Default.htm.
- You can use conditions on topic files in Flare Desktop, then include or exclude them appropriately in the Target Editor.
- In the Target Editor, you can select the Advanced tab and choose an option in the Content to include drop-down. You can include files linked directly or indirectly from the target, or you can include only files linked directly from the TOC.
Server Limitations
You should avoid publishing multiple targets to ServiceNow® from a batch at the same time in order to avoid any server limitations during the upload process. You can still publish targets in a batch, but you probably want to open the Options dialog (File > Options), select the Build tab, and set the Maximum Concurrent Builds to 1.
Practice Publishing
Since you have many options for publishing content to ServiceNow®, you might find it helpful to practice publishing output to a test development instance using different settings in Flare Desktop. Once you identify results that you like in ServiceNow®, you can publish output to production.
Use Versioning
Once the custom endpoint is set in ServiceNow with the plugin (depending on your instance), the article versioning property is enabled, and the JavaScript code is associated with the new REST API, then the Use Versioning option can be enabled in Flare Desktop’s Destination Editor. (Behind the scenes, Flare Desktop and ServiceNow communicate via ping and response to confirm the endpoint is properly configured.)
Note You might see a warning icon next to Use Versioning if something in the setup is wrong. Click it for dynamic information specific to your case.
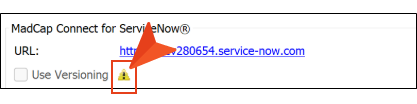
The information is intended for your administrator. A check mark indicates a successful element while an "X" indicates a failed one.
Do the following in the Destination Editor.
-
(Optional) Select the Use Versioning check box. This is optional because you do not have to use the versioning feature to publish to ServiceNow.
-
Select a workflow for your content (e.g., Draft, Review, Published).

