
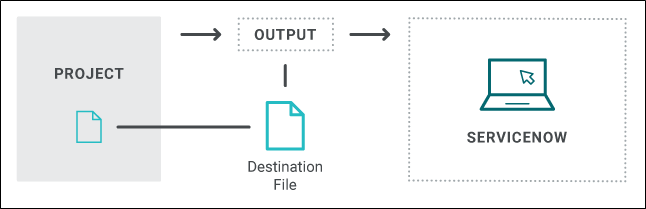
After you have completed the other tasks for publishing to ServiceNow® (i.e., retrieving credentials and installing MadCap Connect for ServiceNow®), you can create a destination file.
[Menu Proxy — Headings — Online — Depth3 ]
How to Create a Destination File for ServiceNow®
- Open the Project Organizer.
- Open an existing destination file or add a new one.
- In the Destination Editor, click in the Type drop-down field, and select MadCap Connect for ServiceNow®.
-
Activate your ServiceNow® license.
- Click Activate. A wizard opens.
- Enter the license key, then click Next.
- Enter the name and email of the user associated with the license key. Then click Next.
- Select either Internet Activation or Manual Activation. Then click Next.
- If you choose Internet Activation, a confirmation displays to indicate that your license has been activated. Click Finish.
- If you choose Manual Activation, follow the instructions on-screen to copy and paste the information in an email to customerservice@madcapsoftware.com.
- In the Destination Editor, click Login Credentials.
- In the first field, enter the ServiceNow® Instance.
- Paste the Client ID and Client secret
- Enter your ServiceNow® User name and Password. Then click Finish.
-
Complete the
See the full topic for details.
-
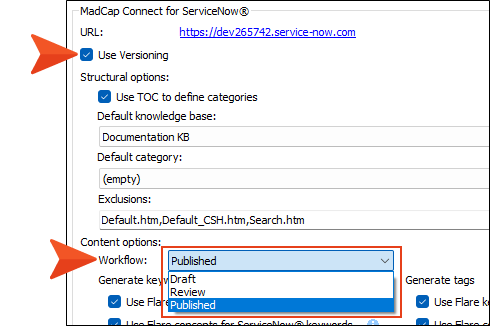
Use Versioning Select this check box if you want to keep updates in a draft state before pushing an article live. This option is only available in the editor if the ServiceNow server supports versioning, and if Flare Desktop has found the endpoint with a predefined name on the server. To enable the Use Versioning option, there is a little set up on the ServiceNow side having to do with a custom scripted REST API.
Example With Use Versioning enabled, this illustrates how versioning might work when publishing from Flare Desktop to ServiceNow.
Workflow option: Draft. This shows the first draft of an article, unpublished. In addition a log file is created.
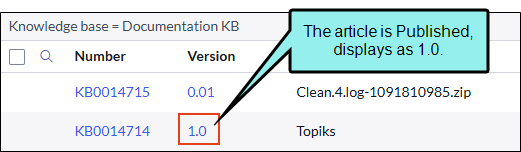
Workflow option: Published. You decide the article is fine, so you want to select Published.
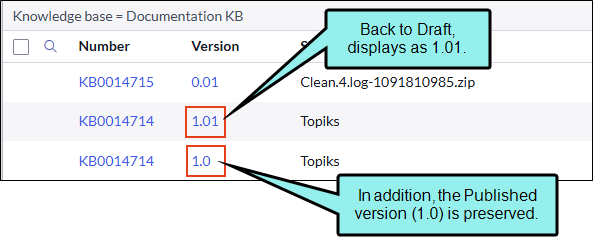
Workflow option: Draft. You need to make the published version a draft again. With versioning, a "copy" is created, while the published version is preserved (and live, available to the public).
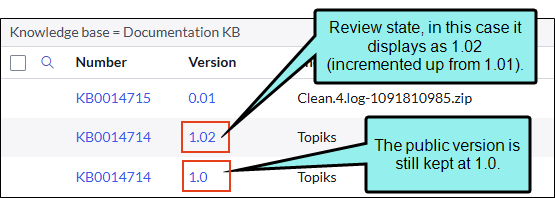
Workflow option: Review. You want the article reviewed, so you publish from a Draft state to Review. A new version of the article is created while incrementing the version number up.
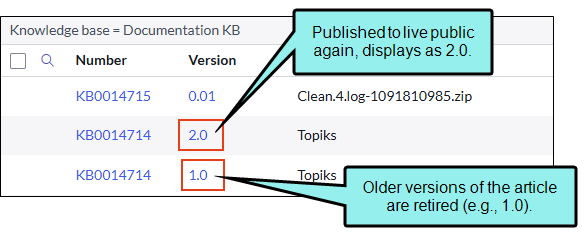
Workflow option: Published. You decide it is time to publish your article again. You select Published. This publishes a new public version, and it retires the older articles.
Note If you use versioning an article is automatically uploaded that is specific to the target and the project. It will remain as Draft in ServiceNow, regardless if you change the workflow drop-down (e.g., Draft, Review, Published). The purpose of this article is to hold a log file (for all articles in the project).

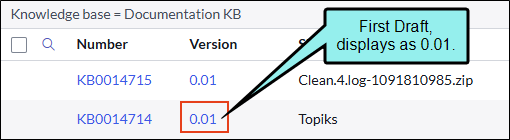
Note When an article is first created from Flare Desktop or in ServiceNow it displays as 0.01. This is an "unpublished" version.
Note If the Use Versioning option is not enabled, it behaves as it did prior to the ServiceNow refactor. It does not care about versioning. It does not create extra articles when switching from Draft to Published or Published to Draft. For example, if you publish as Draft for the first time, the article is 0.01. If you publish again as Published that article will be 1.0. But, if you publish again as Draft, the article is going to change to 1.01—and it does not create a "copy," meaning it does not keep it as Published and create a new Draft article. Instead it alters the same article, and it will affect the article that is live because it will be switched to a Draft state and will be unavailable to the public.
- Use TOC to define categories Select this if you want the resulting categories in ServiceNow® to be based on your TOC structure. Otherwise, the topics will be published to the default category that is selected.
- Default knowledge base Select the ServiceNow® knowledge base to store the published files.
- Default category If you have existing categories on the knowledge base, you can choose one to hold the published files.
- Exclusions You can enter any files (separated by commas) that you want to exclude from the publication process.
- Workflow Select the workflow (Draft, Review, or Published) for the output files being uploaded to ServiceNow®. Be aware that you can achieve different versioning results if you switch between workflow options.
- Generate keywords You can choose how the published files affect keywords on ServiceNow®.
- Use Flare keywords for ServiceNow® keywords Flare keywords will become ServiceNow® keywords after the files are published. Only Flare keywords without spaces can be added to ServiceNow®.
- Use Flare concepts for ServiceNow® keywords Flare concepts will become ServiceNow® keywords after the files are published. Only Flare concepts without spaces can be added to ServiceNow.
- Delete stale ServiceNow® keywords You might have previously published files to ServiceNow® that resulted in keywords. If those keywords or concepts no longer exist in the Flare files being published, selecting this option will remove the out-of-date keywords from ServiceNow®.
- Default keywords Enter keywords (separated by commas) that you want to be associated with all published articles in ServiceNow® (even in multiple languages), whether or not those keywords or concepts were part of the topics in Flare Desktop.
- Generate tags You can choose how the published files affect tags on ServiceNow®.
- Use Flare keywords for ServiceNow® tags Flare keywords will become ServiceNow® tags after the files are published.
- Use Flare concepts for ServiceNow® tags Flare concepts will become ServiceNow® tags after the files are published.
- Delete stale ServiceNow® tags You might have previously published files to ServiceNow® that resulted in tags. If those keywords or concepts no longer exist in the Flare files being published, selecting this option will remove the out-of-date tags from ServiceNow®.
- Default tags Enter tags (separated by commas) that you want to be associated with all published articles in ServiceNow® (even in multiple languages), whether or not those keywords or concepts were part of the topics in Flare Desktop.
-
- (Optional) In the View URL field, you can enter an address corresponding to your publish destination. This field is for your own internal purposes, and is simply a quick way for you to open the output associated with the destination by clicking the button to the right.
-
(Optional) You can select the upload options. The Upload Log File option is automatically selected for ServiceNow®.
- Upload Only Changed Files Select this option if you want Flare Desktop to republish only the files that have changed. This can save significant time.
- Remove Outdated Published Files Select this option if you want Flare Desktop to identify files that were previously published to the destination but are no longer in the source files. Flare Desktop will then remove such files from the destination.
- Click
") to save your work.
to save your work.
What’s Next?
(Required) Publishing to ServiceNow®

