When creating a project in Lingo, you can use a filter to translate only specific content in a folder or in certain file types. Filters allow you to set restrictions on the content in a file or folder that is available for translation. Filters are available for Word, Excel, text, XML, and JSON files. You can also add filters to unsupported file types using a text file type filter. Filters are also available for folders, so you can choose the file types in the folder that you want to translate.
Once you create a filter, you can save it to reuse it later, and you can apply it to all other files of the same type in the project.
Important Creating file type filters is recommended for advanced Lingo users. This feature requires an understanding of advanced topics such as regular expressions, XML, and segmentation rules.
Additionally, it is recommended that you are familiar with the file(s) you are importing prior to adding a filter. Some file type filters require you to select the specific content that you want to import (e.g., sheet labels, headers and footers, comments).
Example
This shows how to access a file type filter:

This shows how to access a folder filter:
Note If you wish to create a new file filter in an open project, select Tools > File Filters. In the File Filters dialog, select the File type from the drop-down list. Then, follow the remaining steps for that file type to create the filter.
[Menu Proxy — Headings — Online — Depth3 ]
How to Create a Filter for Folders
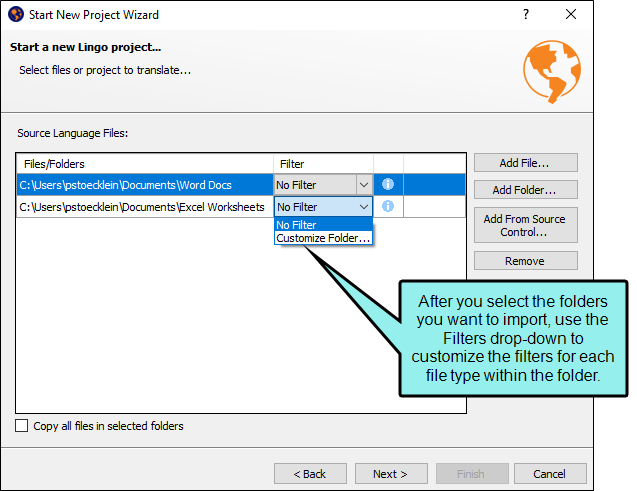
When you create a Lingo project, you can create a project from a folder. You can filter the file types in the folder so only some files are included in the translation project. You can also create additional filters for any files that may be in the folder so only certain parts of the file are imported for translation.
Note If you want to translate an entire Flare, Mimic, or Doc-To-Help project, you must select the project file using the Add File button, rather than selecting the folder where the project is located.
Note If you want to translate a Doc-To-Help project, you must import the entire .d2h project file.
The .d2h project file is required for XML and Word files in a Doc-To-Help project to be imported correctly. Because of this, importing individual XML files from a project is not supported, and importing individual Word files from a project is not recommended.
-
- If you want to create file type filters for the files within the folder, from the Filter drop-down select Customize Folder. The File Types Filters dialog opens.
-
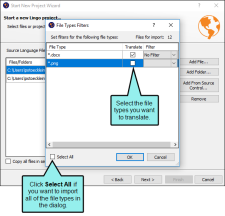
In the Translate column, select the file types you want to import. You can click the Select All check box to add all the file types at once.
-
From the Filter drop-down, select the filter you want to use for each translatable file type.
Note You cannot select a filter for file types that cannot be translated, such as image files.
-
If you want to create a new filter, from the Filter drop-down, select Create New.
Note Applying a text file type filter to unsupported file types lets you translate the files as if they were text files. If you have unsupported file types in your folder and you do not apply a text file type filter to these files, they will be discarded upon project creation.
- Click OK.

How to Create a Filter for Word Documents
-
- From the Filter drop-down, select Create New.
-
Enter a name for your filter and click OK. The File Filters dialog opens.
- (Optional) You can do one of the following before saving your current filter:
- Import a Filter Click Import. In the dialog that opens, locate the filter you want to import, then click Open.
-
Export a Filter Click Export. In the dialog that opens, select the location you want to export the current filter, then click Save.
- Select a Filter From the Filter drop-down, select an existing filter.
- Create a New Filter Click
 .
. -
Delete a Filter Select a filter from the Filter drop-down, then click
 .
.Note If you delete a filter, it will be removed from all translation projects where it is currently in use.
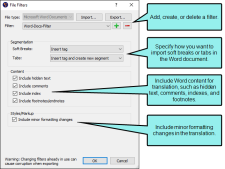
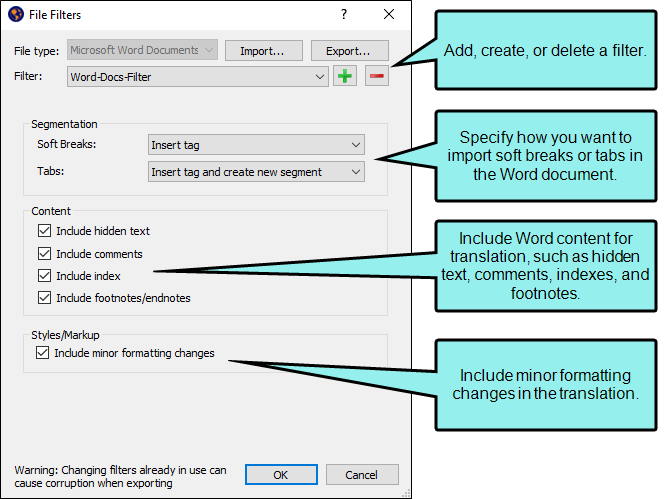
- In the Segmentation area, select an option for how to import soft breaks and tabs into the translation project:
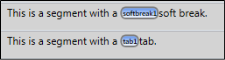
Insert tag Select this option to keep soft breaks or tabs together with the rest of the segment. Lingo adds a tag where the soft break or tab appears in the segment.
Example
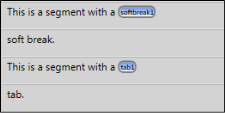
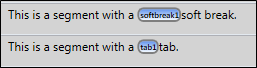
The two segments pictured below include a soft break and a tab, respectively. The Word file type filter in Lingo has been set to add a tag when there is a tab or a soft break, but it will not split the segment. When translating the segment, you can drag the tag into the target segment where it needs to appear.
Insert tag and create new segment Select this option to create a new segment wherever there is a soft break or a tab in your project.
Example
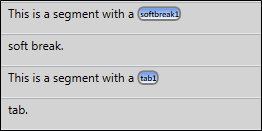
The two segments pictured below include a soft break and a tab, respectively. The Word file type filter in Lingo has been set to add a tag when there is a tab or a soft break, and it will also create a new segment at the location where the tab or soft break appears. When translating the segment, you can drag the tag into the target segment where it needs to appear.
- In the Content area, select the check boxes for the content you want to include in the translation project:
Include hidden text Select this option to include hidden text in the Lingo project so it can be translated.
Example
The segment below includes hidden text. Lingo places a tag where the hidden text appears in the original Word document, so the location of the text is clearly visible in the Translation Editor. However, in this example, the Lingo file type filter is set so hidden text is not included for translation. When translating the segment, you can drag the tag into the target segment where it needs to appear.

In the segment below, the filter has been changed so hidden text is included. Notice that the word "HIDDEN" is now visible. Lingo also places a tag on either side of the hidden text so the text is clearly visible in the Translation Editor. You can drag the yellow tags onto the target segment to mark the hidden text in the target segment.

Include comments Select this option to include comments as separate segments in the Lingo project so they can be translated. If you do not select this option, comments will not be included.
Example
The segment below includes a comment. Lingo places a tag on either side of the phrase that was marked with a comment in the original Word document, so the location of the comment is clearly visible in the Translation Editor. However, in this example, the Lingo file type filter is set so the comment itself is not included for translation.

In the segment below, the filter has been changed so the comment itself is included. Notice that the comment is visible in a second segment. This lets you translate the comment separately. You can also still see the comment tag in the first segment that indicates where the comment was marked in the original Word document. When translating the sentence, you can drag the yellow tag onto the phrase that needs the comment in the target segment. Later, when you export the document, the comment will appear in the finished project, attached to the appropriate location in the document.

Include index Select this option to include index entries as separate line items in the Lingo project so they can be translated. If you do not select this option, index entries will not be included.
Example
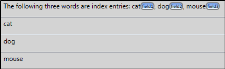
The segment below includes words that are marked as index entries. Lingo places a tag next to the text that was marked with a keyword in the original Word document, so the location of the index keywords are clearly visible in the Translation Editor. When translating the segment, you can drag the tag into the target segment where it needs to appear. However, in this example, the Lingo file type filter is set so the index entry itself is not included for translation.

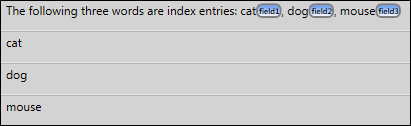
In the segment below, the filter has been changed so the index entries itself are included. Notice that each word in the index is visible, so three additional segments follow the original segment. This lets you translate each index entry separately. You can also still see the keyword tags in the first segment that indicates where the keywords were marked in the original Word document.
Include footnotes/endnotes Select this option to include footnotes or endnotes as separate segments in the Lingo project so they can be translated. If you do not select this option, footnotes or endnotes will not be included.
Example
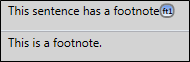
The segment below includes a footnote. Lingo places a tag next to the sentence that was marked with a footnote in the original Word document, so the location of the footnote is clearly visible in the Translation Editor. When translating the segment, you can drag the tag into the target segment where it needs to appear. However, in this example, the Lingo file type filter is set so the footnote itself is not included for translation.

In the segment below, the filter has been changed so the footnote is included as a separate segment. This lets you translate the footnote separately. You can also still see the footnote tag in the first segment that indicates where the footnote was marked in the original Word document.
-
In the Styles/Markup area, select the check box if you want to include minor formatting changes in your translation project.
Example
The segment below includes a text effect, and also includes bold formatting. However, in this example, the Lingo file type filter is set so the text effect is not visible in Lingo. You can only see the bold formatting.

In the segment below, the filter has been changed so the text effect is visible. Lingo places a tag next to the word that was marked with a text effect in the original Word document, so the location of the effect is clearly visible in the Translation Editor. When translating the sentence, you can drag the yellow tag onto the word that needs the text effect in the target segment. Later, when you export the document, the text effect will appear in the finished project.

- Click OK.


How to Create a Filter for Excel Documents
-
- From the Filter drop-down, select Create New.
-
Enter a name for your filter and click OK. The File Filters dialog opens.
- (Optional) You can do one of the following before saving your current filter:
- Import a Filter Click Import. In the dialog that opens, locate the filter you want to import, then click Open.
-
Export a Filter Click Export. In the dialog that opens, select the location you want to export the current filter, then click Save.
- Select a Filter From the Filter drop-down, select an existing filter.
- Create a New Filter Click .
-
Delete a Filter Select a filter from the Filter drop-down, then click
.Note If you delete a filter, it will be removed from all translation projects where it is currently in use.
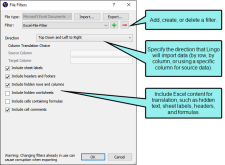
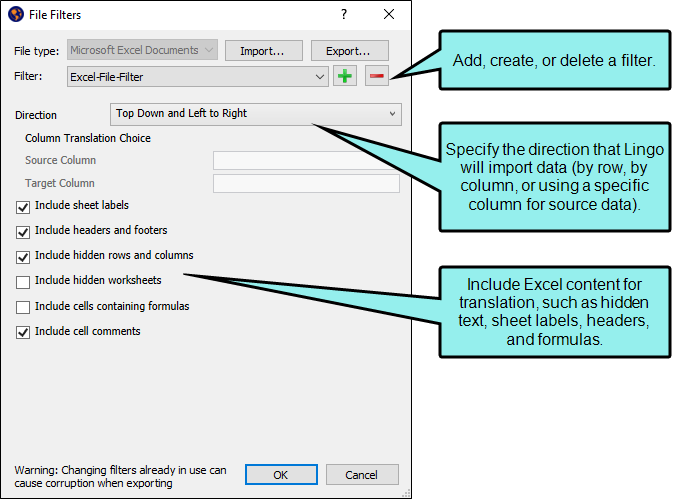
- In the Direction area, select an option for how to import the contents of the Excel file:
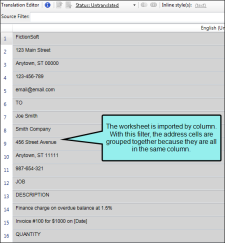
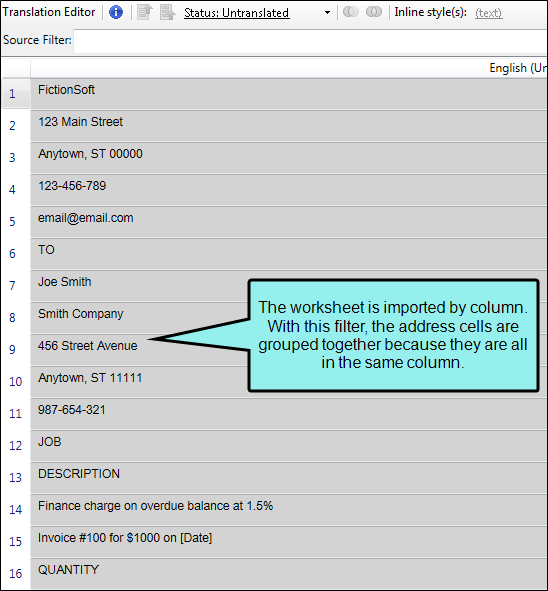
Top Down and Left to Right Select this option if you want Lingo to import cells by column (i.e., starting in Column A and working down the column, then moving to Column B).
Example
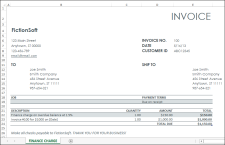
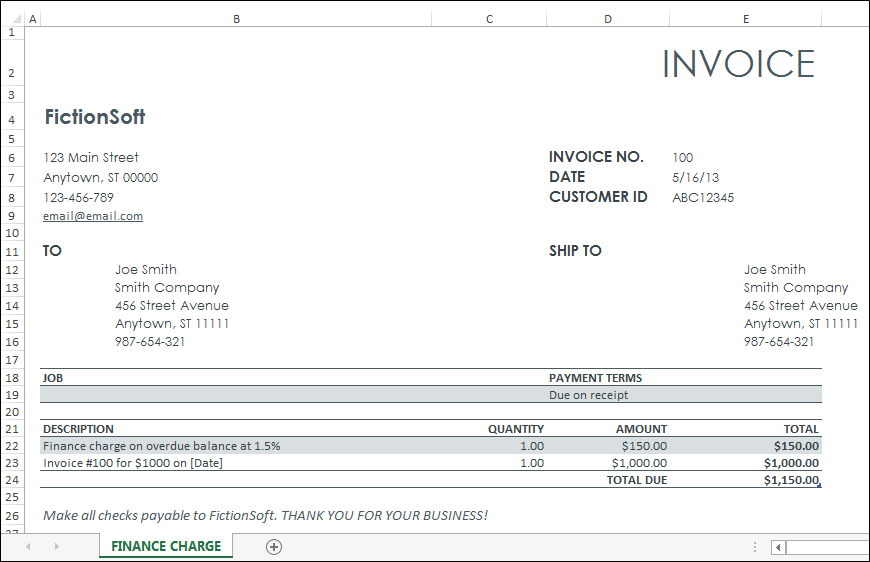
You want to import this Excel document into Lingo.
If you import it using the Top Down and Left to Right direction filter, it will look like this:
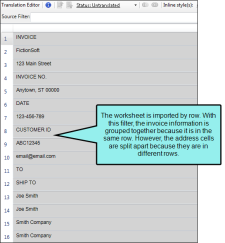
Left to Right and Top Down Select this option if you want Lingo to import cells by row (i.e., starting in Row 1 and working across the row, then moving to Row 2).
Example
You want to import this Excel document into Lingo.
If you import it using the Left to Right and Top Down direction filter, it will look like this:
Choose 2 columns as Source and Target Select this option if you want to choose the columns that Lingo should associate with the source and target segments.
- Source Column Enter the name of the column you want to import as source segments.
- Target Column Enter the name of the column that you want to use for target segments when the finished translations are exported back to Excel.
Important When you enter target translations in Lingo and export them back into Excel, the translations will overwrite any data that may already exist in that column. It is recommended that you select an empty column for translated target segments to avoid accidental data loss.
Important When you apply a filter to an Excel workbook, Lingo applies the filter to all of the sheets in the workbook. This is especially important when exporting to a specific target column because Lingo will export each worksheet's data to the specified column. To avoid accidental data loss, be sure that your target column is not being used in any of your worksheets.
Example
You have an Excel file that you use for glossary terms. You want to import this file into Lingo and translate the terms into Spanish, and then export the translations back to the original Excel so you can save them.
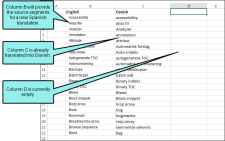
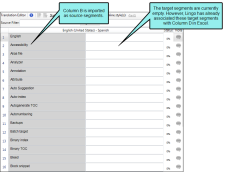
If you import the worksheet using the Choose 2 columns as Source and Target direction filter, you can select the columns you want to import as the source segments (Column B) and associate with the target translations (Column D). It will look like this in Lingo:
When you export the finished translation back to Excel, it will look like this.

- Select the check boxes for the content you want to include in the translation project:
Import sheet labels Select this option if you want to import the name of each worksheet (i.e., the tabs at the bottom of the Excel page) as its own segment.
Import header and footer Select this option if you want to include the worksheet's headers and footers as translatable segments.
Import hidden rows and columns Select this option if you want to include data in hidden rows and columns. If this option is not selected, data in hidden rows and columns will not be available for translation.
Include hidden worksheet Select this option to include hidden worksheets when importing an Excel document. If this option is not selected, hidden worksheets will not be available for translation.
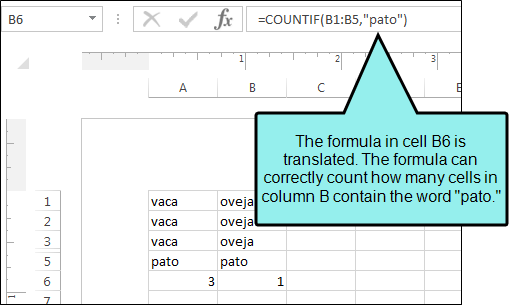
Include cells containing formulas Select this option to import cells that contain formulas.
Example
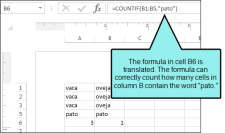
The segment below includes a formula.

Lingo imports the formula so you can translate relevant words (in this case, "duck"). This ensures that the formula will function correctly when the translation is exported back to Excel.
Note This option is not available if you are running a trial version of Lingo.
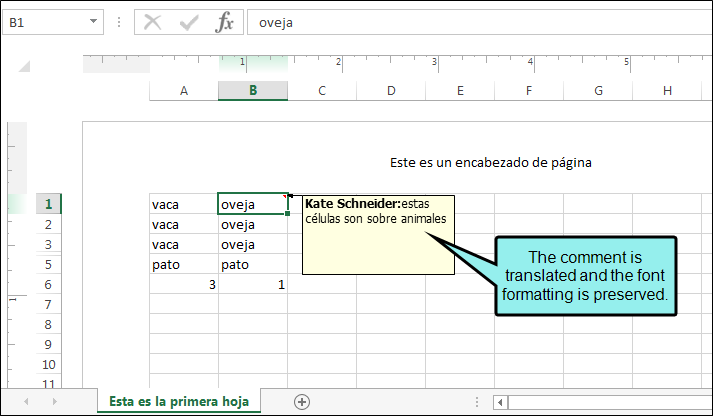
Include cell comments Select this option to import any reviewer comments as a separate segment.
Example
The segment below includes a comment.

Lingo places formatting tags on either side of the phrase that was marked as a comment in the original Excel document, so the location of the original formatting is clearly visible in the Translation Editor. When translating the comment, you can drag the yellow tags onto the target segment and apply the formatting to the appropriate phrases. Later, when you export the document, the comment will appear in the finished project with the correct formatting.

- Click OK.


Note If you import a cell that contains multiple lines of content separated by a line break (ALT+ENTER), these line breaks are not segmented in Lingo.
How to Create a Filter for Text Files
-
- From the Filter drop-down, select Create New.
- Enter a name for your filter and click OK. The File Filters dialog opens.
- (Optional) You can do one of the following before saving your current filter:
- Import a Filter Click Import. In the dialog that opens, locate the filter you want to import, then click Open.
Export a Filter Click Export. In the dialog that opens, select the location you want to export the current filter, then click Save.
- Select a Filter From the Filter drop-down, select an existing filter.
- Create a New Filter Click .
Delete a Filter Select a filter from the Filter drop-down, then click
.Note If you delete a filter, it will be removed from all translation projects where it is currently in use.
-
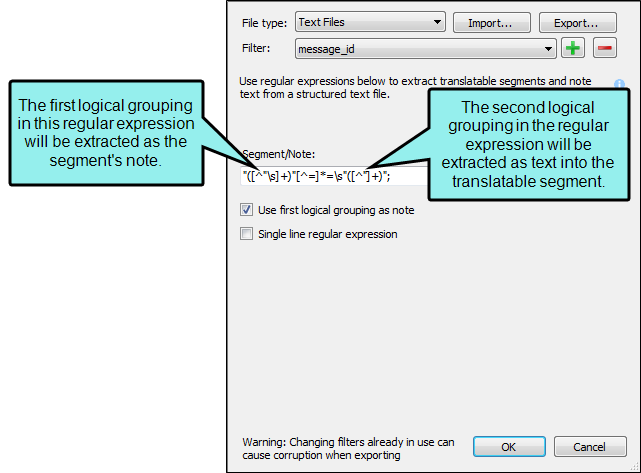
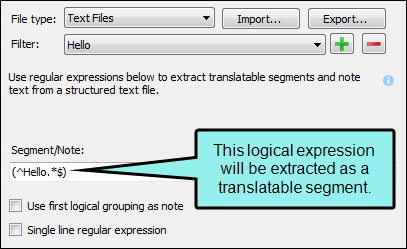
In the Segment/Note field, enter a regular expression to identify the text you want to translate. By default, the first logical grouping is extracted as translatable text. If you enter a second grouping, it is extracted as a segment note.
Important Text filters created in Lingo 9.x or older used separate fields for segments and notes. In Lingo 10 or newer, these regular expressions are combined into a single field.
If you have a text filter that was created in Lingo 9.x or older, and you edit it in Lingo 10 or newer, the segment regular expression will be preserved. However, the notes regular expression is not preserved. You will need to manually update your text filter to include this logical grouping in the Segment/Note field.
-
(Optional) If your segments need to be translated so the first logical grouping is extracted as a segment note, and the second grouping is extracted as translatable text, select Use first logical grouping as note.
-
(Optional) If you want Lingo to interpret the regular expression as a single-line regular expression, select the Single line regular expression box. This changes the behavior of the period (.) language element so that it matches every character, instead of matching every character except for the newline character \n. By default, Lingo interprets regular expressions as multi-line regular expressions.
Example
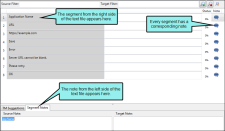
You have a text file that looks like this:
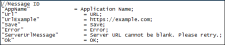
You want to include everything on the left side of the text file (between the quotation marks) as a note in your translatable file, and everything on the right side of the text file (after the equal sign) as the segment for translation.
To accomplish this, you would create a filter using regular expressions that look like this:

Because the notes are on the left side of the file, you are sure to select the Use logical grouping as note box.
When you create the project, it will look like this:
- Click OK.


Note For more information about regular expressions, see Finding and Replacing Files.
How to Create a Filter for XML Documents
-
- From the Filter drop-down, select Create New.
- Enter a name for your filter and click OK. The File Filters dialog opens.
- (Optional) You can do one of the following before saving your current filter:
- Import a Filter Click Import. In the dialog that opens, locate the filter you want to import, then click Open.
-
Export a Filter Click Export. In the dialog that opens, select the location you want to export the current filter, then click Save.
- Select a Filter From the Filter drop-down, select an existing filter.
- Create a New Filter Click .
-
Delete a Filter Select a filter from the Filter drop-down, then click
.Note If you delete a filter, it will be removed from all translation projects where it is currently in use.
-
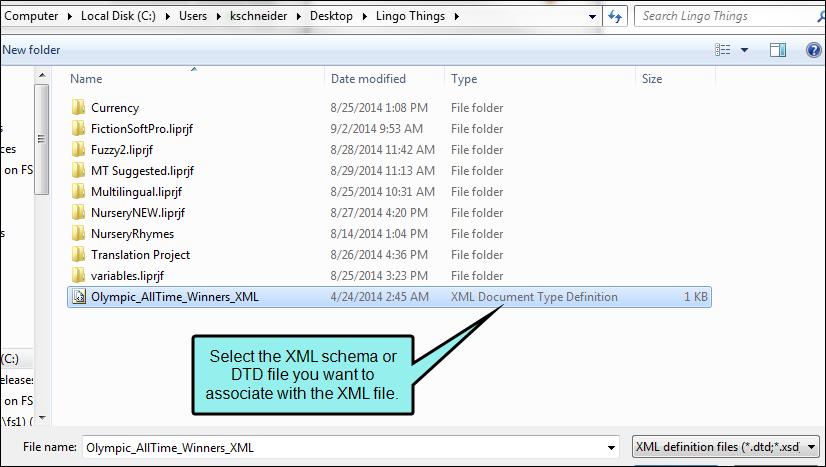
(Optional) If you want to associate a DTD or XML schema with the XML file, click
 . In the dialog that opens, locate the schema or DTD file you want to use, then click Open.
-
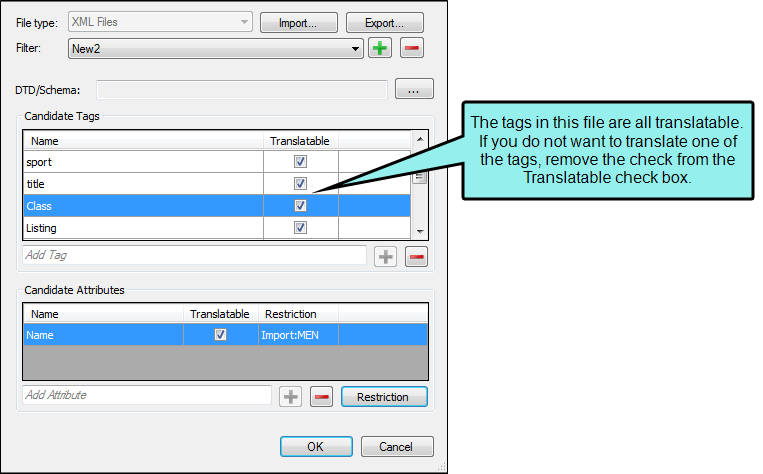
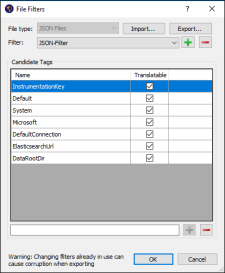
In the Candidate Tags section, select the tags from XML file that you want to translate. If a tag can be translated, it will be checked in the Translatable column. If you do not want to translate a tag, remove the check mark from this column.
Example
You might want to translate tags that are words, but tags that consist of all numbers might not be good candidates for translation. Suppose you have an XML file that includes tags named “price” and “pub_date,” which are used to display numbers only. So you create a new filter called “No Numbers” and you remove the check mark from the Translatable column for these tags.
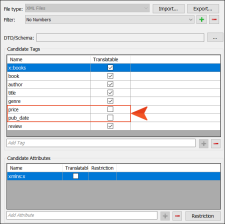
Therefore, those tags will not be included in the project.
- In the Add Tag field, enter any additional tags you want to add to the XML file. These tags do not need to be in the XML file at this time, but if you know that they may be in the file in the future, you can add them here. Enter a name for the tag, then click to add the tag. If you want to remove a tag, select it from the list, then click .
-
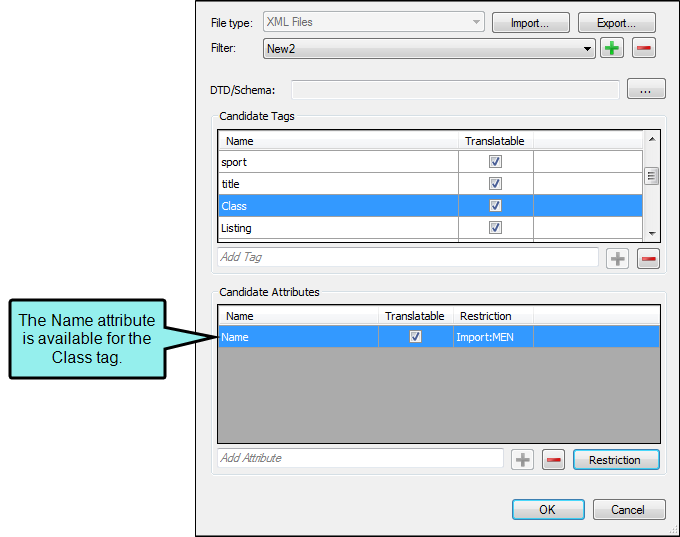
In the Candidate Attributes section, select the attributes from XML file that you want to translate.
Note If a tag does not have any attributes, nothing displays in this section. If you do not see any attributes in the Candidate Attributes section, try selecting a different tag.
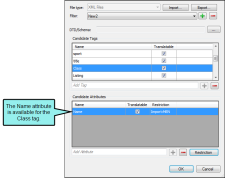
- If you want to translate an attribute, select the check box in the Translatable column. If you do not want to translate an attribute, remove the check mark from this column.
- In the Add Attribute field, enter any additional attributes you want to associate with a tag. These attributes do not need to be in the XML file at this time, but if you know that they may be in the file in the future, you can add them here. Enter the name for the attribute, then click to add the attribute. If you want to remove an attribute, select it from the list, then click .
-
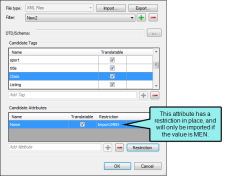
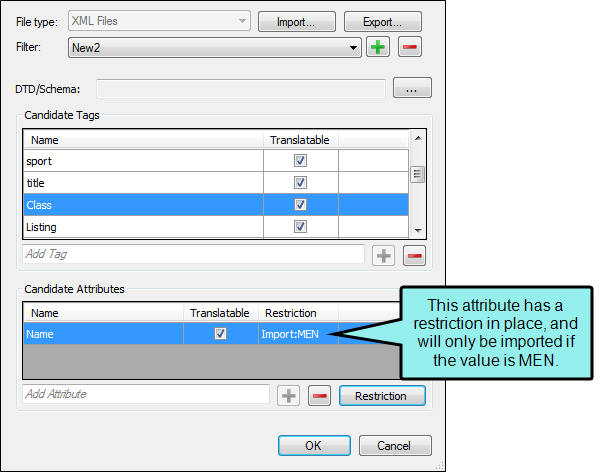
(Optional) When you are adding a filter to an XML file, you can place restrictions on the attributes in the file to tell Lingo when to include or exclude an element for translation. You can also remove restrictions if you no longer need them.
to Add a Restriction to an XML Attribute
-
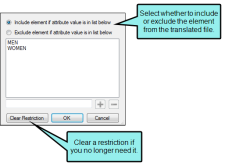
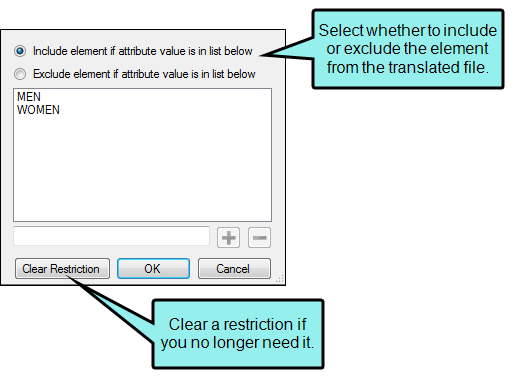
Click Restriction. The Attribute Restriction dialog opens.
-
Select the restriction you want to apply. You can include or exclude the element if the attribute value is listed.
-
In the Add Attribute Value field, enter any additional attribute values you want to add. These tags do not need to be in the XML file at this time, but if you know that they may be in the file in the future, you can add them here. Enter the name for the attribute value, then click
to add the value. If you want to remove a value, select it from the list, then click . -
Click OK. The restriction appears in the File Filters dialog.
to Remove a Restriction from an XML Attribute
- In the Candidate Attributes area of the File Filters dialog, select the attribute with a restriction.
- Click Restriction. The Attribute Restriction dialog opens.
- Click Clear Restriction.
-
- Click OK.

How to Create a Filter for JSON Files
-
- Click the Filter drop-down, and select Create New.
- Enter a name for your filter and click OK. The File Filters dialog opens.
- (Optional) You can do one of the following before saving your current filter:
- Import a Filter Click Import. In the dialog that opens, locate the filter you want to import, then click Open.
-
Export a Filter Click Export. In the dialog that opens, select the location you want to export the current filter, then click Save.
- Select a Filter From the Filter drop-down, select an existing filter.
- Create a New Filter Click .
-
Delete a Filter Select a filter from the Filter drop-down, then click
.Note If you delete a filter, it will be removed from all translation projects where it is currently in use.
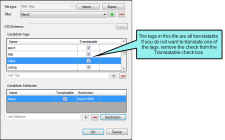
-
Select the tags from the JSON file that you want to translate. If a tag can be translated, it will be checked in the Translatable column. If you do not want to translate a tag, remove the check mark from this column.
- (Optional) Enter any additional tags you want to add to the JSON file, and click .
- (Optional) Select any tags you want to remove, and click .
- Click OK.

How to Create a Filter for Unrecognized File Types
If you add a file type that Lingo does not recognize, you will see a warning image next to the file filter drop-down. To resolve this, you can add a text file type filter to the file. This will treat the file type as a text file and allow you to translate the file.
If you do not add a file type filter to the file, it will be discarded when you create the Lingo project.
-
- From the Filter drop-down, select Create New.
- Enter a name for your filter and click OK. The File Filters dialog opens.
- (Optional) You can do one of the following before saving your current filter:
- Import a Filter Click Import. In the dialog that opens, locate the filter you want to import, then click Open.
Export a Filter Click Export. In the dialog that opens, select the location you want to export the current filter, then click Save.
- Select a Filter From the Filter drop-down, select an existing filter.
- Create a New Filter Click .
Delete a Filter Select a filter from the Filter drop-down, then click
.Note If you delete a filter, it will be removed from all translation projects where it is currently in use.
-
In the Segment/Note field, enter a regular expression to identify the text you want to translate. By default, the first logical grouping is extracted as translatable text. If you enter a second grouping, it is extracted as a segment note.
Important Text filters created in Lingo 9.x or older used separate fields for segments and notes. In Lingo 10 or newer, these regular expressions are combined into a single field.
If you have a text filter that was created in Lingo 9.x or older, and you edit it in Lingo 10 or newer, the segment regular expression will be preserved. However, the notes regular expression is not preserved. You will need to manually update your text filter to include this logical grouping in the Segment/Note field.
-
(Optional) If your segments need to be translated so the first logical grouping is extracted as a segment note, and the second grouping is extracted as translatable text, select Use first logical grouping as note.
- (Optional) If you want Lingo to interpret the regular expression as a single-line regular expression, select the Single line regular expression box. This changes the behavior of the period (.) language element so that it matches every character, instead of matching every character except for the newline character \n. By default, Lingo interprets regular expressions as multi-line regular expressions.
- Click OK.
Note For more information about regular expressions, see Finding and Replacing Files.
Example
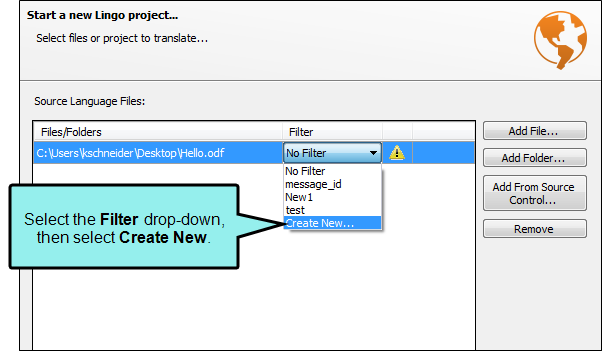
You need to translate an ODF file. However, Lingo does not recognize this file type. When you add the file to your project, you see a yellow warning icon.

To resolve this error, select the Filter drop-down and select Create New.
The File Filters dialog opens, and you can create a new text file filter using regular expressions.
When you select the new text file filter from the drop-down, the error is resolved.
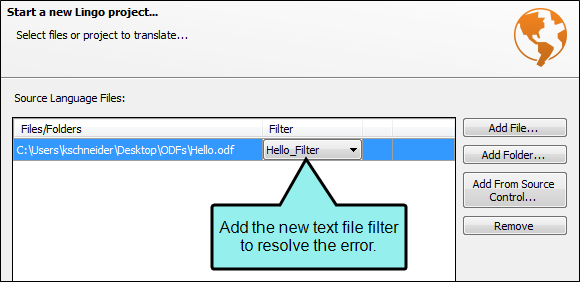
The file is imported for translation.

How to Edit and Update a File Filter
You can edit a file filter after you apply it to a project. When you update the project, the new filter settings will be applied.
- Select Tools > File Filters. The File Filters dialog opens.
- From the Filters drop-down, select the filter you want to edit.
- Edit the filter as desired.
- Click OK.
- Select File > Update Project. This will reload your project and apply the updated filter.
Warning Changing a filter that is already in use may cause corruption when exporting translations.