You can create a new Lingo translation project using the Start New Project Wizard. This wizard lets you select from many different kinds of files (e.g., MadCap Flare projects, Doc-To-Help projects, Microsoft Word documents, Adobe FrameMaker, Adobe InDesign, XML files, DITA files), as well as specify one or more target languages. You can also add entire folders to a project and then select the file types you want to translate.
[Menu Proxy — Headings — Online — Depth3 ]
How to Create a New Project
- Do one of the following, depending on the part of the user interface you are using:
Ribbon Select File > New Project.
- Keyboard Shortcut Press CTRL+SHIFT+N.
The Start New Project Wizard opens.
-
In the Name field, type an appropriate name for your project.
Example
If you have an English version of a Flare project called "FictionSoftPro," and you intend to translate the project into German, you might name your Lingo project something like "FictionSoftPro German."
Or maybe you are translating that project into many languages. Therefore, you might name the project "FictionSoftPro Translated."
- By default, a path to the Documents\My Translated Projects folder on your hard drive is entered in the Folder field. (Lingo creates the My Translated Projects folder when you install the program.) All subfolders and files related to the translated project will be placed in this folder as you work on the project.
- Click
 .
. - Navigate to the folder you want, select it, and click Select Folder.
- Click
-
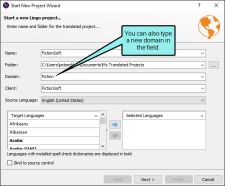
(Optional) In the Domain field, you can type a subject category for your project, or select one from the drop-down. If you enter your own custom category in the Domain field, it will appear in the drop-down the next time you create a new project. Domain metadata appears throughout the project, such as when you select a suggestion in the translation memory.
Example
If you have a project called "FictionSoftPro," and it is for a company that writes software for publishing companies, you might choose to categorize your project using the domain "Art/Literary" or "Tech/Engineering."
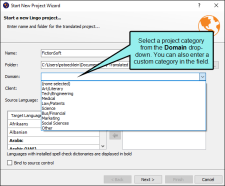
Alternatively, you could create a new domain called "Fiction" by typing Fiction in the Domain field. The next time you want to use that domain, you can select it from the drop-down.
-
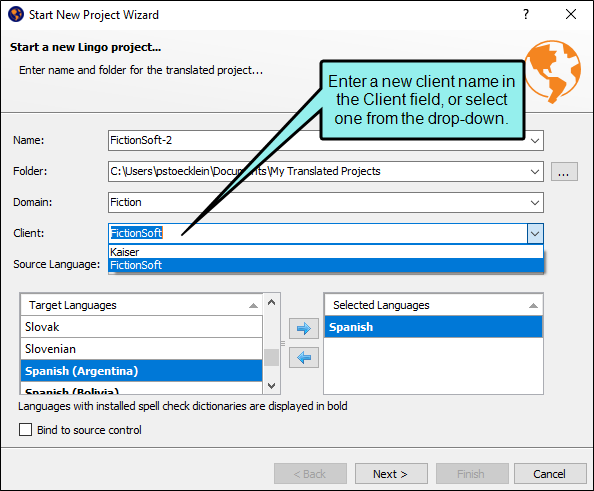
(Optional) In the Client field, you can type the name of the client you are creating a translation project for. When you enter a client name in the field, it will appear in the Client drop-down the next time you create a new project. Client metadata appears throughout the project, such as when you select a suggestion in the translation memory.
Example
If you are creating a translation project for FictionSoft, the company that makes "FictionSoftPro," enter FictionSoft in the Client field. The next time you create a translation project for FictionSoft, you can select their client name from the Client drop-down.

- In the Source Language drop-down, select the original language that is used in the project you are translating. Make sure this language matches the source exactly. For example, you might select English (en) here, but the source files are actually in the English United States (en-us) language. Therefore, you should instead select English (United States) in this field.
-
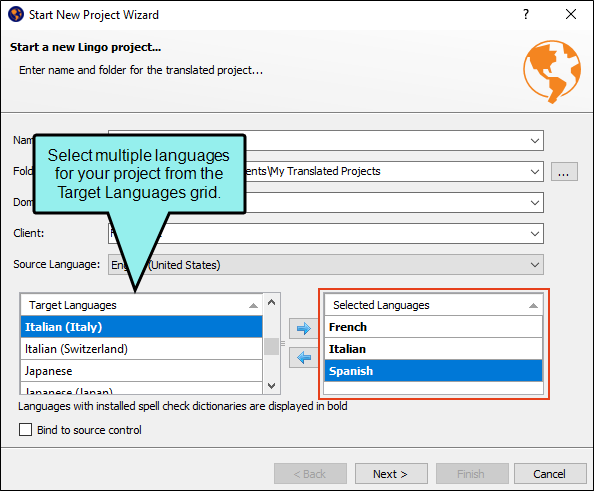
In the Target Languages grid, select the language(s) that you want to use for the translation and click
 to move it to the Selected Languages grid. If you need to remove a language from the Selected Languages grid, click
  .
. Example
If your project needs to be translated into French, Italian, and Spanish, select these three languages from the Target Languages grid, then click
.
Note Selecting a target language also affects spell checking and find and replace.
Note The languages displayed in bold are supported for spell check. This does not mean that you cannot translate in a particular language if it is not displayed in bold font in this page of the wizard. Also, you can import dictionaries for spell checking purposes. See Importing Dictionaries.
Note If you select multiple languages, you can switch between them in the Project Properties dialog and other areas in Lingo. This makes it easy for you to create projects that need to be translated into multiple languages. You can add new languages to or remove languages from a project after all exported bundles have been merged. See Multilingual Projects.
- (Optional) If you want to bind the Lingo project to a source control provider, select Bind to source control.
- Click Next.
- (Optional) If you have selected the "Bind to Source Control" option, click Bind Project. Then in the Bind Project dialog,
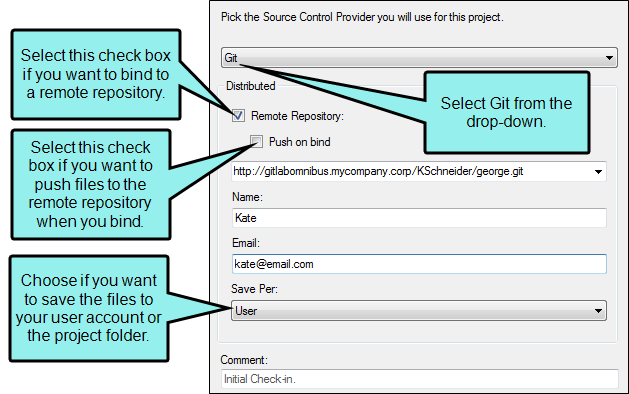
From the drop-down, select Git.
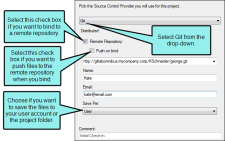
If you are going to bind to a remote repository, select Remote Repository, then enter the address of the repository in the field. If you want to work locally, you can leave this box unselected. You can enter an HTTP URL or an SSH URL.
Note You may need to obtain this information from your system administrator.
- If you want to push to the remote repository when you bind the project, select the Push on bind check box. This will push the initial project files to the repository when you bind the project.
- In the Name field, enter your name.
- In the Email field, enter your email address.
From the Save Per drop-down, select how you want to save your files.
- User Saves the files in your local folder. Select this option if you are working with other tools (e.g., Tortoise) or if you want to use the same user identity across multiple projects.
- Project Saves the files locally to your project. Select this option if you want to use different identities for each project.
- (Optional) In the Comment field, you can enter any internal comments.
- In the Bind Project dialog, click OK.
- (Optional) If you entered an HTTP address, enter your user name and password in the Log In dialog. Click OK when you are finished.
(Optional) If you entered an SSH URL, the Certificate Specification dialog opens. In the dialog, do the following and click OK when you are finished:
- In the Public key field, enter your public SSH key, or use to browse for the key on your network.
- In the Private key field, enter your private SSH key, or use to browse for the key on your network.
If you want Lingo to remember your key information so you do not need to enter it again later, select the check box next to Save certificate information.
Note SSH keys allow you to establish a secure connection between your computer and your Git source control provider (likewise, using an SSH URL is more secure than an HTTP URL; you need to use SSH keys if you want to use an SSH URL). If you do not have a public and private SSH key, your can generate these keys using your Git source control provider (e.g., Gitlab). Follow the directions provided by your source control provider to add these keys to your Git account. Once you generate these keys, they are typically found in the C:\Users\[username]\.ssh folder on your computer.
Public keys typically have a .pub extension. Private keys use the same file name as the public key, but without the file extension.
- In the Public key field, enter your public SSH key, or use
If Using Team Foundation Server
- From the drop-down, select Microsoft Team Foundation Server.
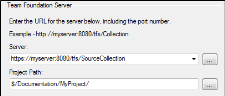
In the Server field, enter the name of the computer or the IP address of the server. You can also click
to select a "Team Project Collection." If you click this button, the Select Team Foundation Server Project Collection dialog opens, and you can do the following.- To add a server, click
 .
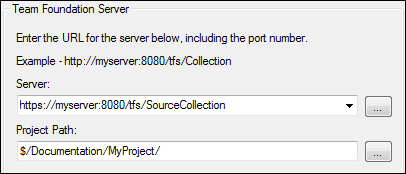
. - Enter the name or URL of the server.
- Enter the path and port number.
Select the protocol (HTTP or HTTPS).
Note If you are binding a Visual Studio Team Services repository to TFS, in the Server field, enter the URL of the project's "Default Collection."
Note You may need to obtain this information from your system administrator. Click OK in the dialogs until you return to the main wizard page.
Note Be sure to specify the path deeper than the server name. For example:
Copy.../tfs/DefaultCollectionor
Copy.../tfs/SourceCollectionIf you do not know this information, contact your system administrator.
Note If you run into issues in this dialog, chances are your user permissions do not have access to all of the collections on the TFS server or Visual Studio Team Services. Please try to enter in the server/collection path manually.
- To add a server, click
- Next to the Project Path field, click .
- Click on the Team Foundation Server folder to which you want to bind the Lingo project.
- Click OK.
- (Optional) In the Comment field, you can enter any internal comments.
- (Optional) If you want the files in the project to be checked out when you are finished, click Keep files checked out.
- In the Bind Project dialog, click OK.
- From the drop-down, select Subversion.
- In the Server field, enter the IP address.
- Next to the Project Path field, click .
- Click on the Subversion folder to which you want to bind the Lingo project.
- Click OK.
- (Optional) In the Comment field, you can enter any internal comments.
- In the Bind Project dialog, click OK.
- If the Log In dialog opens, complete the User name and Password fields and click OK. Copies of the Lingo files are created and added to the folder you specified.
If Using Perforce Helix Core
- From the drop-down, select Perforce Helix Core.
- In the Server field, enter the server address.
- Next to the User field, click .
- Select a user and click OK. (Users are set up separately in Perforce Helix Core.)
From the Type drop-down, select whether you want to bind to a stream or a depot. A depot contains multiple streams.
If You are Binding to a Stream
Next to the Stream field, click New.
If the Log In dialog opens, complete the User name and Password fields and click OK.
- From the Stream Type drop-down, select the type of stream you want to use. Most streams are mainline streams.
Next to the Streams Depot field, click Browse.
- Select a depot. This is essentially a folder or directory in Perforce Helix Core that contains multiple streams, one of which will be your Lingo files.
- Click OK.
- (Optional) In the New Stream dialog, you can complete any of the other fields as necessary. For information about these fields, please refer to the documentation provided with Perforce Helix Core.
- Click OK.
If You are Binding to a Depot
Next to the Depot field, click New, or select an existing depot using the drop-down arrow.
If you clicked New, the New Depot dialog opens.
- In the Name field, enter a name for the depot.
- (Optional) In the Description field, enter a description for the depot.
- Click OK.
Next to the Path field, click
.If the Log In dialog opens, complete the User name and Password fields and click OK.
- Select the location where you want to bind the project.
- Click OK.
- (Optional) In the Comment field, you can enter any internal comments.
- (Optional) If you want the files in the project to be checked out when you are finished, click Keep files checked out.
- In the Bind Project dialog, click OK.
Note If you have elected to bind the project to source control but do not complete the source control fields, the Finish button in the wizard is disabled.
-
To Add Files to a Lingo Project
-
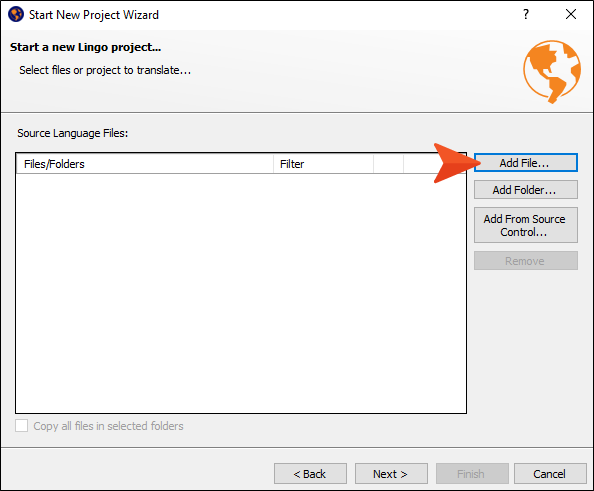
Click Add File.

-
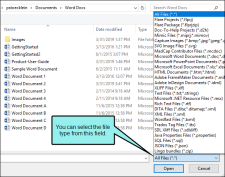
In the dialog that opens, navigate to the project or files that you want to translate. You may need to click the file type drop-down to view and select the appropriate kind of files you want to add.
-
If you need to select only one file, you can double-click it. If you need to select multiple files (e.g., multiple Word documents) in the same folder, you can hold your SHIFT or CTRL key and select either a range or individual files; then click Open.
The various types of files that you can open to translate include:
- MadCap Flare
- MadCap Mimic
- Madcap Capture
- Madcap Contributor
- Flare bundles (FLPRJZIP files)
- Lingo bundles (ZIP files)
- Doc-To-Help
- Adobe FrameMaker
- Adobe InDesign
- DITA
- HTM
- HTML
- JSON
- Microsoft .NET Resource files
- Microsoft Word
- Microsoft PowerPoint
- Properties files (.properties)
- Rich Text files
- SDL Trados
- SQL
- SVG
- TXT
- Wordfast
- XLIFF 1.2
- XML
Note Individual image files can be selected and translated in their own Lingo projects. However, if the images are included in Flare projects, you can translate the callout text for those images at the same time that you are translating the other parts of the Flare project.
Note You must have Adobe FrameMaker installed in order to work with FM and BOOK files. However, if you are adding MIF files, you do not need FrameMaker installed. FrameMaker 8 and above are supported.
-
(Optional) If you want to add more files from another location, you can repeat the previous steps. Keep in mind that if you select Flare, Mimic, or Doc-To-Help project type files, you cannot also add other types of files (e.g. Word documents). However, if you have not selected MadCap or Doc-To-Help project files, you can add any other types of files to the same Lingo project (e.g., you can add Word, FrameMaker, and PowerPoint documents to the same project).
Note You can also add files to your project later using the Add Files to Project button.
- (Optional) If you need to remove a file from the project, click Remove.
-
(Optional) If you want to filter the translated files, you can create a file type filter. Use the Filter drop-down to select an existing filter, or select Create New to create a new one. You can add file type filters to Word, Excel, text, XML, and JSON files. You can also add filters to unsupported file types using a text file type filter.
Important Creating file type filters is recommended for advanced Lingo users. This feature requires an understanding of advanced topics such as regular expressions, XML, and segmentation rules.
Additionally, it is recommended that you are familiar with the file(s) you are importing prior to adding a filter. Some file type filters require you to select the specific content that you want to import (e.g., sheet labels, headers and footers, comments).
Note If you wish to create a new file filter in an open project, select Tools > File Filters. In the File Filters dialog, select the File type from the drop-down list. Then, follow the remaining steps for that file type to create the filter.
To Add Folders to a Lingo Project
-
In the Start New Project Wizard, click Add Folder.

Note If you want to translate an entire Flare, Mimic, or Doc-To-Help project, you must select the project file using the Add File button, rather than selecting the folder where the project is located.
Note If you want to translate a Doc-To-Help project, you must import the entire .d2h project file.
The .d2h project file is required for XML and Word files in a Doc-To-Help project to be imported correctly. Because of this, importing individual XML files from a project is not supported, and importing individual Word files from a project is not recommended.
-
In the dialog that opens, navigate to the folder that contains the files that you want to translate and click Select Folder.
- (Optional) If you need to remove a folder from the project, click Remove.
-
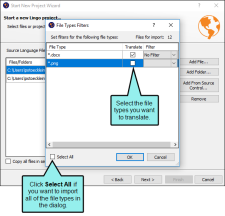
(Optional) If you want to create file type filters for the files within the folder, from the Filter drop-down, select Customize Folder. The File Types Filters dialog opens. In the dialog, do the following:
-
(Optional) If you only want to translate specific file types in the folder, in the Translate column, select the file types you want to import. You can click the Select All check box to add all the file types at once.
Note You cannot select a filter for file types that cannot be translated, such as image files.
-
(Optional) If you want to filter the translated files, you can create a file type filter. Use the Filter drop-down to select an existing filter, or select Create New to create a new one. You can add file type filters to Word, Excel, text, XML, and JSON files. You can also add filters to unsupported file types using a text file type filter.
Note Applying a text file type filter to unsupported file types lets you translate the files as if they were text files. If you have unsupported file types in your folder and you do not apply a text file type filter to these files, they will be discarded upon project creation.
-
Click OK.
For more information about creating file type filters, see To Add Files to a Lingo Project.
-
-
(Optional) If you want to copy all files in the folders you added, in the Start New Project Wizard, select Copy all files in selected folders.
To Add Files or Folders to a Lingo Project From Source Control
-
In the Start New Project Wizard, click Add From Source Control.
-
On the next page of the wizard,
-
- Click Next.
-
(Optional) If you are creating a project using MadCap Flare or DITA source files, select additional project settings.
MadCap Flare Project Settings
Select the following optional Flare project settings.
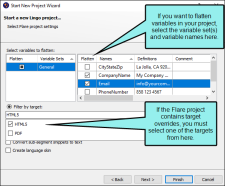
Flatten Variables
Replacing variables with their definitions is referred to as "flattening." You can flatten variables from a specific variable set, and you can select certain variables in a set. This gives the translator greater flexibility when translating, because some variables (like a company name) may never need to be translated, but others may always need to be translated.
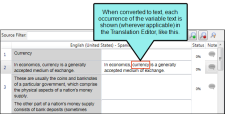
Flattened variables appear as normal text in the Translation Editor, while unflattened variables appear as tags. Translators can move these tags to their correct location in the target segment.
See Content Flattening.
- In the Select variables to flatten area, select the variable set you want to flatten from the left side of the grid. The variables in that variable set appear on the right side of the grid. By default, all of the variables in the set are selected.
-
(Optional) If you only want to flatten some of the variables in a set, on the right side of the grid, remove the check marks next to the variables you do not want to flatten.
Note If you want to flatten variable definitions for a specific target, you can optionally filter by target by selecting a target from the Filter by target drop-down. You can then translate the target-specific variables in the target file in your Lingo project.
- (Optional) Repeat steps
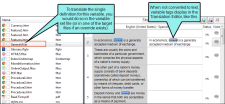
You might use this feature if a variable definition has different meanings in the translation language, depending on the context (e.g., "cash" versus "currency" in German). If you do not flatten variables, you can only translate the variable with a single term, and it will be used everywhere in the project that the variable is inserted. On the other hand, if you do flatten variables, you will then be able to translate each term separately when it appears in the Translation Editor.
Example
If you do not flatten variables, you will see something like this.
If you do flatten variables, you will see something like this.
If the Flare author created a target override for a variable (i.e., one Flare target will use a particular variable definition while another target will use a different one), you can create a target filter in addition to flattening variables. This lets you filter the entire Lingo project to the target whose variable definition you want to use when flattening the variables. You can then translate the target-specific definition in the target file in Lingo.
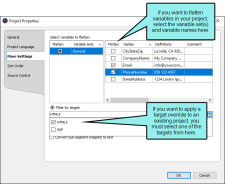
You can flatten variables and apply target overrides to both new and existing projects.
To add them to a new project, apply the settings in the Start New Project Wizard.
To add them to an existing project, select File > Project Properties, then apply the new settings from the Flare Settings tab.
Filter by a Target
You can filter your Flare projects by one or more targets. The resulting project will include all of the translatable files that are part of the selected target(s), such as topics, images, skins, and variables.
A good reason to use target filters is if you need to maintain different translations for different targets. Additionally, you could filter to a specific target and use variable flattening
- Select Filter by target.
-
From the drop-down, select the target(s) whose files you want to include in the Lingo project. After clicking the appropriate check boxes, click elsewhere on the page to close the drop-down.
Any files that are not part of the selected target(s) will not be shown in the File List.
Note If you want to replace variable definitions for a specific target, you can optionally select variables from the Select variables to flatten grid. You can then translate the target-specific variables in the target file in your Lingo project.
Filter Out Conditions
You can filter Flare projects to exclude one or more conditions. You can also select conditions based on the entire condition set, or you can pick the specific conditions in the set that you want to filter by. The resulting Lingo project will include all of the translatable files that are not marked with the selected conditions. Additionally, because Lingo supports block-level, inline, glossary, snippet, and CSS conditions, content within a file or segment that is marked with an excluded condition tag will also be excluded from a filtered Lingo project.
- Select Filter out condition.
- Click Select conditions. The Select Conditions dialog opens.
- From the left side of the grid, select the condition set you want to exclude . The tags in that condition set appear on the right side of the grid. By default, all of the tags in the set are selected.
- (Optional) If you only want to exclude some of the tags in a condition set, on the right side of the grid, deselect the boxes next to the condition tags you do not want to exclude from the project.
- Click OK.
Flatten Snippets
You can flatten
Flattened
- To flatten snippets, at the bottom of the dialog, select the check box next to Convert sub-segment snippets to text.
Note You can only flatten inline
Create Language Skin
If you will be creating Flare output in multiple languages, you can create a language skin. Language skins are used in Flare to display the interface in a specific language.
- To create a language skin, at the bottom of the dialog, select the check box next to Create language skin.
Note You will not see the option to create a new language skin if a language skin already exists in your source file.
Note You cannot filter a Flare project by both target and conditions. If you select one filter, the other will be disabled.
DITA Project Settings
Select the following optional filtering and translation settings for your DITA project.
Filter by Conditional Attributes
You can filter DITA files to include one or more conditional attributes. The resulting Lingo project will include all of the translatable files that are marked with the selected attributes (while excluding those that are not selected). Additionally, because Lingo supports block-level and inline attributes, content within a segment that is marked with an excluded attribute will also be excluded from a filtered Lingo project.
-
In the Select conditional attributes to include section, use the drop-downs to select the attributes you want to include in your DITA project.
- Props Filter to include the selected property attribute.
- Platform Filter to include the selected platform attribute.
- Product Filter to include the selected product attribute.
- Audience Filter to include the selected audience attribute.
- Other props Filter to include any other defined otherprops attribute.
Note If you select All in any of the drop-downs, Lingo will include all available values for that attribute. In other words, values are excluded from that attribute.
Flatten Content References
You can flatten
Flattened
- To flatten all conrefs, at the bottom of the dialog, select the check box next to Flatten conref nodes to plain text.
Note You can only flatten inline
Note For more detailed information about DITA, please refer to www.oasis-open.org/committees/dita/.
- Click Next.
-
(Optional) Available translation memory (TM) databases are listed in a grid, and you can select the ones you want to use for the current project
Add/Remove TM Databases in Grid
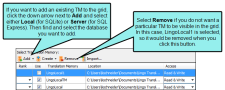
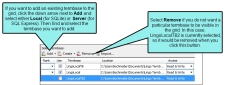
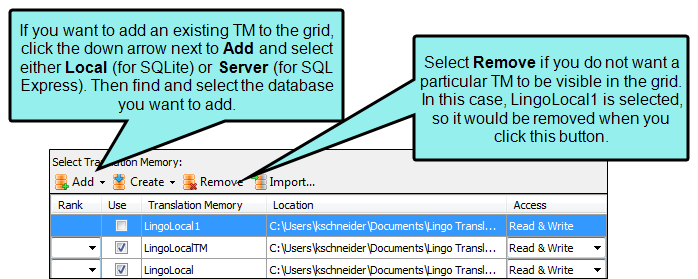
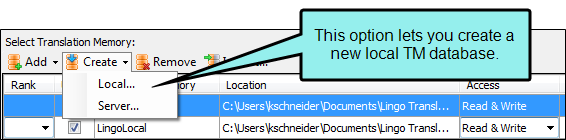
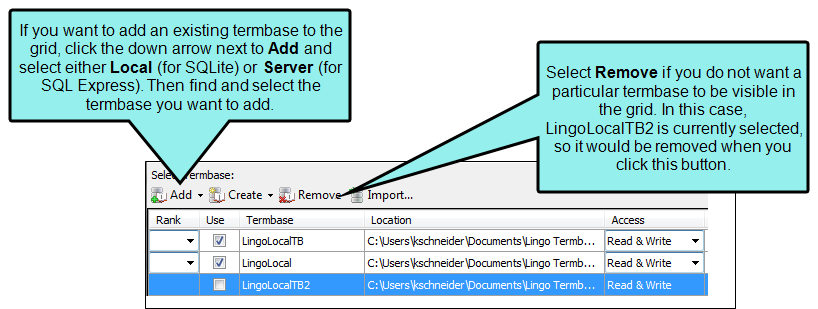
If you have additional TM databases that are not shown in the grid, you can add them. Click Add and from the drop-down select one of the following:
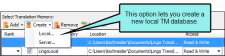
- Local Select this option if you want to use SQLite for a local TM database. This option opens a simple dialog that lets you give the new database a name and choose where to store it. By default, the location for SQLite databases is in Documents\Lingo Translation Memories on your computer. However, you can choose a different location if you like.
-
Server Select this option if you want to use SQL Server Express for a TM database to be stored on a server. This opens a dialog with fields for the name, server, and security information related to the database.
Note If you do not already have SQL Server Express installed and you try to install a server
To download and install the latest version of SQL Server Express, go to:
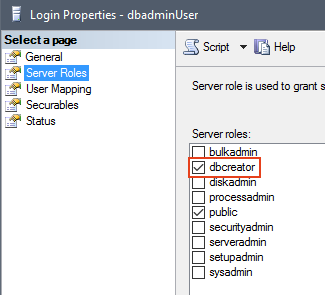
Note In order to create a server translation memory or termbase, you must have both db_datareader and db_datawriter roles , or you must have the dbcreator role. This is set in your SQL management tool.
In the following user mapping image, the user has both db_datareader and db_datawriter selected:
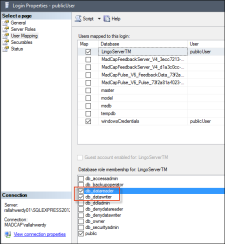
In the following server role image, the user has dbcreator selected:

In addition, you can remove TM databases from the grid if you do not want to see them. This does not delete the databases altogether; it simply removes them from the interface. To remove a TM database, select the row in the grid and click Remove.
Example The following shows how you might add or remove TM databases:
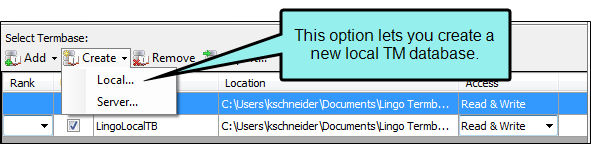
Create New TM Databases
You can also create new TM databases. This is different from the option to add databases. Adding a database simply makes sure a TM that already exists is shown in the grid so you can select it.
Example You are creating a new Lingo project and you already have one local TM database that you plan to use.

However, you want to create an additional local database to use in the project. So you select Create and select Local.
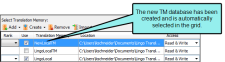
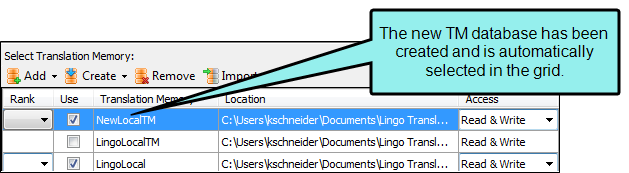
The New Local Translation Memory Database dialog opens. You give the database a name and keep the default location where it will be stored.
When you are finished, the new database is shown in the grid and the Use check box is automatically selected.
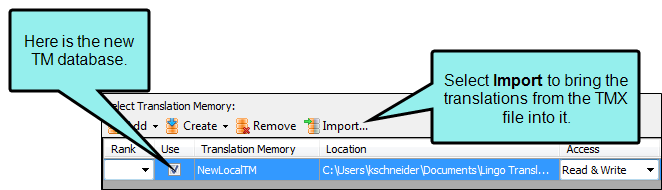
Import TMX Files
If you already have a Translation Memory eXchange (TMX) file containing translations, you can import it into any of the TM databases shown in the grid. To do this, select the database in the grid, then click Import. Complete the fields in the dialog and click Start Import.
Example You are creating a new project and you have created a new TM database. The new database is obviously empty. However, you have a TMX file with lots of translations, and you want the new database to have these translations. So with the database selected in the grid, you click Import.
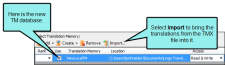
Finally, you would use the dialog that opens to find and select the TMX file to import.
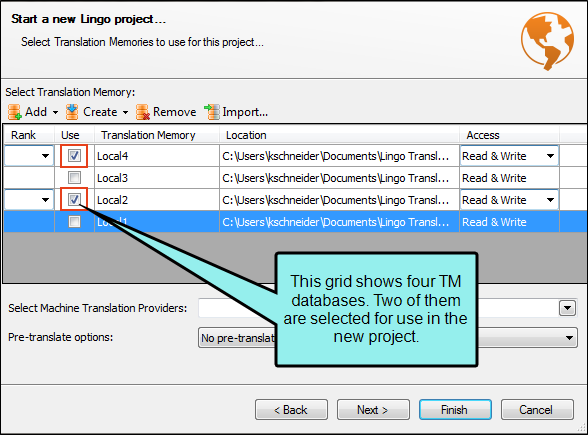
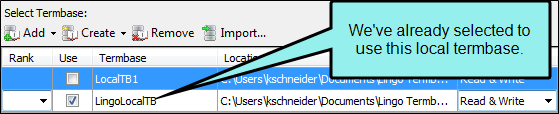
Choose TM Database(s) for the Project
You might have several TM databases shown in this grid, but they will not be associated with the project until you click Use next to them. After you do this, those databases will be associated with the project, allowing you to use matching translation suggestions from them.
Example
Here is an example where two TM databases are selected for use in a new project:

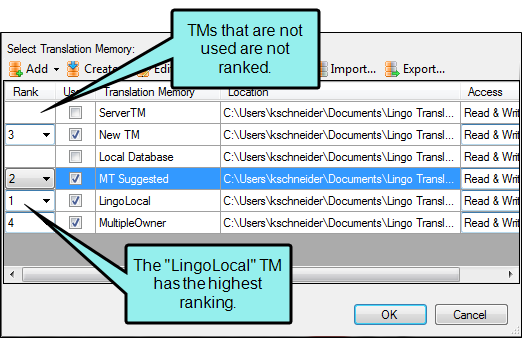
Rank Translation Memory Databases
See Ranking Translation Memories.

Note You can only rank enabled TMs. The Rank drop-down is disabled if a TM is not selected for the project.
Note You can change TM rankings any time after the project is created from the Manage Translation Memory dialog (Resources > Choose TM).
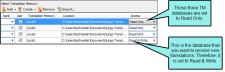
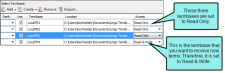
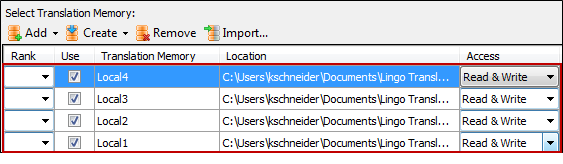
Specify Access
In the grid listing TM databases, there is a drop-down field to specify the access rights for each database. There are options for Read & Write, as well as for Read Only. By default all databases are set to Read & Write, which means they can be altered once they are loaded into the Lingo project. However, you can change any of the databases to Read Only access if you want.
Example You are connecting your new Lingo project to four different TM databases, like this:
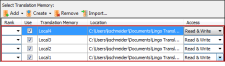
You want to receive translation suggestions from all of the databases. However, when you confirm new translations and upload them to TM, let's say you only want to upload them to the database called "Local1." Therefore, even though the Lingo project will be connected to all four databases, three of them should be set as Read Only, and Local1 should be set to Read & Write.
Note You can only specify access rights for enabled TMs. The Access drop-down is disabled if a TM is not selected for the project.
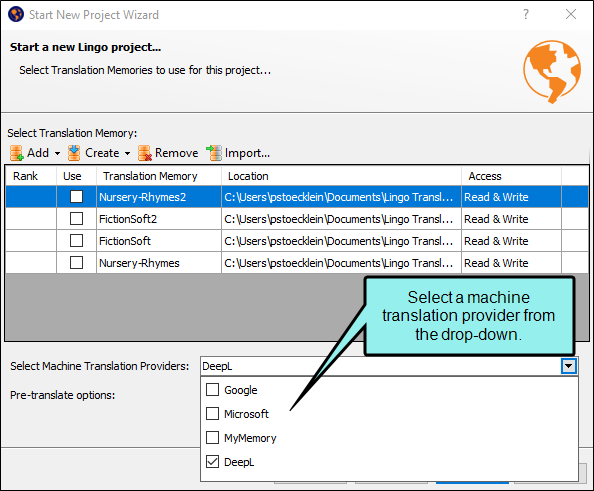
Select Machine Translation Providers
If you want to apply translation suggestions from a machine translation (MT) provider, you can select the provider(s) you want to use when you are setting up your Lingo project.
From the Select Machine Translation Providers drop-down, select the check box(es) for the provider(s) you want to use to machine translate your project. If you need to enter machine translation credentials for these providers, you can add that information after you create the project, in the Options dialog or by selecting Resources > Choose MT. See Translating Projects with Machine Translation.

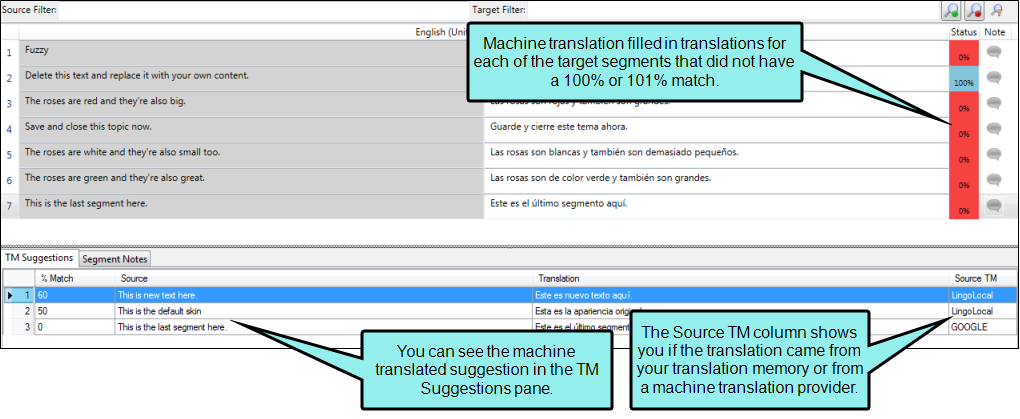
Pre-Translate Files
You can automatically apply matching translations from a TM database, and if there are spots where you do not have matches, you can choose to have Lingo fill in those segments with matches from a machine translation provider. After the project is created, you can review those segments in the Translation Editor and confirm them if you don't want to make any further changes to them.

From the Pre-translate options drop-down, select the option to use for pre-translation:
- No pre-translation Do not pre-translate the project
- Pre-translate with TM Apply matches from the translation memory to segments in the project
- Pre-translate with TM then MT Apply matches from the translation memory to segments in the project, then apply machine translation to any segments that are not translated
Example
Let’s say you have performed a great deal of translation work for a particular client. Once in a while, the source files from that client contain identical segments to those you have already translated in previous projects, and you have uploaded those translations to TM. One day, this client sends you some source files for a new translation project, and these source files include 73 segments that you have already translated for them in the past. During the process of creating the new Lingo project, you select the TM database containing those translations and you click Pre-translate. When Lingo finishes creating the new project, it automatically applies matching translations to all 73 of those segments.
Example
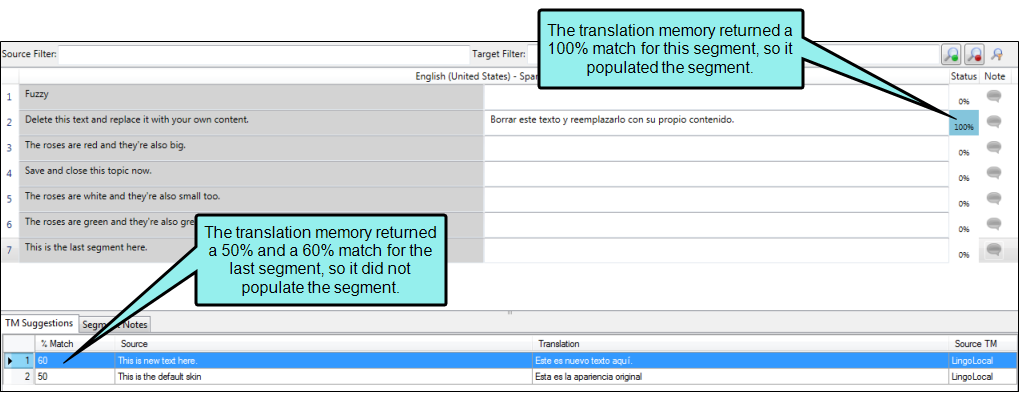
Let’s say you are translating a project using a TM that has been passed along to you from a former colleague. It was assembled using translations from lots of other projects, and you're not sure exactly how accurate it will be, but you want to make a first pass through your project to see what matches there are.
You build a new project and add the TM, then tell Lingo to pre-translate the project using matches from the TM only. When it finishes, you have a few solid matches and a lot of fuzzy matches. However, you also have quite a few empty segments.
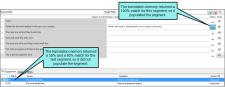
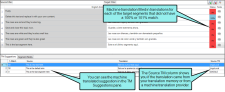
You decide to rebuild the project and add an MT provider as a backup for the pre-translation option, because you know it will fill in the gaps where you are missing translations. You also know it will provide machine translated suggestions in the TM Suggestions area for all your segments, so you can refer to these when updating your fuzzy translations later.
When the new project finishes, you have translations for most of your segments. Now you can review the MT suggestions and make any necessary adjustments, and then add new translations where needed. When you're done, you can add all the completed translations to the existing TM so you'll have a better database to work with in the future.
Note Lingo will use your existing fuzzy match settings to fill in matches using the TM. In the Options dialog (File > Options or Tools > Options), you can change the percentage for fuzzy matches to be filled in.
Note In the Options dialog, you can select a check box labeled "Accept Exact Matches upon applying TM." This option automatically confirms matching segments that are applied at the project or file level.
Note If you apply TM to a project with multiple TM databases selected, Lingo applies matching translations from the highest-ranked database. If no databases are ranked, Lingo applies matching translations from the first database selected.
Note If you apply TM and a segment has multiple exact or context matches, Lingo applies the match from the highest-ranked TM database. If no databases are ranked or there are multiple matches in the same database, Lingo applies the first match it finds in the TM database.
- Click Next.
-
(Optional) Available termbases are listed in a grid, and you can select the ones you want to use for the current project
Add/Remove Termbases in Grid
If you have additional termbases that are not shown in the grid, you can add them. Click Add and from the drop-down select one of the following:
- Local Select this option if you want to use SQLite for a local termbase. This option opens a simple dialog that lets you give the new database a name and choose where to store it. By default, the location for SQLite databases is in Documents\Lingo Termbases on your computer. However, you can choose a different location if you like.
-
Server Select this option if you want to use SQL Server Express for a termbase to be stored on a server. This opens a dialog with fields for the name, server, and security information related to the database.
Note If you do not already have SQL Server Express installed and you try to install a server
To download and install the latest version of SQL Server Express, go to:
Note In order to create a server translation memory or termbase, you must have both db_datareader and db_datawriter roles , or you must have the dbcreator role. This is set in your SQL management tool.
In the following user mapping image, the user has both db_datareader and db_datawriter selected:
In the following server role image, the user has dbcreator selected:
In addition, you can remove termbases from the grid if you do not want to see them. This does not delete the termbase altogether; it simply removes them from the interface. To remove a termbase, select the row in the grid and click Remove.
Example
The following shows how you might add or remove termbases:
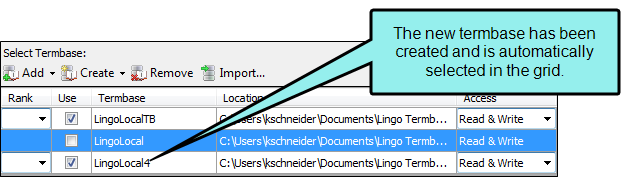
Create New Termbases
You can also create new termbases. This is different from the option to add termbases. Adding a termbase simply makes sure a termbase that already exists is shown in the grid so you can select it. On the other hand, creating a termbase builds a brand new termbase, adds it to the grid, and automatically selects the Use check box so that it will be associated with the project. To create a new termbase, click Create and select Local or Server, depending on whether you want to create a SQLite or SQL Express termbase, respectively. Then complete the fields in the appropriate dialog.
Example
Let's say you are creating a new Lingo project and you already have one local termbase that you plan to use.
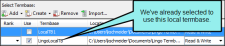
However, you want to create an additional local termbase to use in the project. So you select Create and select Local.

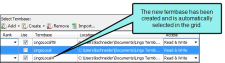
The New Local Termbase dialog opens. You give the termbase a name and keep the default location where it will be stored.
When you are finished, the new termbase is shown in the grid and the Use check box is automatically selected.
Import Termbase Files
If you already have a termbase file containing definitions and terms, you can import it into any of the termbases shown in the grid. To do this, select the termbase in the grid, then click Import. Complete the fields in the dialog and click Start Import. You can import Termbase eXchange (TBX), comma-separated value (CSV), and Microsoft Excel (XLS and XLSX) files.
Example
Let's say you are creating a new project and you have created a new termbase. The new termbase is obviously empty. However, you have a TBX file with lots of definitions, and you want the new termbase to have these definitions. So with the termbase selected in the grid, you click Import.
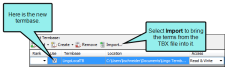
Finally, you would use the dialog that opens to find and select the TBX file to import.
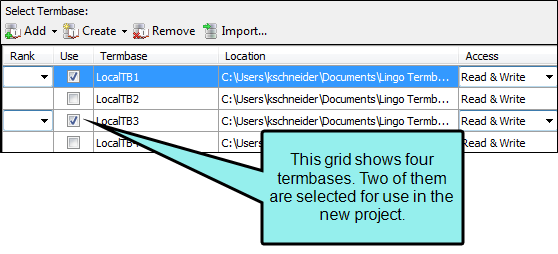
Choose Termbase(s) for the Project
You might have several termbases shown in this grid, but they will not be associated with the project until you click Use next to them. After you do this, those termbases will be associated with the project, allowing you to insert matching definitions from them.
Example
Here is an example where two termbases are selected for use in a new project:

Rank Termbases
If you want to apply a rank to your termbases, you can do that when you are setting up your Lingo project. Higher-ranked termbases will take priority in termbase suggestions.
After you have selected the termbases you want to use, select a rank for each enabled termbase. From the Rank drop-down, select a numeric value for each enabled termbase, where 1 is the preferred termbase. You do not have to select a value; unranked termbases will take lowest priority.
See Ranking Termbases.

Note You can only rank enabled termbases. The Rank drop-down is disabled if a termbase is not selected for the project.
Note You can change the rankings any time after the project is created from the Manage Termbase dialog (Resources > Choose Termbase).
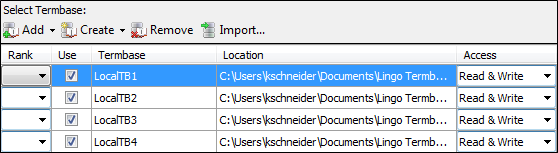
Specify Access
In the grid listing termbases, there is a drop-down field to specify the access rights for each database. There are options for Read & Write, as well as for Read Only. By default all termbases are set to Read & Write, which means they can be altered once they are loaded into the Lingo project. However, you can change any of the termbases to Read Only access if you want. In order to switch to Read Only access, the Use check box must first be selected for that termbase.
Example
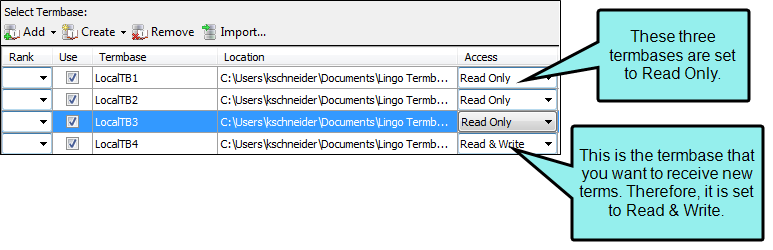
Let's say you are connecting your new Lingo project to four different termbases, like this:
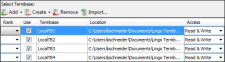
You want to see terms and definitions from all of the termbases. However, when you add new terms to the termbase, let's say you only want to upload them to the termbase called "LocalTB4." Therefore, even though the Lingo project will be connected to all four termbases, three of them should be set as Read Only, and LocalTB4 should be set to Read & Write.
- Click Finish.


When you create a new Lingo project, a file with an .liprj extension is automatically generated (e.g., My Project Italian.liprj). This is the main file for the project and is stored at the root level of the project folder in Windows (e.g., Documents\My Translated Projects\My Project Italian\My Project Italian.liprj). You can open the project by double-clicking this file.
Note If a content developer gives you an updated version of the source project or files after you have already created your Lingo project, you can easily update the project. This incorporates the latest changes from the author. See Updating Projects.
What’s Next?
After creating a new project, you can open files and begin performing translation work. See Viewing Files Requiring Translation and Translating Files.