Lingo's Translation Editor lets you work in Translation (or grid) mode, with the source content in one column and the target language in the next column. For some types of files—such as Flare topics, snippets, and template pages; Microsoft Excel, PowerPoint, and Word documents; DITA files; HTML files; and XML files—you can also switch to Live Preview mode, which lets you view content in its intended context. A suggestions area at the bottom of the Translation Editor lets you quickly select and insert matching translations from your
[Menu Proxy — Headings — Online — Depth3 ]
Types of Content
In Lingo you can translate many types of files in the Translation Editor, including the following:
- Adobe FrameMaker files (FM, MIF, and BOOK)
- Adobe InDesign files (IDML)
- DITA files (DITA, DITAMAP, XML)
- Doc-To-Help projects (D2H)
- HTM and HTML documents
- JSON files
-
MadCap Capture image files (BMP, GIF, JPG, JPEG, PNG, TIF, TIFF)
Note PDF image files cannot be translated.
- MadCap Contributor files (MCDOC)
- MadCap Flare package files (FLPRJZIP)
- MadCap Flare projects (FLPRJ)
- MadCap Lingo bundles (ZIP)
- MadCap Mimic movies and collections (MIMOV, MIPRJ)
- Microsoft .NET Resource files (RESX)
- Microsoft Excel documents (XLS, XLSX)
- Microsoft PowerPoint documents (PPT, PPTX)
- Microsoft Word documents (DOC, DOCX)
-
Properties files (.properties)
Note When translating .properties files, only the value is translatable. The entire value pair is added to the segment as a segment note for your reference.

- Rich text files (RTF)
- SDL Trados newer files (SDLXLIFF)
-
Warning When a TTX file is generated using Trados Workbench, there are no tags that surround the specific segment. Therefore, when importing a TTX file to Lingo, both the source and targets must be assigned.
-
Note When translating SQL files, only the expression is translatable.
- SVG files
- TXT files
- Wordfast files (TXML)
- XLIFF 1.2 files (XLF)
- XML files
Note If you are using the grid view (as opposed to the folder structure view) in the File List window pane, you can use the Filter field to see only specific types of files in the list (e.g., snippets), or you can select All Files to show all translation file types in the same list.
How to Translate Files
Although you do not need to use TM when translating files, it is recommended that you do so. Therefore, before following the steps below, make sure you have performed the necessary setup tasks for TM. See Translation Memory.
You can also set up your computer to use a machine translation (MT) service to provide additional translation suggestions. See Machine Translation.
- (Optional) Before you start translating text, you may want to select Home > Translate project with TM. This scans your translation memory to find 100% matches for untranslated segments and applies those translations accordingly.
-
From the File List window pane, open the file you want to translate.
The file segments are shown in the Translation Editor. The source text is shown in the left column. The right column, which is initially empty by default, is where you enter the translation.
Note You can customize the way the Translation Editor and Translation Memory Editor display translation segments. You can display the source and target segments next to each other, or with the source segment above the target segment. You can also adjust the editor font size, which resizes translation segments, translation suggestions, and segment notes based on your desired font size.
-
Click in a target cell (the right column) of a segment row. The cell may remain empty until you type in it, or the cell may become immediately filled with a perfectly matching translation from TM.
Note If you change the fuzzy matches percentage in the Options dialog, a segment doesn't necessarily have to have a 100% match to be automatically filled in when you click on it. For example, you can change the option so that segments with a 95% match are considered exact.
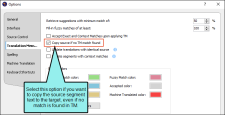
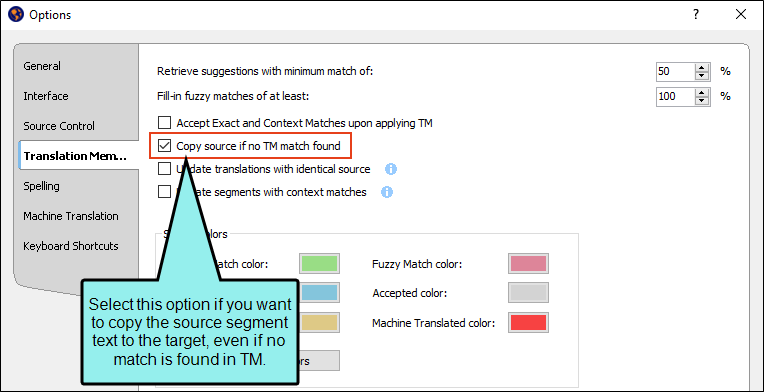
Note If you prefer to use the old behavior from previous versions of Lingo (i.e., automatically display a copy of source segments even if no match is found in TM), you can select a check box on the Translation Memory tab of the Options dialog (File > Options).
- Do one of the following:
- Type your translation.
- If the TM Suggestions tab below shows a match for the segment that you want to use, double-click it. The target cell becomes filled with that translation. You can keep the translation as it is, or you can click in the cell and adjust it.
-
Do one of the following, depending on the part of the user interface you are using:
-
Ribbon Select Home > [one of the Confirm buttons].
-
Keyboard Shortcut Press ENTER.
OR
Press CTRL+SHIFT+Down Arrow or CTRL+SHIFT+Up Arrow on your keyboard (to move to the next or previous untranslated segment, respectively).
- Right-Click Right-click in the cell and from the context menu select Confirm.
The translation is confirmed and focus moves to the next appropriate cell. After a segment is translated and confirmed, the Status cell becomes gray and a check mark is shown in it. Also, if you are using TM, the translation is automatically uploaded to the database.
-
- Click
") to save your work.
to save your work.

Translation Features
When performing translation work, you may find the following features useful.
Filter
A segment filter at the top of the Translation Editor lets you limit the segments shown in the editor.
![]()
Using the Filter
To use the filter, type text in the Source Filter and/or Target Filter field to search for content in either. Then either press ENTER on your keyboard or click  . As a result, only the segments matching your search are shown.
Example
Let's say you have the following segments in the Translation Editor:
![]()
You want to limit the segments shown to only those where the name "Jack" appears in the source segments. So you type Jack in the Source Filter field and click . As a result, only a few segments are now shown.
![]()
Then let's say you want to further limit the segments so that, of those shown, only those with "Jill" on the target side are included. Therefore, you type Jill in the Target Filter field and click . Now the list of segments is further reduced.
![]()
Regular Expressions and Case-Sensitive Text
You can also select options to use regular expressions or to make the search case-sensitive.
Example — Regular Expression
Let's say you want to limit the results to only segments where the source sentences begins with the letter w. First, you enter ^w in the Source Filter field. This is a regular expression that looks for lines that begin with w.
![]()
Then you click  and select Regular Expression. This enables Lingo to use the expression you just typed.
![]()
Finally, you press ENTER on your keyboard and the list is shortened.
![]()
Example — Case-Sensitive
Let's say you have the following segments in the Translation Editor:
![]()
You want to limit the segments shown to only those that contain the word "song" in the source. So you type song in the Source Filter field and click . As a result, only a few segments are now shown.
![]()
However, let's say you want to limit the results to only the segments where the word is lowercase. So you click and select Case Sensitive.
![]()
After you click again, only one segment is found where song is found in lowercase.
![]()
Clearing the Filter and Resetting the Editor
When you want to clear the search fields and show all of the segments again, you can click ![]() .
.
Example
Let's say you have used the filter fields so that the Translation Editor shows only a single segment in the file.
![]()
Now you want to clear the filter fields and return to the original view showing all of the segments in the file. To do this, you simply click ![]() .
.
![]()
Inline Formatting and Tags
Lingo lets you control formatting and other elements in segments so that the translation matches the source in terms of more than just text. This is done through inline formatting styles and tags.
If the source document contains inline formatting that Lingo is able to read (e.g., bold, italic, underlined text), that formatting is displayed in the source cell in the Translation Editor. You need to apply the same formatting to the appropriate text in the target cell.
Tags are shown for elements and formatting that Lingo is not able to read. For example, you might see miscellaneous tags when you import a Word document. Also, Flare project elements such as bookmarks, variables, conditional text indicators, or index keywords are represented by tags. It is not important that you know the purpose of each tag. As the translator, your job is to make sure the same tags in the source segment are added to the target segment and placed next to the appropriate words.
For more information see Inline Formatting and Tags.
Translation Memory Suggestions
At the bottom of the editor is the TM Suggestions tab. If matching content has already been translated and uploaded to the
- % Match Displays a numerical ranking for the match. For example, if 100 is displayed, the content matches 100%; if 85 is displayed, the content matches 85%; and so on.
- Source Displays the word(s) in the source language.
- Translation Displays the translated word(s) in the target language.
- Source TM Displays the name of the TM database containing the translation match.
![]()
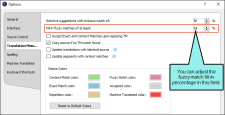
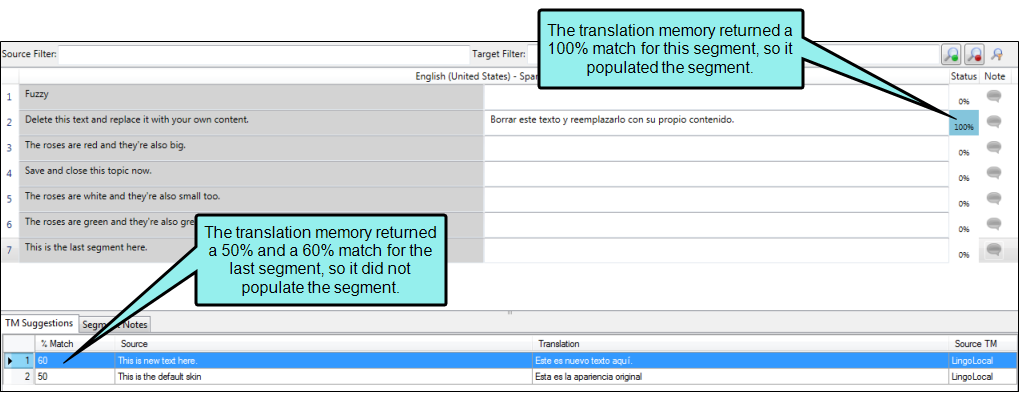
Note Lingo will use your existing fuzzy match settings to fill in matches using the TM. In the Options dialog (File > Options or Tools > Options), you can change the percentage for fuzzy matches to be filled in.
Note In the Options dialog, you can select a check box labeled "Accept Exact Matches upon applying TM." This option automatically confirms matching segments that are applied at the project or file level.
Note If you apply TM to a project with multiple TM databases selected, Lingo applies matching translations from the highest-ranked database. If no databases are ranked, Lingo applies matching translations from the first database selected.
Note If you apply TM and a segment has multiple exact or context matches, Lingo applies the match from the highest-ranked TM database. If no databases are ranked or there are multiple matches in the same database, Lingo applies the first match it finds in the TM database.
Statuses and Matches
When you are working in the Translation Editor, you will notice that various statuses may be used for each segment in a document. These often relate to how closely a segment matches a previously translated segment in TM. Different colors and percentages are used to indicate a segment's status. See Statuses and Matches.
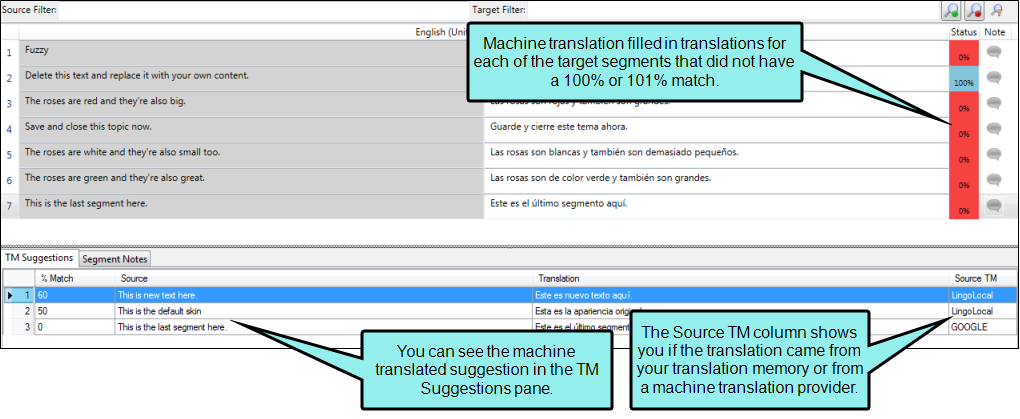
Using Machine Translation
You can use MT in conjunction with any installed TM to provide additional translation suggestions from internet translation providers. These suggestions appear alongside TM suggestions in the TM Suggestions area. You can also translate or pre-translate your entire project using MT suggestions.
Using Termbases During Translation
A termbase is a concept-oriented database that makes translation work easier and quicker by letting you create, manage, and reuse multilingual terminology from a single storage area. This system automatically displays previously translated words from your termbase during the translation process, thus improving the reliability of translations.
Notes for Segments
For each segment in the Translation Editor, you can enter a note. For example, you might want to add a note to remind yourself to do additional research about a term, or to tell a reviewer why a particular translation was used.
A Note column on the right side of the segment row and a tab at the bottom of the editor are available for this purpose.
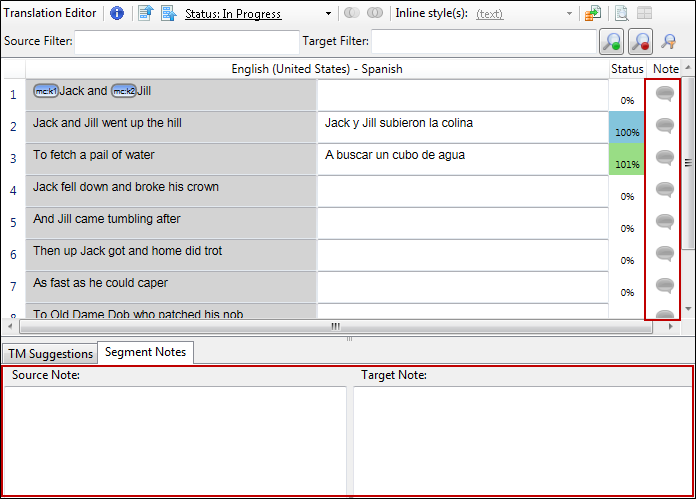
To add a note, open the Segment Notes tab at the bottom of the editor. You can do this in one of the following ways:
- Click the Segment Notes tab.
- Click the Note icon
 for that segment.
 - Right-click in the segment and in the context menu select Add Note.
In the Segment Notes tab, type in either the Source Note or Target Note area. If you want to create a new paragraph, press CTRL+ENTER. After you enter a note, the icon changes in the Note column.

Note When translating .properties files, only the value is translatable. The entire value pair is added to the segment as a segment note for your reference.
![]()
Note You can translate metadata tags in PDF and EPUB targets. The metadata type is added to the segment as a segment note for your reference.
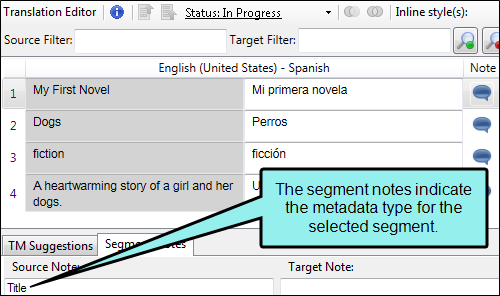
Note When you import a Doc-To-Help project file into Lingo, additional project information (e.g., variables, keywords, topic titles) is imported as part of the D2H file. Open the D2H file in Lingo to translate these segments. A translation note is created for each segment so you can see what kind of data is contained in the segment. Click ![]() to see the translation note on the Segment Notes tab.
to see the translation note on the Segment Notes tab.
Note Segment notes travel with the project. Therefore, if you create a new Lingo project based on the same source files, the same notes will not automatically be associated with those segments because it is a new project.
Note When you import a review package from Contributor, any annotations from the reviewer are added to the segment as segment notes.
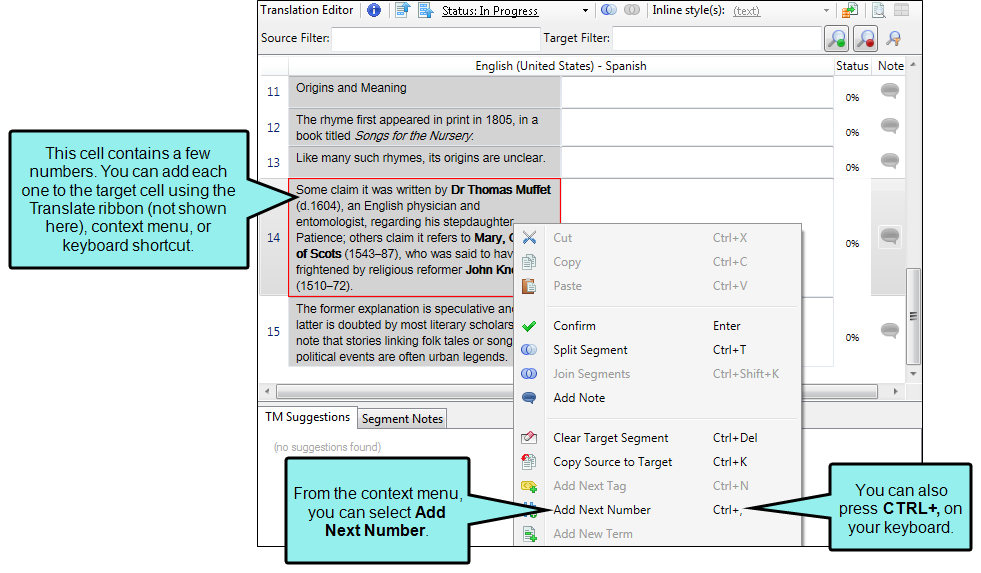
Number From Source—Add
This option that lets you automatically copy a number from the source to the target cell. This helps ensure that you do not accidentally retype an incorrect number during the translation.
You can add numbers from the source in the following ways:
- Context Menu You can right-click in the segment and select Add Next Number.
- Keyboard Shortcut You can press CTRL+, (comma) on your keyboard to add numbers to the target in order.
- Translate Ribbon From the Translate ribbon you can click Add Next Number.
Right-Click/Keyboard Shortcut Options
Several options are available from the context menu when you right-click a segment in the Translation Editor.
![]()
You can also use keyboard shortcuts for these options.
-
Synonyms Lets you select words matched through the thesaurus.
Note If there are no matches for a word in the thesaurus, the Synonyms option is not displayed in the context menu.
- Cut (CTRL+X) Cuts the selection and sends it to the clipboard.
- Copy (CTRL+C) Copies the selection and sends it to the clipboard.
- Paste (CTRL+V) Pastes the selection from the clipboard to the place where the cursor is inserted.
- Confirm (ENTER) Confirms the translation, adds it to TM (if applicable), and moves focus to the next segment. You can also press ENTER on your keyboard to do this.
- Split Segment (CTRL+T) Breaks the segment at the point where the cursor is placed, so that the one segment becomes two.
- Join Segments (CTRL+SHIFT+K) Merges the selected segments into a single segment.
- Add Note Opens the Segment Notes tab at the bottom of the Translation Editor. This lets you type a note related to the selected segment (for the source and/or the target). When you are done, the Note icon to the right of the segment changes to reflect the fact that a note exists.
- Clear Target Segment (CTRL+Delete) Removes all content from the target cell.
- Copy Source to Target (CTRL+K) Copies all of the text, as well as the formatting or tags, from the source to the target cell.
- Add Next Tag (CTRL+N) Copies each tag in order from the source to the target cell.
- Add Next Number (CTRL+,) Adds each number in order from the source to the target cell.
- Add New Term Lets you add a term in the segment to a termbase.
- Thesaurus (SHIFT+F7) Lets you view and select words related to those in an open translation file.
You can edit shortcuts from the Options dialog.
Live Preview Mode
When you translate text, the segments are shown in a grid format (i.e., Translation mode). If you want to see the content in its original context (in paragraphs), click the toggle button ![]() in the local toolbar. This button lets you open Live Preview mode for certain file types (i.e., Microsoft Word, Excel, PowerPoint, MadCap Flare, Capture images with callouts). Live Preview mode displays next to the Translation Editor and updates in real time as you make changes in the Translation Editor. To toggle the location of the Live Preview pane, click
in the local toolbar. This button lets you open Live Preview mode for certain file types (i.e., Microsoft Word, Excel, PowerPoint, MadCap Flare, Capture images with callouts). Live Preview mode displays next to the Translation Editor and updates in real time as you make changes in the Translation Editor. To toggle the location of the Live Preview pane, click  . This toggles the Live Preview pane to display horizontally or vertically.
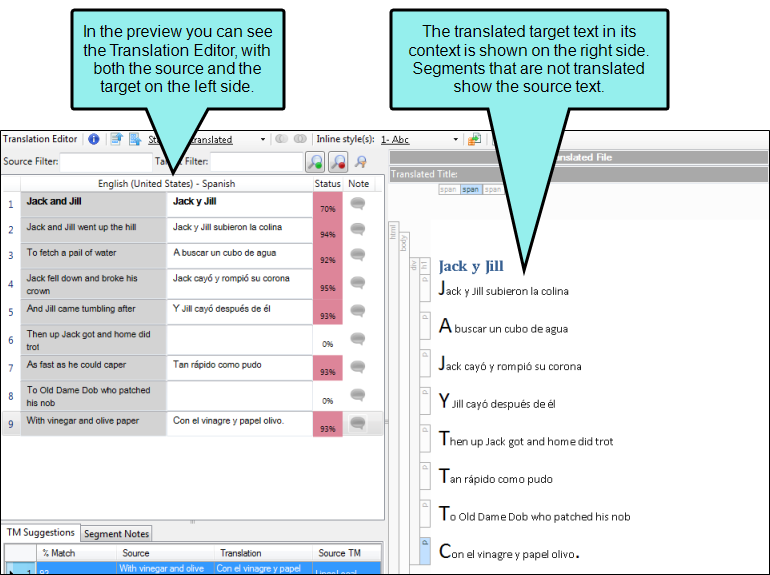
Example — Word
When you first open a Word file in Lingo, it may look something like this, with text segments in a grid.
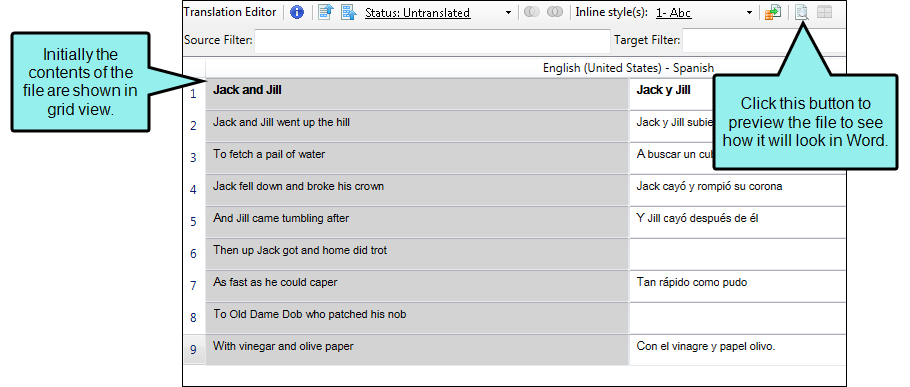
After you click ![]() , the file looks just like it would in Word. You can still see the Translation Editor and make changes, which appear in the preview area as you make them.
, the file looks just like it would in Word. You can still see the Translation Editor and make changes, which appear in the preview area as you make them.
Example — Excel
When you first open an Excel file in Lingo, it may look something like this, with text segments in a grid.
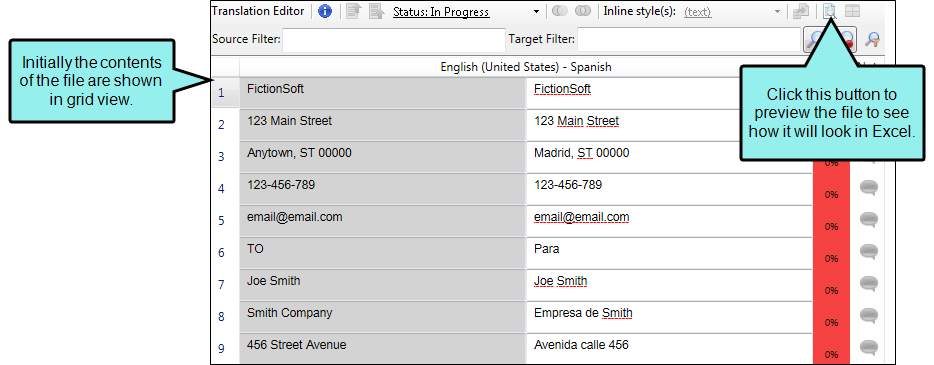
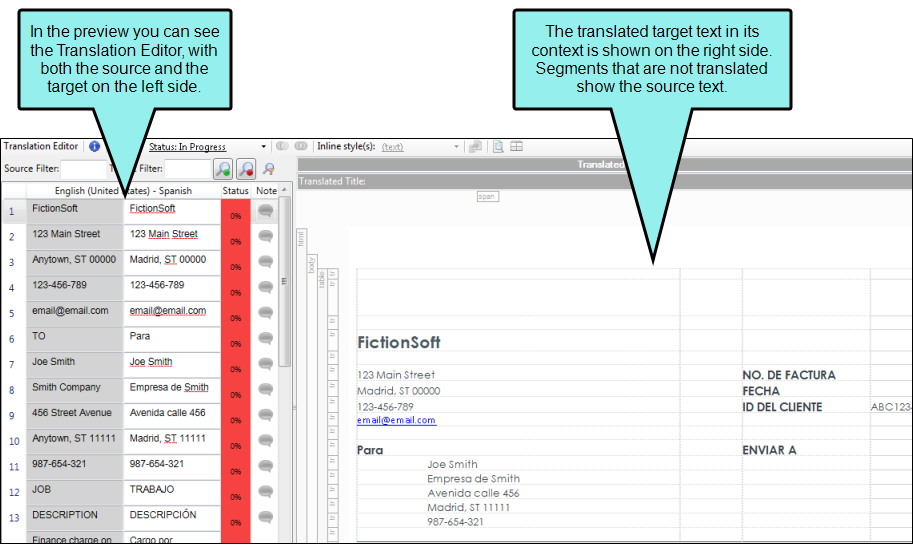
After you click ![]() , the file looks just like it would in Excel. You can still see the Translation Editor and make changes, which appear in the preview area as you make them.
, the file looks just like it would in Excel. You can still see the Translation Editor and make changes, which appear in the preview area as you make them.
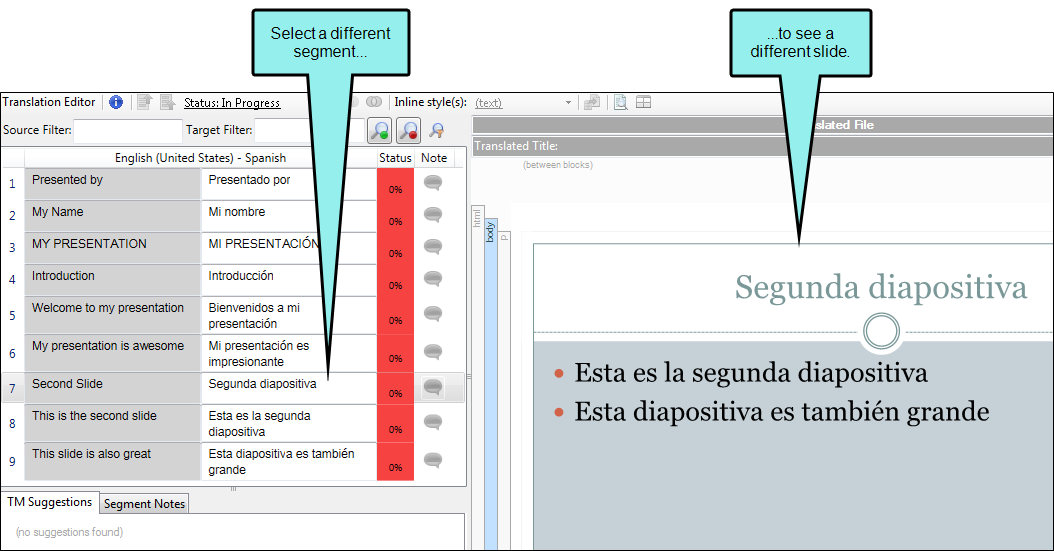
Example — PowerPoint
When you first open a PowerPoint file in Lingo, it may look something like this, with text segments in a grid.
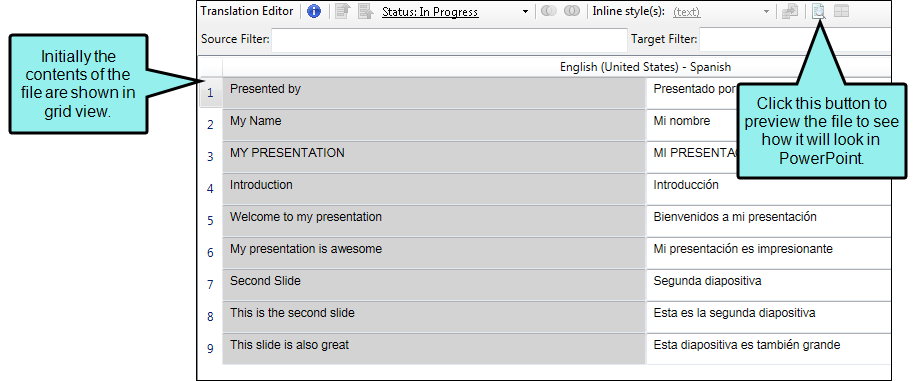
After you click ![]() , the file looks just like it would in PowerPoint. You can still see the Translation Editor and make changes, which appear in the preview area as you make them.
, the file looks just like it would in PowerPoint. You can still see the Translation Editor and make changes, which appear in the preview area as you make them.
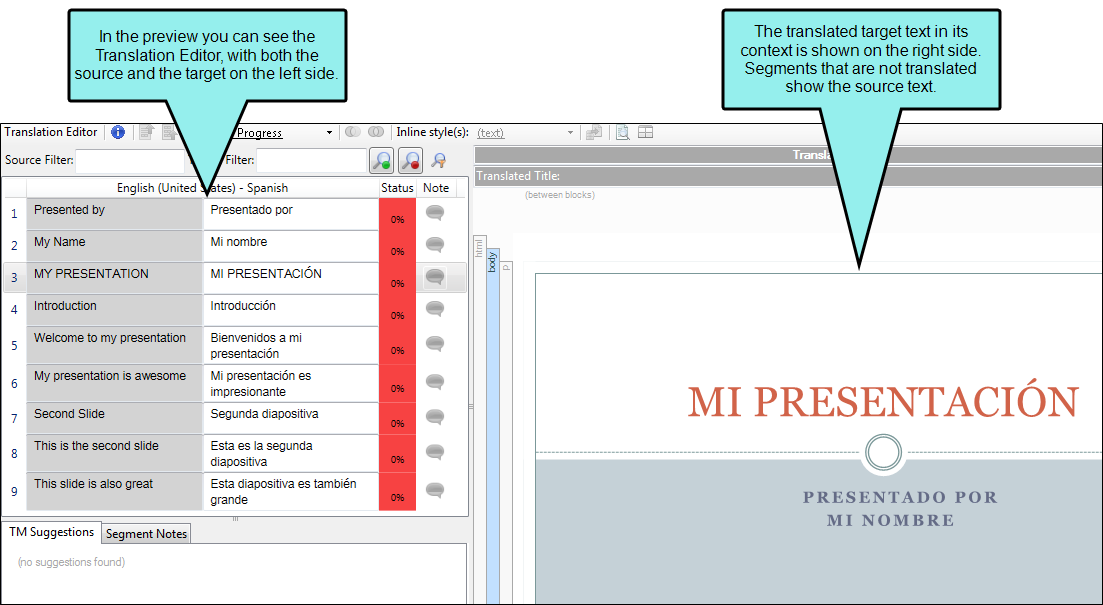
If the PowerPoint document has multiple pages, and most do, select a different segment in the Translation Editor to view the slide.
Example — Flare Project With Capture Image Callouts
This is an example of an untranslated Flare project, viewed in Live Preview mode. Notice that the callout is part of the preview. This is because the callout is part of the image, not part of the text for the topic file.
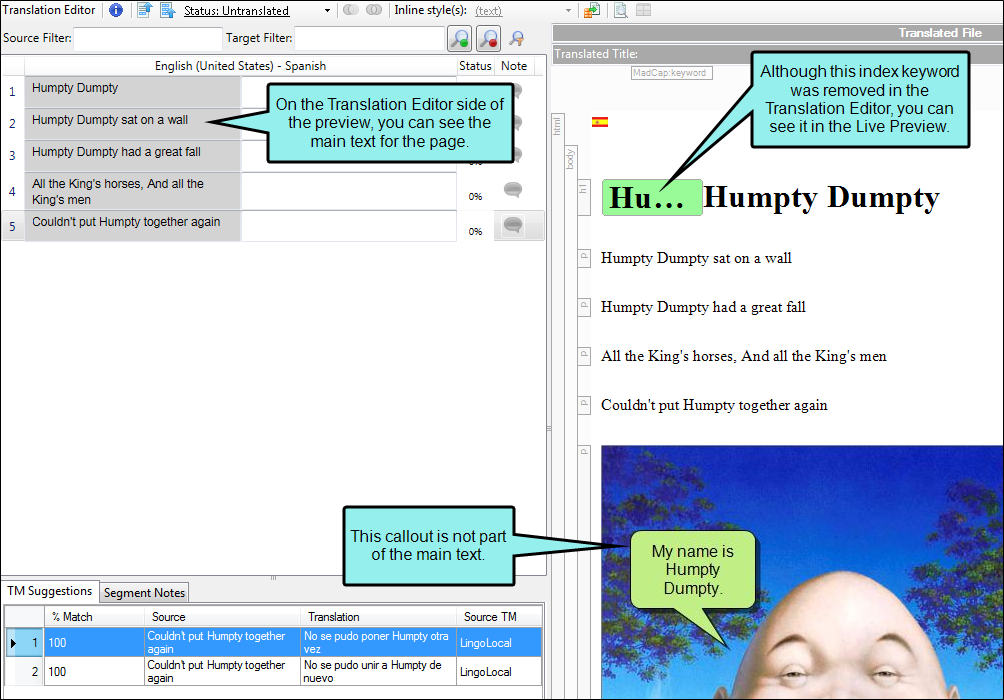
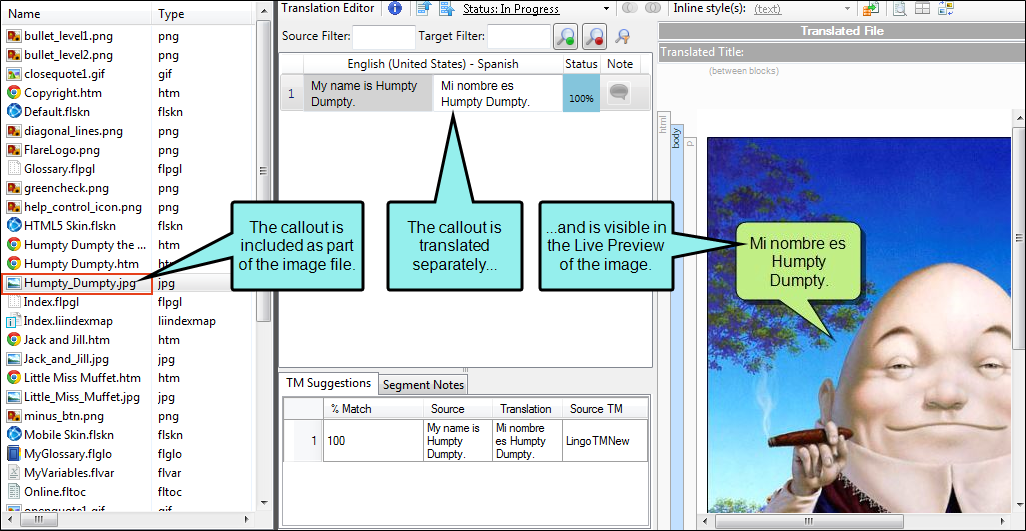
When you open the image file, you can translate the callout separately.
Note The Word preview feature supports DOC and DOCX files.
Note The PowerPoint preview feature supports only PPTX files, not PPT files.
Pre-Translate Files
You can automatically apply matching translations from a TM database, and if there are spots where you do not have matches, you can choose to have Lingo fill in those segments with matches from a machine translation provider. See Applying Translation Memory Suggestions.

Example
Let’s say you have performed a great deal of translation work for a particular client. Once in a while, the source files from that client contain identical segments to those you have already translated in previous projects, and you have uploaded those translations to TM. One day, this client sends you some source files for a new translation project, and these source files include 73 segments that you have already translated for them in the past. During the process of creating the new Lingo project, you select the TM database containing those translations and you click Pre-translate. When Lingo finishes creating the new project, it automatically applies matching translations to all 73 of those segments.
Example
Let’s say you are translating a project using a TM that has been passed along to you from a former colleague. It was assembled using translations from lots of other projects, and you're not sure exactly how accurate it will be, but you want to make a first pass through your project to see what matches there are.
You build a new project and add the TM, then tell Lingo to pre-translate the project using matches from the TM only. When it finishes, you have a few solid matches and a lot of fuzzy matches. However, you also have quite a few empty segments.
You decide to rebuild the project and add an MT provider as a backup for the pre-translation option, because you know it will fill in the gaps where you are missing translations. You also know it will provide machine translated suggestions in the TM Suggestions area for all your segments, so you can refer to these when updating your fuzzy translations later.
When the new project finishes, you have translations for most of your segments. Now you can review the MT suggestions and make any necessary adjustments, and then add new translations where needed. When you're done, you can add all the completed translations to the existing TM so you'll have a better database to work with in the future.
Note Lingo will use your existing fuzzy match settings to fill in matches using the TM. In the Options dialog (File > Options or Tools > Options), you can change the percentage for fuzzy matches to be filled in.
What’s Noteworthy?
Note By default the properties title for a topic file in Flare is the same as the first heading in the topic. Therefore, the first segment row for that file in Lingo affects both the topic title and the first heading. However, if you manually change the properties title for that file in Flare, then in Lingo the first segment row displays the properties title and the second row displays the first heading in the topic.
Note If you have an image file open, you can click  in the local toolbar. This opens a dialog that lets you select a different background image for the file.
Note Skin files from Flare projects are already translated into various languages. Therefore, most of the time you will not see segments from a skin file displayed in the Translation Editor. However, if the author makes a change to a text string in the original Flare project, that segment will be displayed in the Translation Editor.
What’s Next?
When all of the content in a project or file is translated, you can export the work to the application, file, or location. For example, if a Flare project was translated, you can export your work out to a new Flare project; if a Word document was translated, you can export your work out to a new Word document. This translated project or file can then be opened, and output can be created from it. See Exporting Translated Projects.
