Inline Formatting and Tags
Lingo lets you control formatting and other elements in segments so that the translation matches the source in terms of more than just text. This is done through inline formatting styles and tags.
[Menu Proxy — Headings — Online — Depth3 ]
Inline Formatting
If the source document contains inline formatting that Lingo is able to read (e.g., bold, italic, underlined text), that formatting is displayed in the source cell in the Translation Editor. You need to apply the same formatting to the appropriate text in the target cell.
You can apply inline formatting to the target segment in the following ways:
-
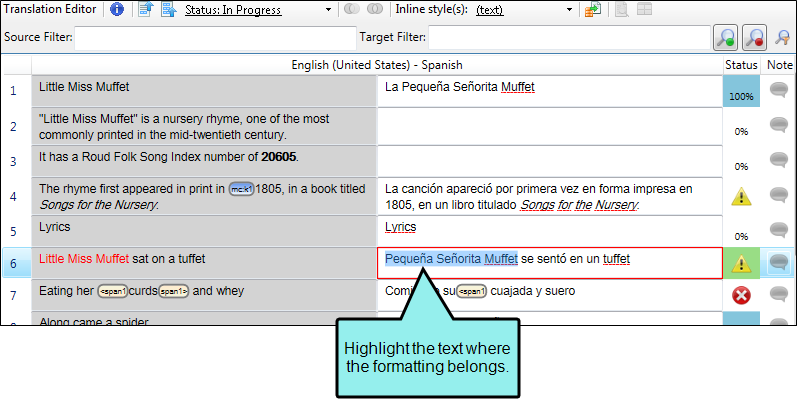
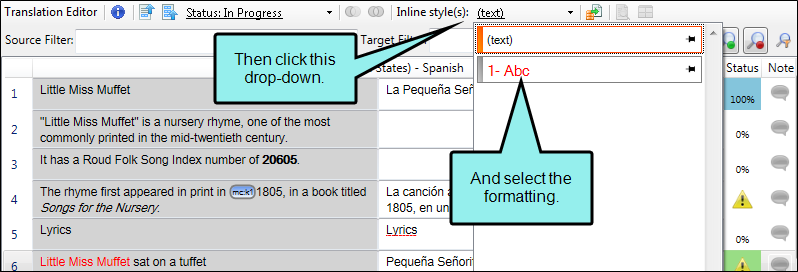
Inline Style(s) Field You can highlight the applicable text in the target segment. Then in the local toolbar, click the Inline style(s) field and select the available formatting. This field displays only the formatting found in the source cell.


-
Keyboard Shortcuts For much inline formatting (e.g., bold, italic, underline, superscript, subscript and any combination of these), you can use Microsoft Word shortcuts (e.g., CTRL+I for italic, CTRL+B for bold). For font size, color, or background color, you must use the Inline style(s) field as described above.
In addition, you can use a keyboard shortcut to access the Inline style(s) field. After highlighting the applicable text in the target segment, you can press CTRL+W to open the Inline style(s) field. You can then use your keyboard to select the formatting.
Tags
Tags
Tags are shown for elements and formatting that Lingo is not able to read. For example, you might see miscellaneous tags when you import a Word document. Also, Flare project elements such as bookmarks, variables, conditional text indicators, or index keywords are represented by tags. It is not important that you know the purpose of each tag. As the translator, your job is to make sure the same tags in the source segment are added to the target segment and placed next to the appropriate words.
You can add tags in the following ways:
- Context Menu You can right-click in the segment and select Add Next Tag.
- Drag and Drop You can click on tags in the source cell and drag them to the target cell.
- Home Ribbon From the Home ribbon you can click Add Next Tag.
- Keyboard Shortcut You can press CTRL+N on your keyboard to add tags to the target in order.
Example
The segment below includes a condition tag.

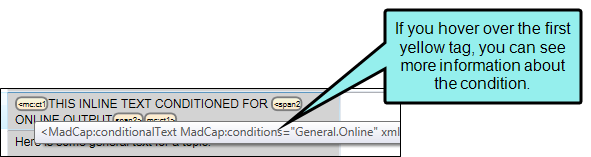
Lingo places yellow conditional text tags on either side of the text that were marked with a condition tag indicator in the source document. You can hover over the tags to see information about the condition that is applied to the text.
When the translator translates the segments, he can drag the yellow tags into the target segments, so the translation will also include the condition tag. Later, when the translator exports the document back to Flare, the condition tag will appear in the finished project.
Error and Warning Icons
If the source segment contains formatting or tags, you might see an error or warning icon in the Status column. You can hover over the icon for additional information about the error or warning.
|
|
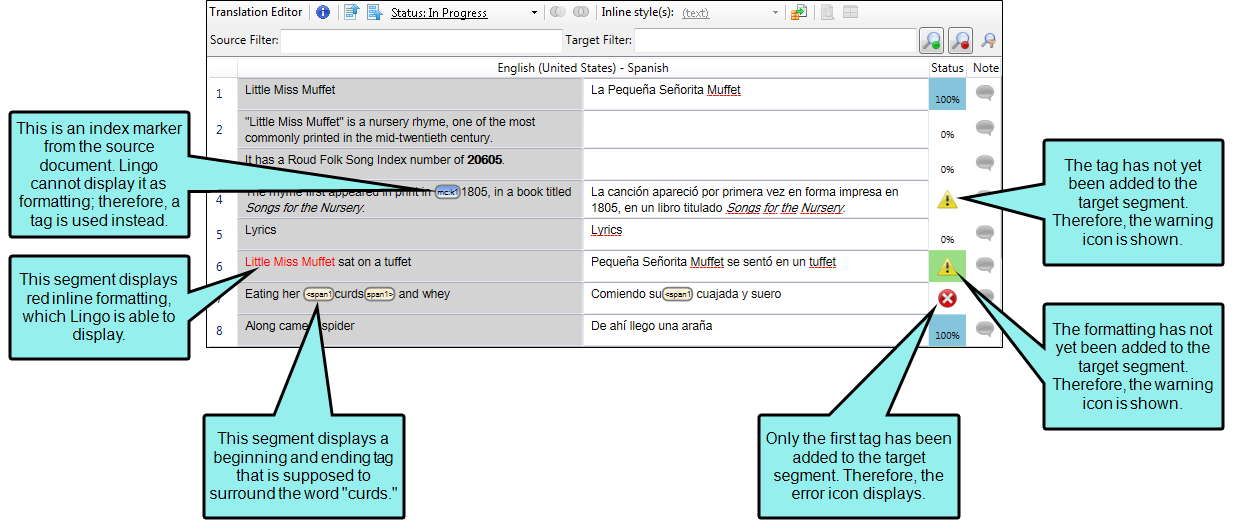
This warning icon means that the source segment contains formatting or tags, but that you have not yet added them to the target segment. If you see this icon, you can still save, export, or preview the file (when applicable). In addition, you can confirm the translated segment as completed. |
|
|
This error icon means that you have incomplete tags in the target segment. In other words, some tags require a beginning and ending tag, and if you have only one of those, Lingo identifies it as invalid and gives you the error. If you see this icon, you cannot save, export, or preview the file (when applicable). |
Example
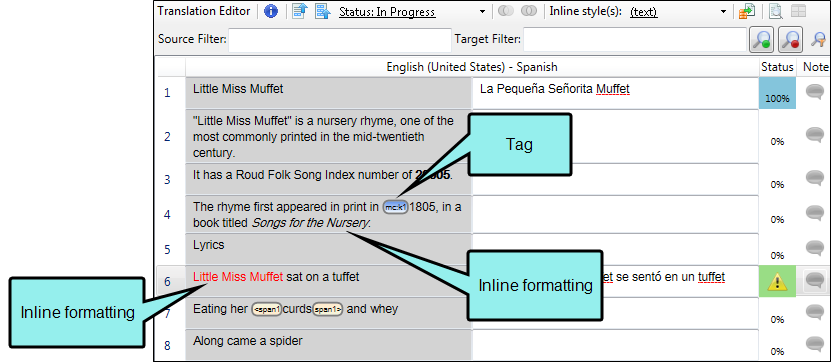
The following example shows segments with inline formatting and a tag, as well as the error icon:
What’s Noteworthy?
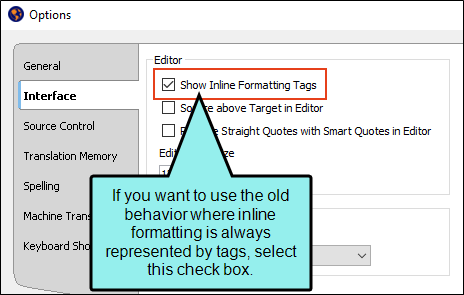
Note If you want all formatting to be displayed as tags in the Translation Editor and Translation Memory Editor (as in previous versions), you can select a check box in the Options dialog. You may need to close and reopen files in the project to see the change.
Note If you are not sure what a tag means, you can click the toggle button ![]() in the local toolbar of the editor to switch to Preview mode to see the content in its intended context.
in the local toolbar of the editor to switch to Preview mode to see the content in its intended context.
Note Unflattened snippets and variables appear as tags in a segment. You can translate these items by opening the snippet or variable file in from the File List. See Content Flattening.
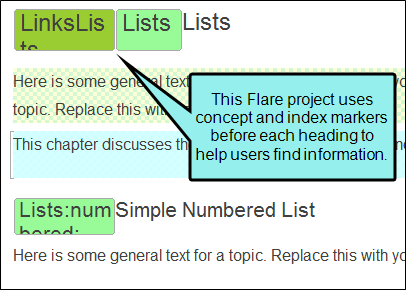
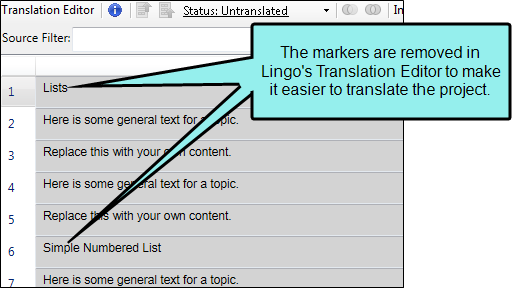
Note If a concept or index tag appears at the beginning or end of a segment, it is not displayed in the Translation Editor. This makes segments look cleaner in the Translation Editor, and prevents translators from needing to move tags that are not related to the segment. Additionally, these tags are not displayed in Live Preview mode. Index and concept keywords are still displayed if they appear between two words. You can translate any index and concept tags in a project when you open the index keyword or concept keyword file from the File List window pane.
Note Tags (e.g., spans) are removed from a segment if they wrap the entire translation unit. The exception to this is condition tags, which are not removed if they span the entire unit (this is because condition tags can affect translation status).
Similarly, unflattened snippets, conrefs, and variables will be removed from the Translation Editor if they span the entire translation unit (e.g., a snippet that makes up an entire segment).
This content will be added back into the project when you export it. Be sure to translate the content in the associated content file in the File List so it will be translated in the finished project.
Note When you import and export Translation Memory eXchange (TMX) files, the formatting and tag data are included. See Importing TMX Files and Exporting Translation Memory Files.
