You can open the Options dialog by selecting File > Options. This dialog lets you choose miscellaneous preferences and global settings.
[Menu Proxy — Headings — Online — Depth3 ]
General Tab
|
Minimize to System Tray |
By default, when you minimize Lingo, a shortcut button on the main part of the taskbar lets you reopen the application. However, you can select this check box if you want to minimize Lingo to the system tray instead. With this option selected, a shortcut icon is placed in the system tray (i.e., notification area) of the taskbar when Lingo is minimized. You can click on this icon and select Restore to reopen the application. |
|
Auto-Reload Documents |
Select this check box if you want Lingo to reload documents automatically. |
|
Auto-Save Documents |
Select this check box if you want Lingo to periodically auto-save any open files. You can specify the number of minutes that should elapse between each auto-save. |
|
Close others when opening new document |
You can have multiple files of all types open in the interface at the same. By default, when you open a new file, other documents that are already open remain open. However, you can change this behavior so that files already open in the interface are automatically closed when you open a new document.You can use any of the following options:Close others This option automatically closes all other open documents.Close others with no changes This option automatically closes all other open documents that do not have unsaved changes. If you have files open where changes have been made but not saved, those files will remain open until you save and close them.Close others with same extension This option automatically closes all other open documents that share the same file extension. Close others with same extension and no changes This option is the same as the previous option, except that files with unsaved changes will not automatically be closed. Those files remain open until you save and close them. |
|
Reset "Show Once" Dialogs |
There are some dialogs in Lingo that open just once to give you a message or warning when something changes or you switch modes. These dialogs have a check box labeled "Show this dialog." If you deselect that check box, you will not see the dialog again. However, you can use this reset feature to display that dialog (and all other "Show Once" dialogs) again the next time. |
|
Recreate Missing File Filters |
Select this check box to have Lingo automatically recreate missing file filters. This maintains the link to these filters if you deleted the original filter or share the project with someone who does not have the original filter. |
|
Recreate Missing Project TM and Termbases |
Select this check box to have Lingo automatically recreate missing translation memories and termbases. This maintains the link to these files if you deleted the original database or share the project with someone who does not have the original database. |
|
Prefer Local Help |
By default, Lingo's online and dynamic Help system points to files hosted externally. This allows for live updates to the Help. Because the Help system is hosted online, you may not be able to access it if you are behind a firewall or if you have a slow connection. In that case, you can use a local version of the Help. Lingo will even switch to the local Help automatically if it detects that you cannot connect to the external Help system. Select this option if you want to use the local Help manually. Note The local Help system is only updated when the application is updated. If you want to be sure that you have the most current version of the Help, disable the local Help. |
Interface Tab
|
Show Inline Formatting Tags |
If the source document contains inline formatting that Lingo is able to read (e.g., bold, italic, underlined text), that formatting is displayed in the source cell in the Translation Editor. You need to apply the same formatting to the appropriate text in the target cell. Tags are shown for elements and formatting that Lingo is not able to read. However, if you want all formatting in the Translation Editor and Translation Memory Editor to be displayed as tags (as in older versions of Lingo), you can select this option. You may need to close and reopen files in the project to see the change. |
|
Source Above Target in Editor |
Select this option if you prefer to have the target segment display directly below the source segment, rather than next to the source segment. This applies to the Translation Editor and the Translation Memory Editor. You may need to close and reopen files in the project to see the change. |
|
Replace Straight Quotes with Smart Quotes in Editor |
Select this check box to use single and double curly smart quotes (") instead of straight quotes (") when you type in the Translation Editor or Translation Memory Editor. This option is disabled by default. |
|
Editor Font Size |
This setting adjusts the font size of the source and target segments in the Translation Editor and Translation Memory Editor. You may need to close and reopen files in the project to see the change. |
|
Theme |
You can click the Active Theme field and select a color scheme for the interface. |
Source Control Tab
The options you see on this tab depend on whether your project is already bound to source control.
Not all options are applicable to each of Lingo's integrated source control providers. If you select an option that is not applicable to the provider you are using, this option is ignored. For example, Git does not use lock functionality, so if you select this option it will be ignored.
Additionally, terminology varies for each source control provider. You may see slightly different dialogs or prompts depending on which source control provider you are using.
|
Automatically check file out from source control when saving file changes |
Select this check box to automatically check the file out from source control when you save changes to it. |
|
Lock files when automatically checking out |
You can select this check box if you are using Microsoft Team Foundation Server, Apache Subversion, or Perforce Helix Core and want files that are automatically checked out to be locked as well. Locking files means that other users cannot check those same files in when you have them checked out. You might use this feature to prevent conflicting changes from occurring and having to merge files as a result. Note Subversion will automatically lock a modified file when saving changes (if it is not already locked) if you selected the option to automatically check out files from source control when saving them. Because there is not a "checked out" status for Subversion files, these files will be marked as modified |
|
Show prompt to add auto-created files to source control |
Select this if files were automatically added to your project and you want to be prompted to add those files to source control. For example, this might occur if you drag a word file to Content Explorer. Multiple files might be automatically created when you do this. |
|
Enable background status checks |
Select this check box if you are using source control integration in Lingo and you want the application to check for frequent status changes automatically. You can specify the number of minutes and seconds when you want Lingo to ping the source control repository and get status changes for files that have been checked out, checked in, moved, deleted, etc. The upside of this feature is that you can ensure that the source control status information is always up to date. The downside is that you may experience slower performance due to this constant communication over the network. |
|
Do not prompt to get latest when opening source control bound projects |
When you open a project that is bound to source control, a message automatically asks if you want to get the latest version of files. Select this check box if you want to disable this prompt. Therefore, in the future when you open the project you will no longer see the message, and the project will open without replacing any local files with the latest ones from source control. |
|
Prompt to check in files when closing source control bound projects |
Select this if you want to automatically be reminded to check in files when you close a project that is bound to source control. |
|
Enforce TFS comment policy |
By default, Lingo ignores all Microsoft Team Foundation Server check-in policies. However, if your source control administrator requires a comment when you check in a file, you can select this option to force Lingo to abide by this policy. Note Selecting this option only enforces the TFS comment policy. It will not check for other policies. |
|
Bind Detection |
Bind DetectionBind detection scans your project when you load it to see if the project has been previously bound to source control. If a binding is detected, you then have the option of applying the binding and committing the project to source control. Depending on the provider you are using, Lingo may search the file system and its artifacts, as well as contact and query servers, to find potential source control bindings. For more details, see the following:
|
|
Use Git executable for network functions Get Git for Windows Get an updated version of Git for Windows |
Use this section to integrate Git for Windows (Git.exe) if your project is bound to Git (not a Central binding though) via Secure Shell (SSH). This might be necessary to avoid errors. However, an upside to installing Git.exe is that it is likely to result in faster and better performance for file transfers. |
Proxy Server Tab
|
Use proxy server |
You might need to enable this option if your network has a proxy server and you require any network connection from Lingo (e.g., opening the online Help). After enabling this option, enter your company's proxy server information. You might need to consult your network administrator to obtain the necessary credentials. After completing the fields on this tab, close and restart Lingo for the changes to take effect. |
|
Address |
Enter the address of the proxy server. |
|
Port |
Enter the port for the proxy server. |
|
Enable authentication |
Enable this so that you can enter a username and password for access to the proxy server. |
Translation Memory Tab
|
Retrieve suggestions with a minimum match of |
Enter a percentage in the field. Only translations with a rank greater than or equal to the specified percentage will be displayed as suggestions in the interface. Example You set this percentage to 50%. When using translation suggestions, you might have one translation in your database that matches the current string exactly (100%), another translation that matches it 75%, and a third translation that matches it only 30%. In this case, only the first two translations will be available for you to select in the interface. |
|
Fill-in fuzzy matches of at least |
Enter the percentage at which you can insert matching translations automatically. By default, this percentage is set at 100%, meaning you can use automatic inserts only when text strings match existing translations exactly. However, you can reduce this percentage if you wish. Any matching translation that falls below that specified percentage is considered fuzzy because it does not match the string closely enough to warrant an automatic insert. Example You open a topic to translate the text in it. In the suggestions area at the bottom of the Translation Editor, a few matching translations from your translation memory database are shown. Perhaps two of the translations match segments exactly (100%) and there are other partial matches that are below 100%. Perhaps one of those is a 98% match. All of the partial matches, including the one at 98%, are considered fuzzy. When you first opened the Translation Editor, a message displayed. It might say something like this: "2 segments had matches of at least 100% and there were 3 other partial matches. Do you want to use the top matches automatically?" If you select Yes, the two translations that match text 100% will replace the corresponding strings in the topic automatically. If you want to use any of the partial matches, you must do so manually. Now suppose you want to be able to automatically use matching translations if they match 97% of the string text. Therefore, you set the fuzzy matching option to 97%. If you then return to the same topic, this time the message will say the following: "3 segments had matches of at least 97% and there were 2 other partial matches. Do you want to use the top matches automatically?" If you select Yes, both of the 100% matches are automatically used, as is the 98% match (because it is no longer considered a fuzzy match). |
|
Accept Exact and Context Matches upon applying TM |
If this option is selected and you apply translation memory (TM), 100% and 101% matches are automatically accepted. Therefore, those segments in the Translation Editor are displayed with a gray status background and check mark. If this option is not selected and you apply TM, 100% or 101% matches are simply pre-loaded into the Translation Editor. This lets you review those segments before manually accepting the matching translations. |
|
Copy source if no TM match found |
Select this if you want Lingo to copy source segments to the target cell in the Translation Editor, even when no match of any kind is found in TM. This is in contrast to the default behavior, where target cells are initially empty, unless an exact match in TM is found and loaded. |
|
Update translations with identical source |
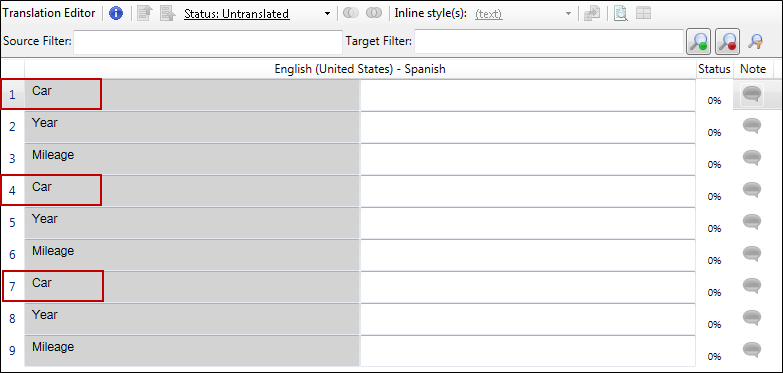
This dictates what happens when you have multiple identical source terms and you begin translating, confirming, and uploading them to TM. After segments are confirmed, what happens to those that are not yet translated? Are translations for those segments updated accordingly? That's what this check box lets you control. See Updating Translations With an Identical Source. Example Let's say you have a file with the term "Car" appearing three times.
Suppose you translate the first "Car" term as "Carro" and confirm it. The second and third instances are marked as repetitions and the Carro translation is copied to them.
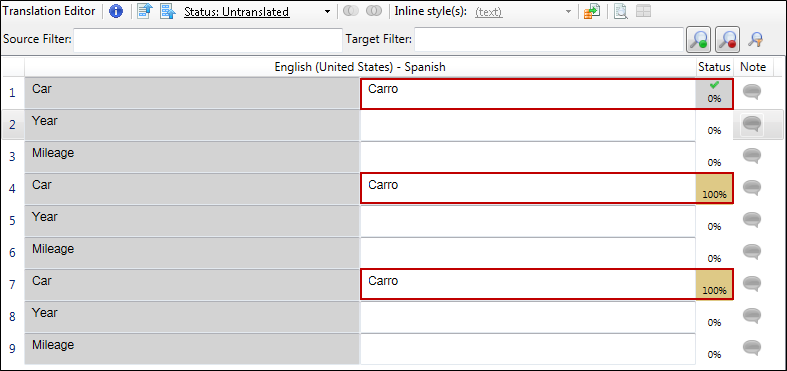
If you change the translation for the second "Car" term to "Coche" and confirm it, the third "Car" term remains as "Carro."
This is the default behavior, with the option not selected. If this option is selected and you change the translation of the second "Car" term to "Coche," all three of the rows will show that translation.
|
|
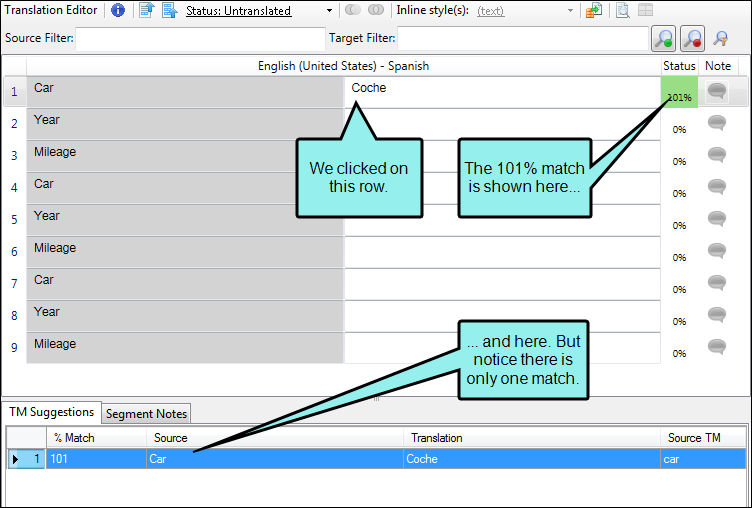
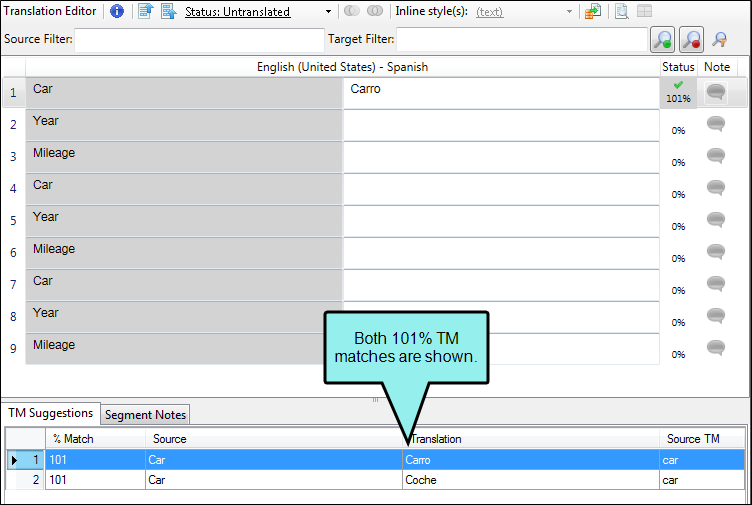
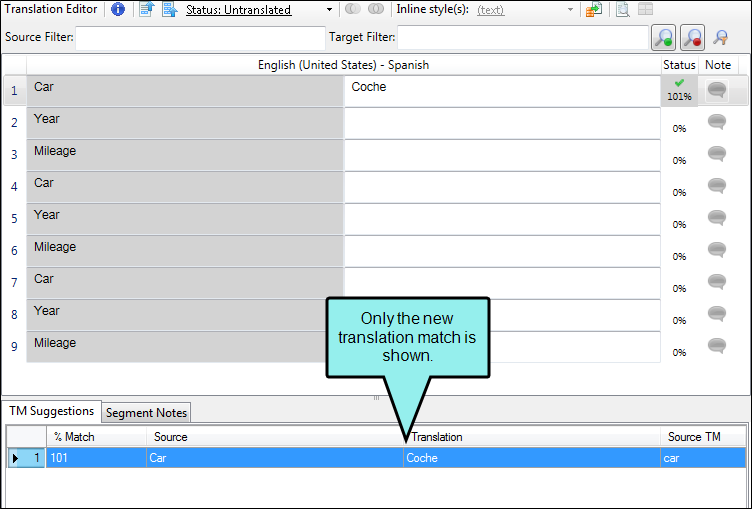
Update segments with context matches |
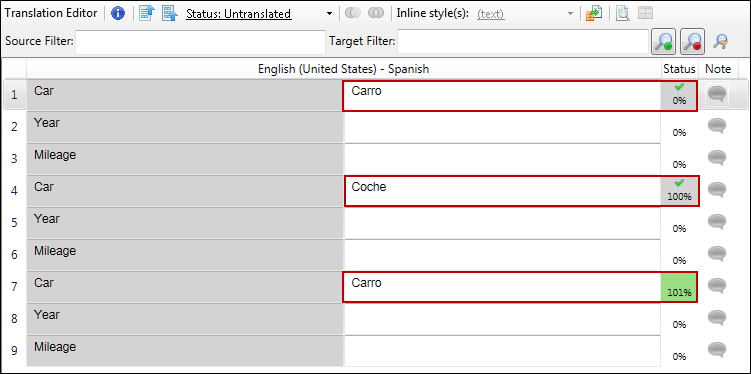
This dictates what you see in the Translation Editor when you confirm multiple translations of segments that have 101% matches. See Updating Segments With 101% Matches. Example Let's say you have a source file with the term "Car." Now suppose this term and has already been translated to "Carro" in Spanish and added to the TM. When you click in a segment with the term "Car," Lingo shows that it has a 101% match.
If you change the translation to "Coche," confirm it, click back in that cell, and look down at the TM Suggestions area, you will see both the old translation (Carro) and the new one (Coche) as 101% matches.
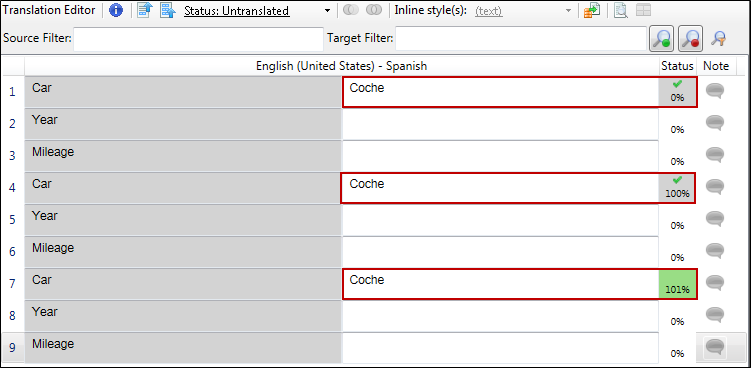
This is the default behavior, which is what happens when the check box in the Options dialog is not selected. If you select the check box in the Options dialog, create a new project, and follow the same steps, you would see only one 101% match, the new one (Coche).
|
|
Status Colors |
You can use this section to change the color for any kind of status that shows in the Translation Editor. See Changing Segment Status Colors. |
|
Reset to Default Colors |
Click this if you want to return to the factory color settings for each status. |
Spelling Tab
|
Select Global Dictionary Location |
A global dictionary is a file that contains words and can be used for spell checking by any Lingo By default, a new global dictionary is stored in your AppData folder, like all of your built-in dictionaries. However, you can select Use custom location to choose a different location for your global dictionary. For example, you might be working with a team of writers and want to make sure you are all using the same spellings for certain terms. By choosing a network directory, your entire team can use the same global dictionary. After selecting this option, click |
|
Installed Dictionaries |
This section displays information about the dictionaries that are installed and therefore available to your project. You can import additional dictionaries if you want.
|
|
Spelling Options |
You can use these fields to ignore any of the following when spell checking files:
|
 to choose the location.
 Machine Translation Tab
|
Select Machine Translation Provider |
Select a machine translation provider. Lingo currently supports machine translation (MT) from Google Cloud Translation, Microsoft Translator, MyMemory, and DeepL. |
|
Settings |
Enter the authentication credentials for the selected MT provider. Each provider requires different settings. After you enter your credentials, click Test Connection to ensure that your connection is successful. Note If you are using DeepL, please refer to that provider's documentation to ensure your version of DeepL is compatible with a computer-assisted translation (CAT) tool. Otherwise, your key will not work in Lingo. |
|
Cache MT results as XLIFF alternates |
Save previously used MT results in the XLIFF file. This prevents the MT for looking for new translations for previously translated segments. If the source segment is modified, the MT will look for a new translation for the updated segment. If this option is disabled, the MT will look for new translations whenever you click a target segment or translate the project with the MT. |
|
Use MT in concordance searching |
Search MT suggestions using the concordance. See Concordance. |
Keyboard Shortcuts Tab
|
Command Scope |
Select a Lingo option to which you can assign a keyboard shortcut. It also displays the current keyboard shortcut assigned to the selected action. |
|
Option/Shortcut |
Select the option whose keyboard shortcut you want to change. You can click the Option or Shortcut column headings to sort the columns alphabetically. This can help you more easily find a command or see which shortcut keys are free to use. |
|
Key Assignment |
Choose a key to apply as a keyboard shortcut to the option that is currently selected in the Command Scope section. |
|
Other commands using shortcut |
If you create a shortcut that is already being used, this field displays the conflicting command. |
|
Modifier Key Assignment |
Choose a modifier key ( the CTRL key, SHIFT key, and/or ALT key) to include in a keyboard shortcut combination. Click the check box next to a key name to include it in the keyboard shortcut combination. |
|
Unlisted Commands |
Assign a shortcut to a command that does not appear in the grid above by clicking Unlisted Commands. In the Other Commands dialog, select a command, then click OK. The unlisted command appears in the grid. |
|
Reset to Factory Defaults |
This returns the tab to the factory default keyboard shortcuts. |
