You can replace an image in Lingo instead of deleting and adding the image manually. You can also create a batch that lets you replace many images at the same time, without needing to retranslate their callouts.
If you are working in a multilingual project, you can replace the original images with different images for each language in your project. This is very useful if you need to localize images for different languages or countries.
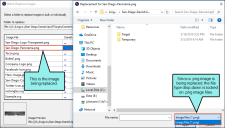
Example
You are translating documentation for a company whose products are used in both English- and Spanish-speaking countries. You need to localize the images in the documentation so the text on the images is appropriate for the language used in the documentation. To do this, you can use the Batch Image Replace dialog to sync the images from the English source project with the localized Spanish images.

To do this, you create a folder with the localized Spanish images. After you click the  button in the Batch Replace Images dialog, you select the Spanish Images folder.

Any images that have identical file names to those in the original Images folder are automatically replaced with your localized Spanish images.

How to Replace Images
-
(Optional) In the File List, select the image file(s) you want to replace.
-
Do one of the following, depending on the part of the user interface you are using:
- Ribbon Select Home > Batch Replace Images.
- Local Toolbar In the local toolbar of the File List, click
 .
.
The Batch Replace Images dialog opens. If you selected image files, they appear on the left side of the grid. If you did not select any files from the File List, the grid is blank. Otherwise, the grid will show the files you selected in the File List.
- (Optional) If you are working in a multilingual project, select a language from the drop-down on the right side of the grid. The current target language is selected by default.
-
(Optional) If you want to replace images in a batch, next to the Folder to Replace field, click
 . In the dialog that opens, find and select the folder containing the images that you want to replace. Click Select Folder.
Note You can only select folders within your Lingo project.
-
Replace the original images with new images. You can sync the original images to images in a replacement folder, or you can replace individual images.
To Sync the Original Images to a Replacement Folder
- On the right side of the grid, click the Sync button
 next to the current language.
 - In the dialog that opens, find and select the folder containing the images you want to sync for the current language. Click Select Folder.
-
If the images in the replacement folder have the same names as the images in the original folder, the replacement images will automatically be linked to the original images. A confirmation dialog appears notifying you how many replacement links were set. Click OK. In the Batch Replace Images dialog, the replacement images appear on the right side of the grid.
Note If Lingo cannot find a replacement image that matches the original image's exact name or file type extension, no replacement will be selected. If this occurs, you can replace these images individually.
To Replace Individual Images
-
On the right side of the grid, click the link next to the image file you want to replace. If you have not added a replacement image yet, the link will look like an ellipsis; if you have already added a replacement image, the link will display the image's file name.
Note If you previously localized an image and then reopened the Batch Image Replacement dialog (or changed languages using the drop-down language menu), the replacement link next to the original image will say "localized." This alerts you that you have already replaced that image with a new image. However, you can still click the link and replace the image with a new image.
-
In the dialog that opens, find and select the replacement image you want to use. Click Open. In the Batch Replace Images dialog, the replacement image appears on the right side of the grid.
Note When you replace individual images, you can only select the same type of image being replaced.
- Continue replacing images as needed.
- On the right side of the grid, click the Sync button
-
(Optional) To preview an original or replacement image, select it in the grid. A preview of the image and its file path appear in the lower-left corner of the dialog.
-
(Optional) If you want to undo a localization, you can reset the link. To do this, select the cell(s) you want to reset, then click Reset selected cells.
Tip Hold down SHIFT or CTRL to select multiple cells.
Warning Resetting cells is permanent. As a best practice, you should only click Reset selected cells if you have made a serious error and cannot correct it manually.
- (Optional) Repeat steps 4-7 for the other languages in your project.
-
Click OK.

Note If there are not any images in your project, batch image replacement is disabled.
Note Callouts from the original image are transferred to the replacement image and can be translated in Lingo. However, if your replacement image also contains callouts, these callouts will be flattened during the replacement process, and will no longer be editable. As a best practice, choose replacement images that do not include callouts.
Note When performing a batch replacement, you can replace images in subfolders. To sync correctly, the subfolders must have the same names in the original folder and the replacement folder. Folders with different names will not sync.
Note If you have localized images and you update your Lingo project, a confirmation dialog will ask you if you want to replace the localized images with the images from the source project.
Note If you are translating a MadCap Mimic movie, you can replace frame background images. However, image objects are not replaceable.