If there is a branch on your remote repository, you might want to add it locally so you can work in it. This can be done from the Branch Management dialog, which lets you see both local and remote Git branches.
How to Get a Remote Branch
-
With any branch selected as the active one, do a pull
-
Open the Branch Management dialog in one of the following ways:
-
Status Bar In the lower-right of Lingo, click the name of the active branch.
Note If you do not see this option, make sure View > Status Bar is enabled.
-
Ribbon Select Source Control > Branch (the face of the button, not the drop-down).
- Right-Click If you have the File List open, right-click on any file and select Source Control > Project > Branch.
-
-
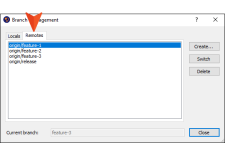
Select the Remotes tab.
-
Select the branch you want to get (i.e., check out)
-
Close the Branch Management dialog.

