If you have created more than one branch, you can switch to, or select, the branch you want to work with. When you switch to a new branch, you will see the files associated with that branch, and any new commits will be associated with the selected branch. There are multiple ways to switch branches. One of the benefits of using the Branch Management dialog is that you can switch to either local or remote branches.
Warning You should commit all of your current changes before switching branches. If you have uncommitted changes when you switch branches, they will be lost.
[Menu Proxy — Headings — Online — Depth3 ]
How to Switch Branches—Status Bar
-
Make sure the status bar is enabled (View > Status Bar).
-
In the lower-right of the interface, click the branch drop-down, which displays the branch that is currently active. Then, select the branch you want to switch to. If you do not have any pending changes, your branch switches.
How to Switch Branches—Submenu
- Do one of the following, depending on the part of the user interface you are using:
Ribbon Select Source Control > Branch.
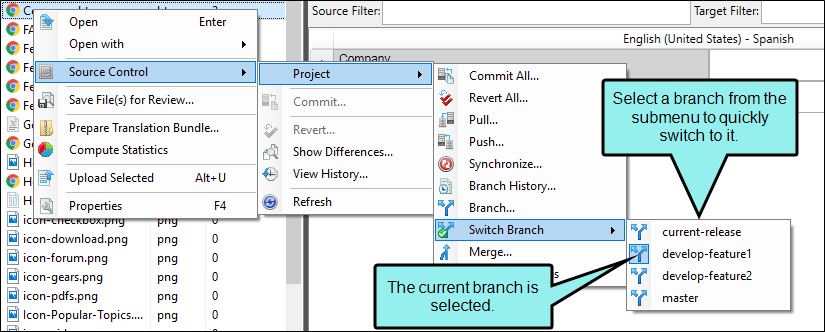
- Right-Click If you have the File List open, right-click on any file and select Source Control > Project > Switch Branch.
-
From the submenu, select the branch you want to use. If you do not have any pending changes, your branch switches.

Note Your current branch is marked in the submenu.
How to Switch Branches—Branch Management Dialog
-
-
Open the Branch Management dialog in one of the following ways:
-
Status Bar In the lower-right of Lingo, click the name of the active branch.
Note If you do not see this option, make sure View > Status Bar is enabled.
-
Ribbon Select Source Control > Branch (the face of the button, not the drop-down).
- Right-Click If you have the File List open, right-click on any file and select Source Control > Project > Branch.
-
-
Select the Locals or Remotes tab, depending on which kind of branch you want to select. Switching to a remote branch will add it to the Locals tab, and make that branch the active one in the Lingo interface.
-
Select the branch you want to get (i.e., check out), and click Switch.
-
Close the Branch Management dialog.
How to Switch Branches—Source Control Explorer
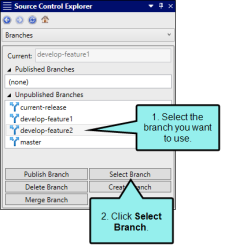
You can also switch branches using the Source Control Explorer. You can view a list of published and unpublished branches in the Source Control Explorer, so this method is preferable if you want to pick a branch by its publication status.
- Select View > Source Control Explorer. The Source Control Explorer opens.
-
From the drop-down or the Home pane, select Branches.
The Branches pane opens. In the pane, you can see your current branch, as well as lists of your published and unpublished branches.
-
Select the branch you want to switch to.
-
Click Switch Branch. If you do not have any pending changes, your branch switches.

Switching With Pending Changes
If there are pending changes on your current branch, a dialog asks if you want to switch branches and discard your modifications. This is because the changes were made on the current branch, and do not carry over when you switch branches.
- Click Yes to switch branches. Your changes will be lost.
- Click No to cancel the switch. Commit your changes before attempting the switch again. See Committing Source Control Files—Git.
