Adding Concepts and Terms to Termbases
After you associate a termbase with your project, you can add translated concepts and terms to it. A concept is a group of related terms in different languages. You can do this in various ways.
[Menu Proxy — Headings — Online — Depth3 ]
Quick Add Terms Method
You can add many different terms at the same time to a termbase. For example, you might need to add a list of corporate terms from an email. In addition to quickly add lots of different terms, you do not need to have any files open for translation at the same time. When you do this, the terms are added as new concept rows in the Termbase Editor.
How to Add Concepts and Terms via the Quick Terms Method
- Select View > Termbase.
- In the local toolbar, click
 . The Batch Add Terms to Termbases dialog opens.
 - In the Language 1 field, select the first language.
- In the Language 2 field, select a second language.
- In the first row click in the Original cell and type the term in the first language and press ENTER on your keyboard.
- In the first row click in the Translation cell and type the term in the second language and press ENTER on your keyboard.
- In the next row repeat steps 5 and 6. Do this until you've added all the terms you need.
- Click OK. The concepts and terms are added to any termbases that are associated with the project. The next time you reopen the Termbase Editor, you will see the concept rows you added, and you can add variations of those terms and additional details for them.
Note You can also use the "Quick Add Terms" option by clicking in the local toolbar of the Termbase Editor.
Termbase Editor Method
In the Termbase Editor you can add one concept row at a time to a termbase. The advantage of this method is that, for each concept row you enter, you can also add variations of the term and more detailed information (e.g., source, definition, related term, context sentence, usage). In addition, you do not need to have any files open for translation at the same time.
How to Add Concepts and Terms via the Termbase Editor
- Select the Resources ribbon. In the Termbase section, select Edit Termbase.
- From the submenu, select the termbase you want to edit.
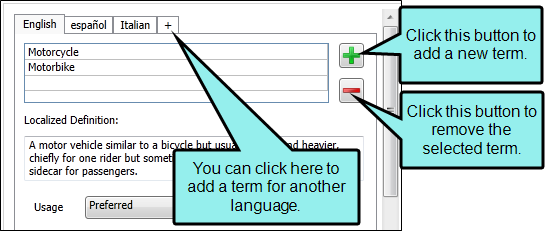
- In the local toolbar, click
 . The Add Term to Termbase dialog opens.
 - In the top field, select a language and type the term.
- In the next field, select a second language and type the term.
- Click OK. The new concept row is added to the grid in the editor.
-
In the lower-left area of the Termbase Editor, you can click the plus tab to add the term in another language. You can also click
 to add variations of the term.
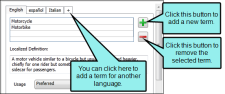
- Click
") to save your work.
to save your work.
Translation Editor Method
In the Translation Editor you can add either one term at a time or multiple terms at once to a termbase. The advantage of this method is that you can quickly add terms as you are translating segments for a file. When you do this, the terms are added as new concept rows in the Termbase Editor.
How to Add Terms via the Translation Editor
- Open a file.
- In the Translation Editor, highlight a term in a segment (source or target) that you want to add to the termbase.
- Do one of the following:
Right-click in the field and select Add New Term.
OR
- In the local toolbar click
 .
.
The Add Term to Termbase dialog opens. The term that you highlighted is also highlighted in the corresponding field in this dialog.
- In the other field, highlight or type the corresponding term.
-
(Optional) If you want to add metadata to the term, click Advanced. The Add Term to Termbase dialog expands to display additional drop-downs and fields where you can add additional information to the term.
To return to the basic editor, click Basic.
Part of Speech
You can click in this drop-down and select the part of speech for the term in each row.
Example
Adjective, verb, noun, and so on.
Term Type
You can click in this drop-down and select an option to describe what type of term it is.
Example
Abbreviation, phrase, variant, and so on.
Gender
You can click in this drop-down and select the appropriate gender for the term in each row.
Example
Feminine, masculine, neuter.
Usage
You can click in this drop-down and select an option that lets you recommend the use of the term or prevent its incorrect use.
Example
Not recommended, preferred, obsolete, and so on.
Location
You can click in this drop-down and select a user interface location where someone would see the term.
Example
Check box, menu item, tab, and so on.
Geographical
You can enter the geographical area where the term is used. Example
You might enter "North America" or "Africa."
Project
If you are working on multiple projects for a client, you can enter the appropriate one in this field. Each project might have many unique terms associated with it. By default, this field displays the name of the Lingo project.
Example
You might enter "Spanish Translation Project" or "Project for Marketing Department."
Source
You can enter the source of the term. Example
Let's say you are working for a client and one of the employees is named Bob Smith. If Bob told you to use this particular term, you might enter his name in this field.
Customer
If this term is used by specific customer, you can add the name of that customer. Example
You might enter "Harley Davidson."
Definition
Enter a definition for the term.
Example
If the term is "motorcycle," you might enter "A motor vehicle similar to a bicycle but usually larger and heavier, chiefly for one rider but sometimes having two saddles or an attached sidecar for passengers."
Metadata Applies To...
Select whether you want to apply the metadata to the source and target term (default), only the target term, or only the source term.
- Click OK. The new concept row is added to the grid in the Termbase Editor.
- Click to save your work.
What’s Next?
After adding terms to a termbase, you can edit them (adding more details) and use them in your translation work. See Editing Termbases and Inserting Terms From a Termbase.

