Selecting Actions for Objects
After you add an object (e.g., button, input box) to a frame, you can assign an action to it (e.g., go to next section, go to previous frame). When the user performs a specified event, the action is triggered (e.g., when the user types clicks a button, the movie advances to the next frame).
[Menu Proxy — Headings — Online — Depth3 ]
How to Select an Action
- Open the frame.
- Double-click the object. The Object Properties window pane opens.
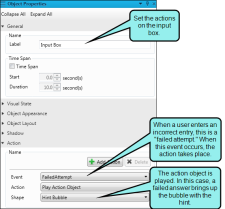
- Expand the Action section.
-
Click Add Action.
A set of two fields, Event and Action, appear.
-
In the Event field, select one of the following:
- Click The object changes when the user clicks the object.
- DoubleClick The object changes when the user double-clicks the object.
- MouseEnter The object changes when the user moves the mouse over the object.
- MouseLeave The object changes when the user moves the mouse off of the object.
- MouseUp The object changes when the user clicks, and then releases, the mouse button. This lets you create a "pressed" effect that changes back to the default settings when the mouse button is released.
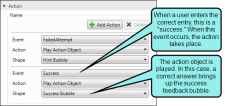
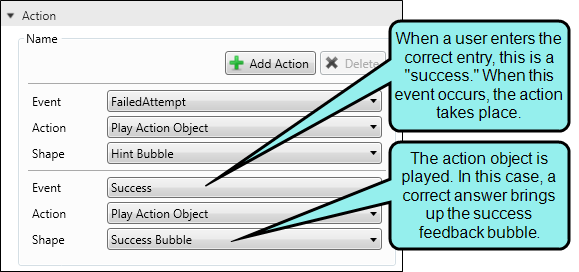
- Success The object changes when an input box has been answered correctly.
- Failed Attempt The object changes when an input box has been answered incorrectly but the user is still within the allowed number of failed attempts.
- Failure The object changes when an input box has been answered incorrectly the max number of times allowed.
- End The object changes when the frame ends. To use an end event, you must have an action object in your frame. You can convert an object to an action object by right-clicking it, then selecting Advanced > Convert to Action Object.
-
Do one of the following:
Associate an Action Object With an Interactive Object or Shape
If you want to trigger an action object to appear when an event occurs, choose the "Play Action Object" event. For example, you could use an action object to display a feedback bubble when a user enters information into an input box. You must have action objects on the frame in order to use this option. Action objects are often used with interactive objects, but you can associate them with any shape. See Interactive Objects.
-
In the Action field, select Play Action Object.
The Shape field appears.
-
In the Shape field, select from any action objects currently in this frame.
Example
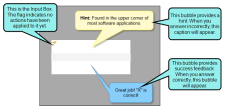
You have an input box in the frame so the user can answer a question. You've already added the correct entry to the input box properties and have set it to allow an infinite number of answer attempts, but you feedback appear when they enter an incorrect entry. You also want feedback to appear when they've entered the right answer. First, add two bubbles to the frame: one to provide a hint when the user enters the incorrect response, and another to provide success feedback when the user enters the right answer.
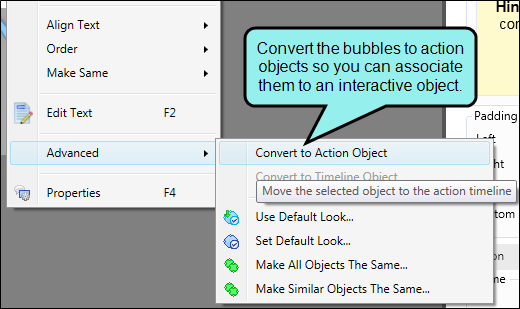
Next, right-click each of these bubbles and select Advanced > Convert to Action Object. This lets you associate them with the interactive input box.

Then, add two actions to the input box. The first one is for the hint.
The second action is for the success feedback.
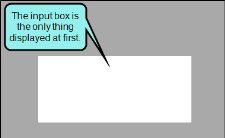
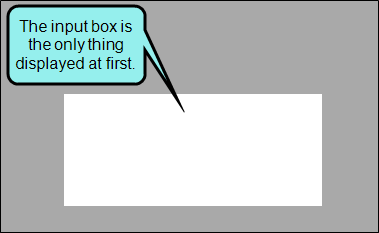
In the output, only the input box displays at first.
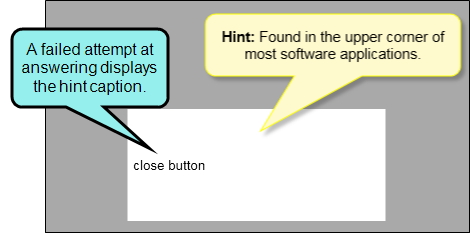
When the user types "close button," and presses ENTER, the hint will appear.

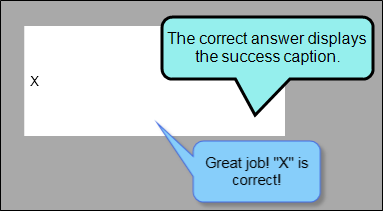
When the user types the correct entry, "X," and presses ENTER, the success feedback appears.

Use the Preview option (Object > Preview Mode) to check your progress as you work.
Set a Visual State for an Object
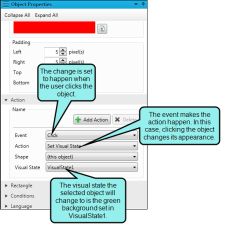
Choose the "Set Visual State" action when you want an object's look to change when an event occurs. Visual states can affect either the selected object or another object (e.g., when the user clicks the selected object, another object changes its state). See Visual States.
- In the Action field, select Set Visual State. A set of two fields, Shape and Visual State, appear.
- In the Shape field, select the object to which you want to apply the visual state.
- (this object) When an action triggers the visual state, it affects the selected object (e.g., the current object will change color when clicked).
[another object] When an action triggers the visual state, it affects a different object (e.g., when the user clicks the current object, a different object on the frame will change color). Objects you select here must have one or more visual states available.
-
In the Visual State field, select the visual state you want to apply (e.g., when the cursor moves over an object, it will use "Visual State 1.").
Note After you create and apply a visual state, you can preview how it will look without building the movie. See Using Preview Mode.
Example
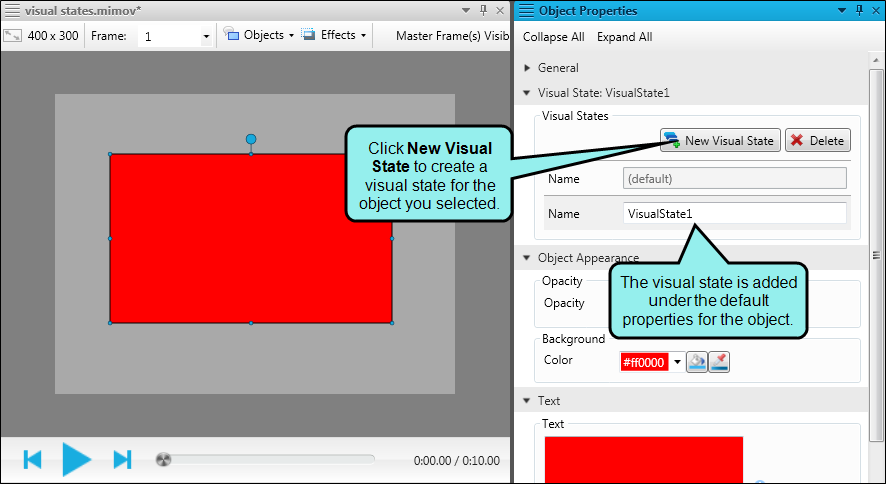
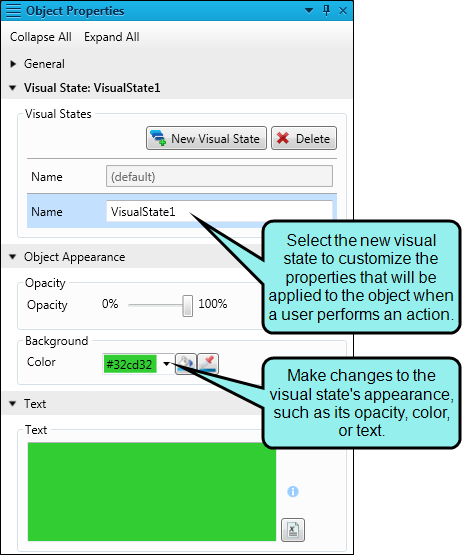
Let's say you have a rectangle that is red no matter what the user does to the object while viewing the movie. You would like it to change to green when the user clicks the object.
When you open the Object Properties window pane, you have the option to create a visual state for the rectangle. The visual state you create is applicable only to the red rectangle.


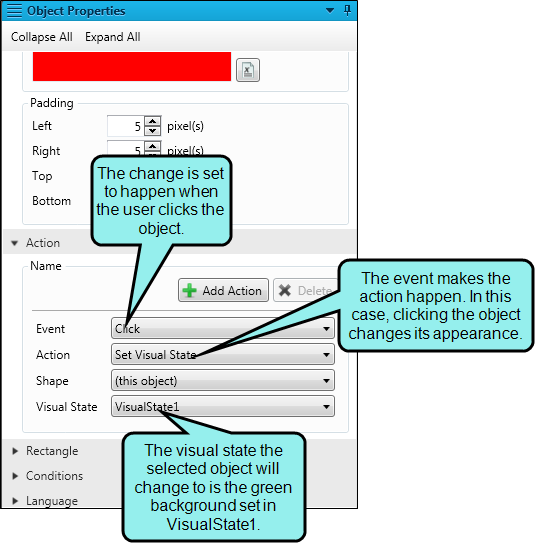
Once the visual state is created, select the default visual state (this is because the action will affect the default state, not the visual state). Then expand the Action section in the object's properties, and select the action you want to trigger the visual state.
You can preview the visual state and action by using Preview Mode. Select the Home ribbon. In the Mode section, click
 . Now, performing the action on the object (e.g., clicking, double-clicking) in the Frame Editor will let you see how the visual state looks.
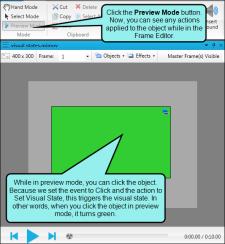
Add a Resume Action to Continue Playing the Frame
Choose this action when you want the user to click an object in order to continue the movie. This might be useful if you want to pause the movie until the user makes entries in an input box.
- In the Action field, select Pause/Resume Movie.
- Right-click the frame and select Properties.
- In the Frame Properties window pane, expand the Frame Transition tab.
- Click Pause movie at end of frame.
- Click
") to save your work.
to save your work.
Add Any Other Action Type
There are several other actions that you can add to an object by selecting them from the Action drop-down. Choose any of the following actions:
- Accept Input Select this option to accept the user's input. Let's say you add an input box to a frame. After users complete the input box, they can usually simply press ENTER on the keyboard. However, if you want users to click say, a button, when they are finished with the input, you can create a button and apply this action to it. After users finish typing the input, they can click that button to submit the input (instead of pressing ENTER on the keyboard).
- Open URL Select this option to open a remote file (such as a website) when the specified event occurs (e.g., click, double-click). When you select this option, the URL field appears at the bottom of the tab. Enter the full URL in this field. With this option, the website or other file will open in the viewer used for displaying the movie.
- Open URL in New Window Select this option to open a remote file (such as a website) when the specified event occurs (e.g., click, double-click). When you select this option, the URL field appears at the bottom of the tab. Enter the full URL in this field. With this option, the website or other file will open in the default application for the file type (e.g., HTM files open in Internet Explorer, DOC files open in Microsoft Word).
- Go to Frame Select this option to open a specific frame in the movie when the specified event occurs (e.g., click, double-click). When you select this option, the Frame field appears beneath the Action field. Enter the number or name of the destination frame in this field. (The name of the frame is identified above it in the Frames window pane. You can change the name in the Frame Properties window pane.)
- Go to Next Frame Select this option to open the next frame in the movie when the user clicks the button or other object.
- Go to Previous Frame Select this option to open the previous frame in the movie when the specified event occurs (e.g., click, double-click).
- Go to First Frame Select this option to open the first frame in the movie when the specified event occurs (e.g., click, double-click).
-
Go to Section Select this option to open a specific movie in the collection when the specified event occurs (e.g., click, double-click). When you select this option, the Section field appears beneath the Action field. Select the name of the destination movie from the drop-down list in this field. This option assumes you have created a collection and added multiple movies to it.
Note If you are linking to a movie that has a name with a number only, Mimic considers that number to be the movie's position in the collection sequence. For example, if you enter 2 when specifying the destination movie, Mimic will link to the second movie in the collection, not necessarily to a movie that you have named "2."
- Go to Next Section Select this option to open the next movie in the collection when the specified event occurs (e.g., click, double-click). This option assumes you have created a collection and added multiple movies to it.
- Go to Previous Section Select this option to open the previous movie in the collection when the specified event occurs (e.g., click, double-click). This option assumes you have created a collection and added multiple movies to it.
- Go to First Section Select this option to open the first movie in the collection when the specified event occurs (e.g., click, double-click). This option assumes you have created a collection and added multiple movies to it.
-
- Click to save your work.


Tip Newly created buttons include two default visual states:
- Hover MouseEnter and MouseLeave events create a hover effect.
- Click Click and MouseUp events create a pressed/click effect.
You can edit these visual states and actions to create your own button effects. You can also use them as a template for creating visual states and actions for other objects.
Note Multiple actions can be applied to each object.
Note Actions applied to an object will remain part of the object if you add it to your palette.
Note You can convert any object into an action object. Right-click on the object and select Advanced > Convert to Action Object. If you want to convert an action object into a regular object, right-click on the action object and select Advanced > Convert to Timeline Object.
What’s Next?
If necessary, you can continue enhancing the movie. Otherwise, you can finalize the movie by building and distributing it. See Editing a Movie and Building Movie Output Using the Interface.

