Editing Keyframes
Once you have set a keyframe, you can easily edit it. This is particularly useful when you only want to make minor adjustments to your existing keyframe. When you edit a keyframe, you gain access to the interpolation property, or the way the object or clip effect transitions from one keyframe to the next.
[Menu Proxy — Headings — Online — Depth3 ]
How to Edit Object Keyframes
- Open a movie that contains one or more objects with keyframes.
-
In the Timeline window pane (View > Timeline), do one of the following:
- For all standard object types, click Frame View. Any action objects converted to objects will also be in this view.
- For action object types, click Action View. Any objects converted to action objects will also be in this view.
- Scroll down to the object's desired keyframe bar (e.g., opacity, text).
-
Double-click on the keyframe (diamond) within the keyframe bar that corresponds to the transition that you want to edit.
The Keyframe Properties window pane opens.
-
Do one of the following, depending on the type of keyframe:
To Change the Opacity
- In the Keyframe Properties window pane, expand the Opacity Keyframe section.
-
In the Properties section, do one of the following:
- Time Select a different time at which the keyframe will begin.
- Value Select a different percentage for the amount of opacity for this particular keyframe.
- Interpolation Select one of the following:
- Linear Set a gradual change in opacity from this keyframe to the next.
- Discrete Set an instant change in opacity from this keyframe to the next.
To Change the Color
A timed, subtle change to an object's background color can redirect attention to that object when the transition begins.
- In the Keyframe Properties window pane, expand the Gradient Keyframe section.
-
In the Properties section, do one of the following:
- Time Select a different time at which the keyframe will begin.
- Gradient Select a different color for the object for this particular keyframe. Click the down arrow in the first field to select a color for the start of the gradient, or the second field to select a color for the end of the gradient. If you want a solid color, set both fields to the same color. To see advanced color options, select
 . You can also click
  to pick a color from your screen.
 - Interpolation Select one of the following:
- Linear Set a gradual change in color from this keyframe to the next.
- Discrete Set an instant change in color from this keyframe to the next.
To Change the Position
You have more options for the trajectory when editing a position keyframe. Edit a position keyframe to change the way the trajectory moves from one keyframe to the next (e.g., curved path, straight path, no path).
- In the Keyframe Properties window pane, expand the Position Keyframe section.
-
In the Properties section, do one of the following:
- Time Select a different time for the keyframe to begin.
- Position Select a different position on the frame for the object for this keyframe. The first field sets the horizontal position, and the second sets the vertical position. You can also drag a position keyframe's corresponding trajectory point in the Frame Editor to move it the object to a new position. This changes the position numbers automatically.
- Interpolation Select one of the following:
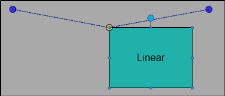
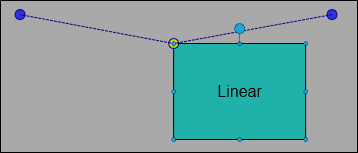
- Linear Set a straight path from this keyframe to the next.
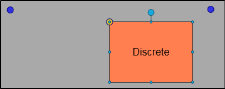
- Discrete Set an instant jump from this keyframe to the next. In other words, the object will not move along a path; it will appear in one position, and then the next.
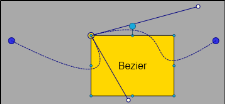
- Bezier Set a curved path from this keyframe to the next. This opens two sets of Control Point fields. The first control point set is for the length of the control; the second field is for the position. This lets you customize the depth of the trajectory's arc (first field) and the position of the trajectory's wave (second field). As an alternative to using the Control Point fields, you can manually click and drag the white control point handles in the Frame Editor to change the path's arc and wave.
- Control Point 1 Controls the trajectory from this keyframe to the previous keyframe. This control will not work on the first position keyframe as this keyframe is the starting point.
- Control Point 2 Controls the trajectory between each keyframe.
Example
This rectangle has a linear trajectory. It will move smoothly along the straight trajectory line.
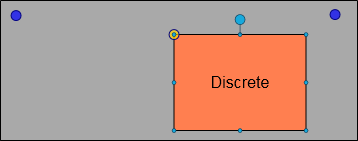
This rectangle has a discrete trajectory. It will jump from one trajectory point to the next.
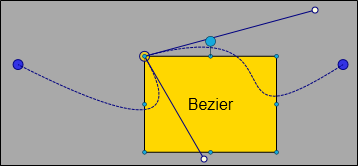
This rectangle has a bezier trajectory. It will move smoothly along a curved line. You can adjust the control points (the white dots) to change the shape of the curve between each keyframe.
To Change the Size
You might want to show an object become smaller to accommodate other objects taking over the focal point of the slide.
- In the Keyframe Properties window pane, expand the Size Keyframe section.
-
In the Properties section, do one of the following:
- Time Select a different time at which the keyframe will begin.
- Size Select a different size for the object for this particular keyframe. The first field sets the width, and the second field sets the height. Manually set the size of the object for each keyframe by clicking and dragging the small blue handles on the object.
- Interpolation Select one of the following:
- Linear Set a gradual change in size from this keyframe to the next.
- Discrete Set an instant change in size from this keyframe to the next.
To Change the Rotation
Rotating an object on the frame will create a spinning effect.
- In the Keyframe Properties window pane, expand the Rotation Keyframe section.
-
In the Properties section, do one of the following:
- Time Select a time at which the keyframe will begin.
- Value Select or enter a number for the amount of rotation. A negative number turns the object counter-clockwise, while a positive number turns it clockwise. Manually rotate the object by clicking and dragging the large blue handle on the object.
- Interpolation Select one of the following:
- Linear Set a gradual change in rotation from this keyframe and the next.
- Discrete Set an instant change in rotation from this keyframe to the next.
To Change the Text
Changing the text on an object lets you reuse that object.
- In the Keyframe Properties window pane, expand the Text Keyframe section.
-
In the Properties section, do one of the following:
- Time Select a different time at which the keyframe will begin.
- Text In the text box, enter the text that will appear during the keyframe.
- Interpolation The interpolation between text keyframes is always discrete. One keyframe's text is completely removed before the next keyframe's text appears on the object. This prevents an overlapping of text between keyframes.
-
Click
") to save your work.
to save your work.
How to Edit Clip Effect Keyframes
You can apply keyframes to clip effects. You can edit these keyframes at any time.
- Open a movie that contains one or more objects to which clip effects with keyframes have been applied.
-
In the Timeline window pane (View > Timeline), do one of the following:
- For all standard object types, click Frame View. Any action objects converted to objects will also be in this view.
- For action object types, click Action View. Any objects converted to action objects will also be in this view.
- Scroll down to the effect's desired keyframe bar (e.g., position, size).
-
Double-click on the keyframe (diamond) within the keyframe bar that corresponds to the transition that you want to edit.
The Keyframe Properties window pane opens.
-
Do one of the following, depending on the type of keyframe:
To Change the Position
Changing a clip effect's position keyframe controls where the effect area is located on or around the object.
- In the Keyframe Properties window pane, expand the Position Keyframe section.
-
In the Properties section, do one of the following:
- Time Select a different time at which the keyframe will begin.
- Position Select a different position on the frame for the effect area for this particular keyframe. The first field sets the horizontal position, and the second field sets the vertical position. If you want to change the position of the effect area manually, you can click and drag the red effect area frame to a new location. You can also drag a position keyframe's corresponding trajectory point in the Frame Editor to move it the object to a new position.
- Interpolation Select one of the following:
- Linear Set a straight path from this keyframe to the next.
- Discrete Set an instant jump from this keyframe to the next. In other words, the object will not move along a path, it will appear in one position, and then in the next.
- Bezier Set a curved path from this keyframe to the next. Bezier also adds two sets of Control Point fields. The first field of each control point set is for the length of the control; the second field is for the position. This lets you customize the depth of the trajectory's arc (first field) and the position of the trajectory's wave (second field).
- Control Point 1 Controls the trajectory from this keyframe to the previous keyframe. This control will not work on the first position keyframe as this keyframe is the starting point.
- Control Point 2 Controls the trajectory from this keyframe to the next keyframe.
To Change the Size
You might want to show a clip effect become larger to cover an entire object.
- In the Keyframe Properties window pane, expand the Size Keyframe section.
-
In the Properties section, do one of the following:
- Time Select a different time at which the keyframe will begin.
- Size Select a different size for effect area for this particular keyframe. The first field sets the width, and the second field sets the height. Manually set the size of the effect area for each keyframe by clicking and dragging the edges of the red effect area frame.
- Interpolation Select one of the following:
- Linear Set a gradual change in size from this keyframe to the next.
- Discrete Set an instant change in size from this keyframe to the next.
-
Click
to save your work.
Examples
Example
Let's say you have an oval that goes from red to blue to yellow. You want to change the red state to a light blue.
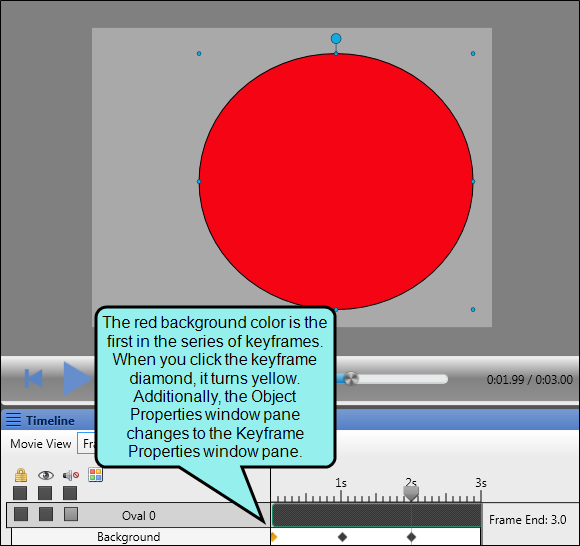
When you click on the first diamond that represents the red state, the Keyframe Properties window pane opens, showing only the Gradient Keyframe properties.

Once you set the value field to a light blue color, you can preview your movie or save your work.
Example
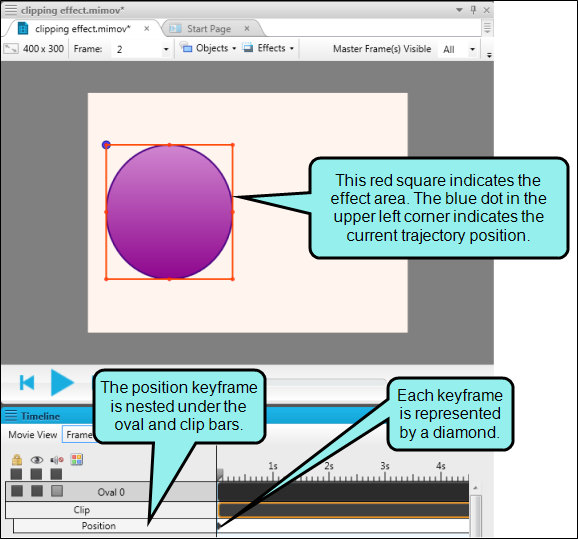
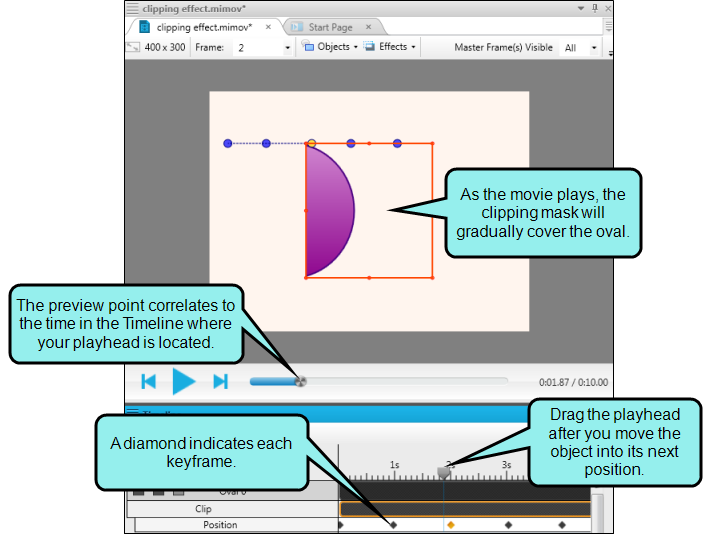
This frame contains an oval object to which a clip effect has been applied. Right now, the effect covers the entire object, so you can see the entire oval. However, we want the effect to gradually move off the oval, so the oval disappears from the frame. To do this, we can add a series of position keyframes by using the Keyframe button  in the Effect Properties window pane.

When the object is at the starting point of the effect, in other words, when the entire oval is contained in the clip effect area rectangle, click the position keyframe button. Once the first keyframe has been added, the position keyframe type bar is added to the clip effect bar, and each keyframe is indicated by diamond on the keyframe type bar. Additionally, a blue trajectory dot is added to the frame to indicate the current location of the effect.
For each position, drag the playhead to the time at which the effect should move, then drag the effect rectangle to the right of the oval. A new keyframe diamond is automatically added to the Timeline, and the trajectory updates.
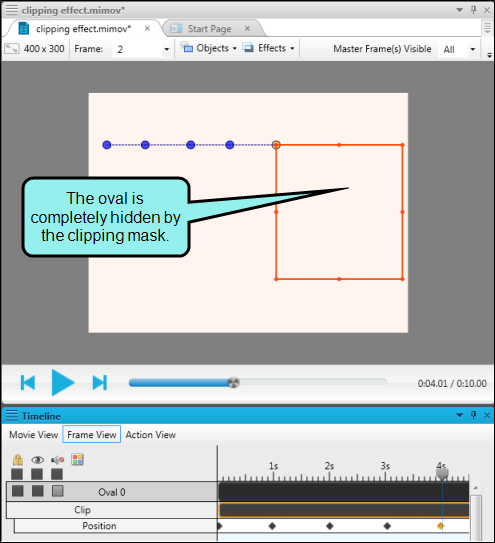
Continue to add position keyframes until the entire oval has disappeared.
What’s Noteworthy?
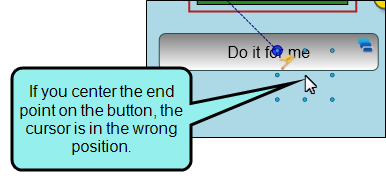
Tip When applying position keyframes to an object or effect, the position keyframe location is placed at the upper left corner of the object. Depending on the type of path you are drawing, you may want to slightly adjust the object's trajectory to account for the space between the upper left corner of the object and the middle of the object.
For example, if you have a cursor object and you need it to "click" a button, you may want to position the trajectory slightly above and to the left of the button, so it appears that the cursor is in the middle of the button.

Note Each diamond within a keyframe type bar (e.g., the size bar) is treated separately. In other words, if a size bar shows five diamonds, each of those diamonds represents an individual keyframe. Editing one of those diamonds affects only that particular keyframe's state. If you are trying to achieve a gradual increase in the size if your object or the object effect, you will want to adjust the diamonds that follow the one you change.
Note You can copy an object that contains keyframes to a different frame, and the keyframes will be retained. However, if the new frame is shorter than the original frame, some keyframes may not be played (because they occur after the frame has ended). If you want all of the keyframes to play, you may need to move them to fit within the duration of the new frame.
Note If you set a shape's opacity to 0% (fully transparent), it will be hidden on the frame. This lets you prevent users from clicking on or selecting a shape accidentally.
Note The "Snap to Keyframe" option below the Timeline window pane lets you precisely move the playhead to a keyframe for an object. When this option is enabled and you drag the playhead, it "snaps" like a magnet to the nearest keyframe. If you attempt to align the playhead on a keyframe without this option, you might find that you are slightly off target.
What's Next?
As you are editing keyframes, you may find that some need to be removed completely. See Removing Keyframes.

