You may want to erase sections of your background image without removing the image completely. The eraser lets you manually remove portions of a drawing or image at your discretion.
[Menu Proxy — Headings — Online — Depth3 ]

How to Erase an Area
You can use the eraser to make freehand removals from any part of the canvas or background image.
- Open the image.
- From the Edit ribbon or local toolbar, click
 .
. -
From the Size field, select a size for the eraser surface.
Note You can also use keyboard shortcuts to increase or decrease the size of the tool. Press [ to decrease the size, or press ] to increase the size.
- (Optional) Zoom in on the image to make more precise erasures.
- Click in the true canvas area and drag the mouse over the unwanted parts of the image. Release the mouse button when you are finished.
-
Click
 to save your work.
Example
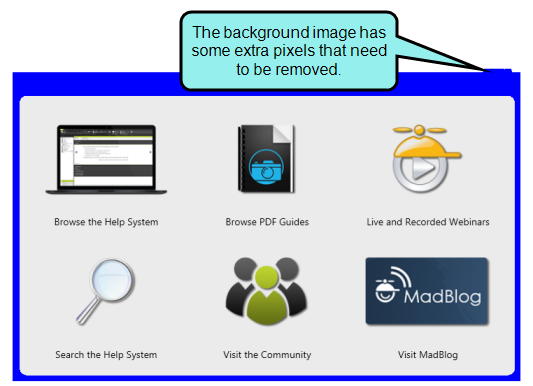
Your background image has a small area of protrusion on the transparent background. You want to remove that protrusion, but you don't want to crop the size of the true canvas to the borders of the image.
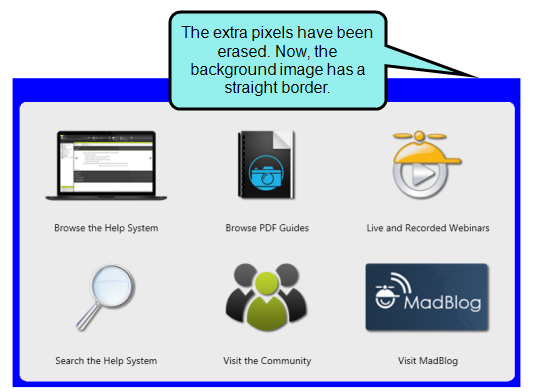
After zooming in on the unwanted protrusion, use the eraser to remove it and maintain your transparent background.
How to Erase Using the Selection Rectangle
You can use the selection rectangle to set a boundary for the eraser. This lets you limit the area where you can erase to the area within the rectangle's borders.
- Open the image.
- From the Edit ribbon or local toolbar, click
 .
. - Click on the part of the canvas you want to erase and drag the mouse until the rectangle covers the section of the canvas you want to erase.
- From the Edit ribbon or local toolbar, click .
-
From the Size field, select a size for the eraser surface.
Note You can also use keyboard shortcuts to increase or decrease the size of the tool. Press [ to decrease the size, or press ] to increase the size.
- (Optional) Zoom in on the image to make more precise erasures.
-
Click in the area of the rectangle and drag the mouse over the parts of the selection that you want to remove. You will not be able to erase outside of the rectangle area. Release the mouse button when you are finished.
Note If the selected area is large, press the DELETE key to remove all of the selected area at once.
Note After you are done using the tool, press the ESC key to switch to Select Mode, or click
 or one of the other tools to continue.
Note If the background scale is set to anything other than 1.000, the canvas tools (magic wand, selection rectangle, color fill, pencil, eraser, and flatten) will not be available. Be sure to make changes to the canvas before making adjustments to the background scale.
-
Click
to save your work.
Example
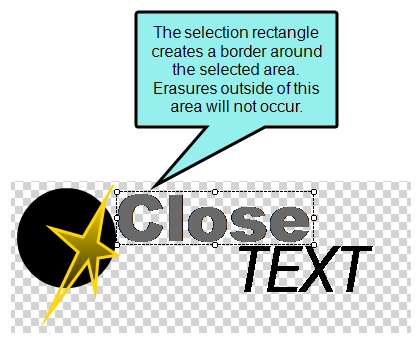
You have an image that has text very close to some shapes. You want to remove the first line of the text, but you don't want to accidentally erase a little bit of one of the shapes.

In this case, you could use the selection rectangle to box the text area you want to erase.
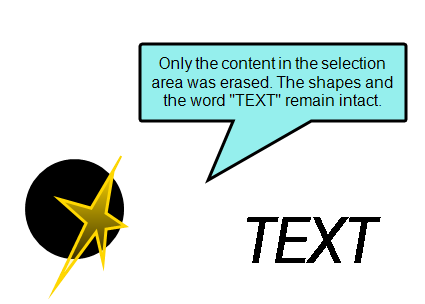
Next, use the eraser without worrying about removing any of the content outside of the selection rectangle. You can erase all of the selected content by pressing the DELETE key, or you can freehand erase.
How to Erase Using the Magic Wand
You can use the magic wand to select a specific area. This lets you limit the area where you can erase to the magic wand's selection.
- Open the image you want to modify.
- From the Edit ribbon or local toolbar, click
 .
. - In the local toolbar, use the Fill Tolerance drop-down
 to adjust the tool's sensitivity to slight variations in color. Use a low tolerance if you want to select very specific areas of the image. Use a high tolerance if you want to select an area where there are very slight differences in a color, or if you want to intentionally select large sections of an image.
 -
Click on the part of the canvas you want to erase. The magic wand adds a semi-transparent overlay onto the surface of the selection.
Note After making the first selection using the magic wand, you can continue to add selections by holding down the SHIFT key while clicking in new areas. All areas that are part of the selection will display a semi-transparent overlay on top of the existing image.
- From the Edit ribbon or local toolbar, click .
-
From the Size field, select a size for the eraser surface.
Note You can also use keyboard shortcuts to increase or decrease the size of the tool. Press [ to decrease the size, or press ] to increase the size.
- (Optional) Zoom in on the image to make more precise erasures.
-
Click in the magic wand selection and drag the mouse over the parts of the selection that you want to remove. The magic wand adds a semi-transparent overlay onto the surface of the selection. You will not be able to erase outside of the selection area. Release the mouse button when you are finished.
Note If the selected area is large, press the DELETE key to remove all of the selected area at once.
Note After you are done using the tool, press the ESC key to switch to Select Mode, or click
or one of the other tools to continue. -
Click
to save your work.
Example
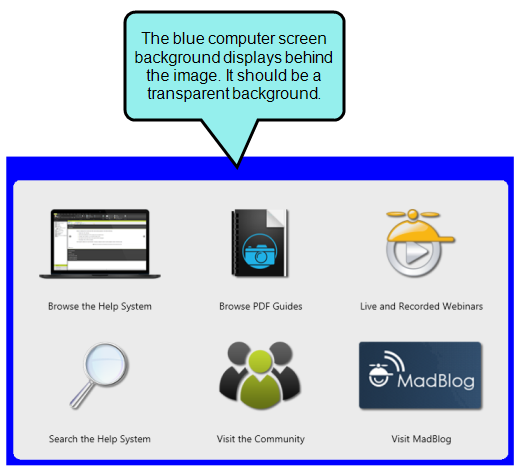
You created an image a while ago. However, your computer's background is part of the image, but the image has been flattened. You need to remove the computer screen background, but you don't want to erase any other part of the image.
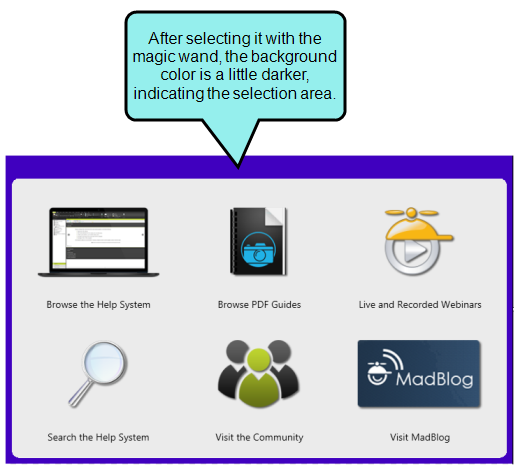
Use the magic wand to first select the computer screen background.
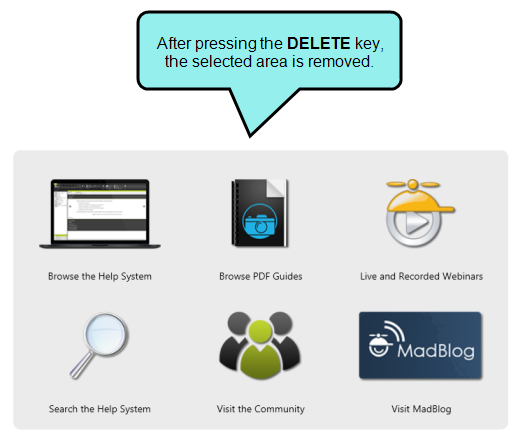
Now, use the eraser (or press the DELETE key) to remove it without erasing anything else.
Note The eraser only works on images, objects, or drawings that part of the background. Because of this, areas that have been erased will show a transparent background (gray and white checkers).
Note If you are using a drawing or selection tool and Auto-Adjust is enabled, you will not be able to use the tool outside of the true canvas. The cursor changes to a no symbol  to indicate areas outside of the true canvas boundaries where drawing and selection tools are disabled.
What's Next?
If necessary, you can continue editing the image (e.g., adding objects, effects, a callout; cropping the image; resizing the image). Otherwise, you can finalize the image by saving it. See Editing Images.