Creating Single-Source Images

You can single-source images, producing one set of images, but different settings (e.g., gray scale, resolution) for online and print-based outputs.
[Menu Proxy — Headings — Online — Depth3 ]
How to Create Single-Source Images
MadCap Capture Tasks
- If you want to use a profile to specify single-source settings before capturing images, open that profile. Otherwise, capture an image and then double-click it to open the File Properties dialog.
-
In the Profiles Editor or File Properties dialog, select the Format tab. Then choose the medium (e.g., Web (Default) for online outputs and Print for print-based outputs), and enter the appropriate settings for each. See Capture Profiles or Setting Image Properties Using Mediums.
Note You can enable settings for different mediums (i.e., other than the Web (Default) medium) only if the image in question already exists in a MadCap Flare project.
Note Some settings are available in the File Properties dialog, but not in the Profiles Editor.
- Save the captured image in the appropriate location in the Flare project folder (e.g., Content > Resources > Images).
MadCap Flare Tasks
- Insert the image into the appropriate topic(s) or snippet(s).
- Develop targets for your different outputs.
- Build and view the targets.
- View the output for the targets. Notice that the image uses the appropriate settings.
Example
Example You create a Flare project and you are using Capture to produce images for it. You want to generate two different outputs from that Flare project. Let's say the first output is an online Help system to be placed on a website, and the other output is a PDF document, which you will send to a printer.
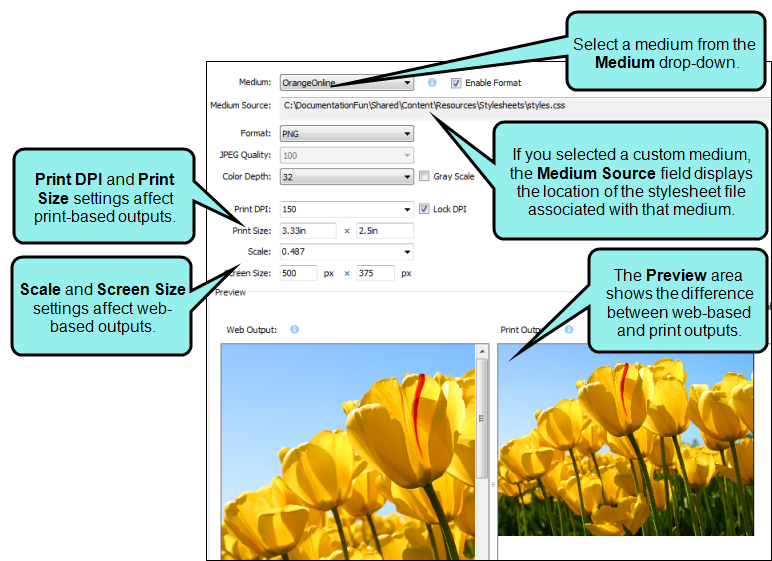
When you edit the image properties in Capture, you select a medium from the Medium drop-down to specify the image settings (you may elect not to change any of the default settings). When you select the Web (Default) medium type, you can change the Screen Size or Scale settings to affect how the image will appear on the monitor in your web output. When you select the Print medium type, you can set the image's Print DPI. You can also manually enter print dimensions in the Print Size fields or change the image's Scale.
Note: Although some settings—like Print DPI—are irrelevant for certain medium types, you may want to fill them in regardless of the medium type you choose, just in case you need to use a medium for another type of output.
If you also have custom mediums available in your Flare project, you can choose these options from the Medium drop-down as well. The settings you define for a custom medium can be different than those you define for a Print or Web (Default) medium, so you can make changes specific to a medium's layout.
In Flare, you insert the Capture image. When you generate output for the website, Flare displays the settings you specified for the Web (Default) medium. When you generate the PDF output from the project, Flare displays the settings for the Print medium. When you generate the custom output, Flare displays the settings for the custom medium. However, if the custom medium is unavailable (or if it is disabled in Capture), Flare will use the Web (Default) or Print settings.
Note Not only can you incorporate the single-source image into Flare, but you can save a standalone version of the image with the print settings applied to it. When you do this, a copy of the image is saved in a folder called "PrintVersions," next to the location where the original image was saved.