About Team Authoring
Team authoring is a source control feature that makes it possible for multiple authors to work together on a single project. Authors work on their own local copy of a project on their machine (called the working copy), while the master project (or the team project) is located on the organization's network or on a web server. Although the same project is made available to the entire team, one author's changes will not be overwritten by another author's changes.
With team authoring, your projects can be stored in the following kinds of repositories:
- Microsoft® Team Foundation Server
- Web Repository
- File System Repository
If you would prefer to store your documents in Microsoft® SharePoint®, see Merging Word Documents.
Team members work on their own local copy of the Doc-To-Help project. When a document is checked out and is being edited by one team member, it is locked so that others can’t edit it at the same time. Until changes are checked in, they remain local to the author's machine, appearing only in the team member's working copy of the project. Likewise, changes made by other authors cannot be viewed until they are retrieved from the repository. Doc-To-Help makes it easy to check files in and out of the repository.
A Doc-To-Help project must meet the following team authoring requirements:
- All of the project's documents and auxiliary files must be located within subfolders of the project folder (Media, CSS files, Documents, etc.). Doc-To-Help automatically sets your project up this way by default.
- If your project uses customized templates or themes, all team members must have the same versions of those files in the same locations on each of their machines.
- All team members must have the same version (including build number) of Doc-To-Help installed on their machine. This information is available from the File > Help > About MadCap Doc-To-Help.
- If using a Team Foundation Server repository, all team members must install Microsoft Visual Studio Team Explorer 2008 or later.
Following are the primary steps associated with team authoring:
-
Set Up Project Each team authoring project must have an administrator (usually the documentation manager or lead writer). The administrator makes the project available to other team members by uploading it to the central repository and configuring the settings.
In addition, the administrator handles other functions, such as: removing backup files, unlocking files from the repository, upgrading the team project, and disconnecting team authoring support from working copies of projects.
- Connect to Project After a team authoring project is set up, team members must connect to and download the team project in order to create their own working copies of the project. Once team members have a working copy, they can check files out, edit them, and check them back in.
- Work in Team Project After connecting to a team project, team members can work in their own working copy of the project.
Additional team authoring options can be set in the Options dialog (File > Tools > Options > Team).
When you open the working copy of a team project, Doc-To-Help will include an additional ribbon and window, both named "Team Authoring."
Three different file types make up a team authoring project:
-
Documents These are the source documents included in your Doc-To-Help project. By default, they will be located in the Documents folder. Any rich content variable documents will be included in these folders also.
-
Auxiliary Files These are any files that are not documents. Examples include image and CSS files. By default, these will be located in the Media and CSSFiles folders.
-
Project File (.d2h Extension) This is the project itself, which contains all project information such as keywords, attributes, windows, and project properties.
You can check out and work with all three file types. In projects stored in a File or Web Repository, when a document or auxiliary file is checked out by an author, no one else can edit that file until those files are checked back in. When an entire project is checked out, no one else can edit the project or the files within it until the project is checked back in. Projects stored in Team Foundation Server (TFS) repositories have additional check out options.
You can manage components of your Doc-To-Help project in the following ways if you intend to bind it with a shared repository:
- Connecting to a Team Project
- Setting Up a Team Project
- Changing Repository Settings
- Getting Latest Version of the Project
Once your Team Authoring project is open, you can access the Team Authoring panel for more functions to help manage this project.
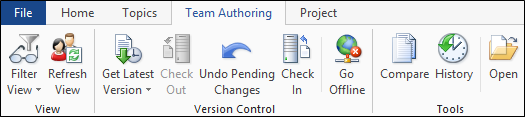
After you have opened your project, you can do the following with the Team Authoring ribbon:
-
Filter View Choose the file types that will be displayed in the Team Authoring window: Documents, Auxiliary Files, Only Pending Changes.
- Refresh View Refresh the entire display to update the file status.
-
Get Latest Version Get the latest version of the selected document from the repository. (TFS projects include a drop-down that allow you to choose a specific version of a document.)
-
Check Out Check the selected document out of the repository.
-
Undo Pending Changes Undo all changes made to a document that has been checked out.
-
Check In Check the selected document into the repository.
-
Go Offline Break the connection with the server. You will be prompted to choose the project editing mode: Restricted or Unrestricted. If you choose Restricted, an Unrestricted Project Editing button will appear in the ribbon, allowing you to switch modes if you wish. This button will toggle to Go Online while you are offline.
-
Compare (TFS projects only) Compare the selected document with the version on the server.
-
History (TFS projects only) View a history of the selected document's changes.
-
Open Open the file selected in the Team Authoring window for editing.
Note Doc-To-Help integrates directly with Team Foundation Server and Microsoft SharePoint. It does not directly integrate with third-party tools such as ClearCase. However, Doc-To-Help will not interfere with those tools, so you can use them with your Doc-To-Help projects.