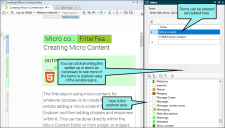
After you insert an index keyword, you might decide later that the index keyword needs to be altered. You can modify an index keyword simultaneously for all topics where that keyword is located, or you can modify it in a specific topic or snippet.
[Menu Proxy — Headings — Online — Depth3 ]
How to Edit a Keyword in Multiple Topics or Snippets
- Do one of the following, depending on the part of the user interface you are using:
Ribbon Select View > Index Window.
- Keyboard Shortcut Press F9.
The Index window pane opens. The window pane is split into two sections—the Terms area at the top and the Explorer area at the bottom. If you want to see more or less of either section, you can click the splitter
 between them and drag it up or down.
 - In the explorer area at the bottom of the window pane, right-click on the index keyword or subkeyword that you want to rename. From the context menu select Rename Keyword. The keyword is renamed in all topics where it had been inserted.
How to Edit a Keyword in a Specific Topic or Snippet
- Open the content file.
-
In the XML Editor, right-click on the marker holding the index keyword that you want to modify. From the context menu, select Edit Index Keyword.
The Index window pane opens. The window pane is split into two sections—the Terms area at the top and the Explorer area at the bottom. If you want to see more or less of either section, you can click the splitter
 between them and drag it up or down.
 - In the Terms column of the Index window pane, click in the cell containing the keyword that you want to change.
-
Type the index keyword as you want it to appear in the index. If you want to add a second level to the index keyword, type a colon after the first term, and then type the second term.
Example If you type Software:MadCap Flare, the term "Software" appears at the first level of the index, and the term "MadCap Flare" appears as a subentry under "Software."
Note If you want to delete a keyword from the Terms area of the Index window pane, click on the rectangular area to the left of the index keyword (on the area with the arrow
 ) and press Delete on your keyboard.
Note As you type in the Index window pane, notice that the cursor does not lose focus in the XML Editor. It merely turns gray so that you know for certain where you are adding the index keyword. When you return to the XML Editor, the cursor returns to its previous state.
- Press ENTER. The index keyword is modified.
- Click
 to save your work.
What’s Noteworthy?
Note If you edit an index keyword contained in a snippet, the changes are automatically reflected in any topics where you have inserted the snippet previously.
Note If you want to edit the look of a generated index in print-based output, see Editing the Look of Your Print Index. If you want to change the look of indexes in online output, you can do so by modifying styles within your skin. See Editing Skin Settings, Standard Skin Styles, and HTML5 Skin Styles.
Note If you want to edit the look of a generated index in print-based output, you can do so by using styles. For more information about using styles, including steps, see the online Help or the Flare Styles Guide. If you want to change the look of indexes in online output, you can do so by modifying styles within your skin. For more information about skins, see the online Help.
Note If you want to change how index keywords look when they're inserted in the XML Editor, you can change the MadCap|keyword style in the Stylesheet Editor.This does not affect the output.


