The TOC Editor is used to create tables of contents manually.
Creating and editing a table of contents file in Flare can be very easy to do for both online and print output. You can drag topics from the Content Explorer to the TOC Editor. You can also manually add TOC books and items, and then link them to other files. The links usually point to topics, but for online outputs they can also point to external files, other Help systems, and movies. You put all of these books and items in a structure that you think would be useful for the individual. In online output, end users browse through a TOC to find information. And in HTML5 Side and Top Navigation output, the TOC items become links in menus.
[Menu Proxy — Headings — Online — Depth3 ]
Online vs. Print TOCs
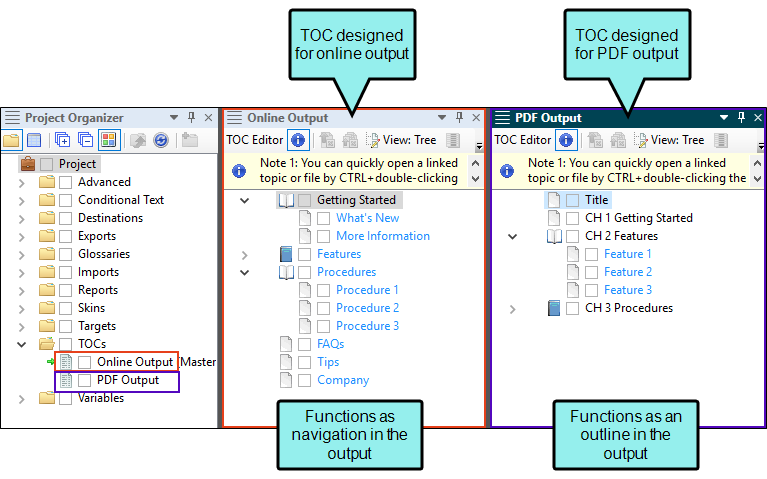
The TOC files you see in the Project Organizer work differently for online output than they do for print-based output. For online outputs, TOC files are exactly as their name suggests; they are files that create TOCs or menus in the output. But for print-based outputs, that same TOC file functions more like an outline. The element that actually generates a TOC in print-based output is called a “proxy,” which is inserted into a topic. You can manually create that proxy yourself, or you can select an option in the Advanced tab of the Target Editor and let Flare do it all for you. There are pros and cons for both methods.

How to Open This Editor
- Open the Project Organizer.
- Expand the TOCs folder and double-click the file.
Buttons and Descriptions
|
|
Hides or shows special information pertaining to the editor or window pane. |
|
|
Exports all of the data in the window pane to a comma-separated value (CSV) file. This option is enabled only if you are working in Grid View. |
|
|
Exports only the selected data in the window pane to a comma-separated value (CSV) file. This option is enabled only if you are working in Grid View. |
|
|
This button toggles between Tree View and Grid View when you click it. Tree View is the traditional format of the |
|
|
Opens the Columns dialog, which lets you configure the way the column information is shown. This option is enabled in Grid View only. |
|
|
Expands all of the |
|
|
Collapses all of the |
|
|
If you have created and applied condition tags, clicking this button toggles between showing and hiding them in the |
|
|
Click this button to create a new topic and simultaneously link it to a new item in the |
|
|
Click this button to add a new item to the |
|
|
Click this button to add a new book to the |
|
|
Click this button to add a new book at the top level (i.e., extreme left) of the |
|
|
Click this button to create a test node in a TOC. Select an item in the TOC, and click |
|
|
Click this button to open the Properties dialog for whatever item is selected in the If the item selected in the TOC Editor is a test node, this button displays as Test Options and opens directly to the eLearning tab in the Properties dialog. |
|
|
Click this button to move the selected item to the left in the |
|
|
Click this button to move the selected item to the right in the |
|
|
Click this button to move the selected item upward in the |
|
|
Click this button to move the selected item downward in the |

|
Opens the Content Explorer and highlights the location of the selected content file within it. |
|
|
Opens the Send Topic for Review Wizard, which lets you send the linked document to another person for review. |
|
|
Click this button to open the selected item. For example, if you select an item that is linked to a topic and then click this button, that topic opens in the XML Editor. You can also open an item by holding your CTRL key and double-clicking the item. |
|
|
Click this button to show or hide reports of unlinked entries. |
|
|
Click either of these buttons to open a small window that displays how many broken or unlinked items are in the editor. Below, in the editor, a triangle icon |
|
|
Click this button to navigate to the previous warning in the |
|
|
Click this button to navigate to the next warning in the |
|
|
Click this button if you want to toggle the behavior of double-clicking an item in the TOC Double-Click ButtonClick The default behavior (without the toggle button selected) is that double-clicking an item will open the properties dialog, and holding down the CTRL key while double-clicking will open the file linked to the item. If you activate the toggle button, this behavior is reversed; double-clicking an item opens the file linked to it, and holding the CTRL key while double-clicking will open the properties dialog.
|
|
|
Displays the color of condition tags that are associated with the |


 to add a new TOC entry as a sibling below the selected entry.


What’s Noteworthy?
Tip To find where a particular topic has been inserted into a table of contents (TOC), right-click the topic file in the Content Explorer or within the topic itself, and select Locate in TOC. If the topic is located in more than one TOC, a dialog opens, listing all of those TOCs. Select the TOC you want to look in and click Open.

