An HTML5 target is where you can set eLearning course options for final online output. The format of the output depends on the type of HTML5 skin you choose (e.g., Side Navigation, Top Navigation, Tripane, skinless).
Note Even though the HTML5 output type is common for eLearning material, you can also create the PDF output type. See PDF Output for a Course.
[Menu Proxy — Headings — Online — Depth3 ]
How to Edit the eLearning Target
The following describes options in the Target Editor for when you have an eLearning course as the target.
-
From the Project Organizer, expand the Targets folder, and double-click your eLearning target. The Target Editor opens.
-
From the General tab, select the Startup Topic drop-down. Select a topic that you want learners to land on when first viewing online output. You can optionally select (default); this defaults to the first topic in the TOC.
-
Select the Primary TOC for the course.
-
(Optional) From the Skin tab, select the eLearning Toolbar drop-down to choose a customized toolbar skin component. See Editing the eLearning Toolbar Skin Component.
Note You are not limited to one skin component of each type, although that is the most common situation. If you want, you can use multiple skin components of any type. If this is the case, you can associate a default skin component with a target. When you do this, the skin component you choose will always be used for any proxy of that same type that you insert for that target, unless you override it by associating a different skin component with a specific proxy that you've inserted.
-
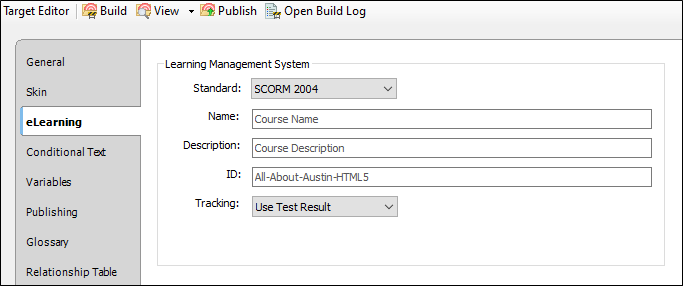
(Optional) From the eLearning tab, select the Standard drop-down. Choose the learning management system (LMS) standard to generate. You can only select one per target.
Generating a standard LMS package is not necessary if you just want to test and build a course locally. In this case, select none.
Note If you select to generate an LMS package, a zip file will get created and stored in the target's output folder when the build completes.
-
(Optional) Depending on the LMS standard selected, update the corresponding fields that follow.

-
Name Enter a name that helps to quickly determine the purpose of the course.
-
Description Optionally enter a description for the course.
-
ID This is an ID for the course. Use the default, or customize.
-
xAPI For the xAPI standard, the ID is a URL so the course can launch. A course should have a unique ID (i.e., URL) for a particular target. Each time you build that target, the same ID is used unless you change it.
When an xAPI package is generated, it includes the "tincan.xml" document in the root zip folder. This is a metadata file for the xAPI package.
-
SCORM The ID should be a unique identifier for the manifest file. This value can include letters, numbers, and some characters such as periods and underscores.
The manifest file decribes the contents of the LMS package zip file. When a SCORM package is generated, it includes the "imsmanifest.xml" document in the root zip folder. When importing SCORM content to an LMS, the LMS reads information and specifications from the manifest file for a proper import. A SCORM package also has a metadata.xml file that details information (e.g., course name, description) from the eLearning tab.
-
-
Type Enter the type.
-
xAPI Displays for xAPI only. This field is populated with the recommended xAPI course type URL. Update as needed.
-
eLearning Tracking
Tracking Select an eLearning tracking method for the course type.
-
Use Quiz Results Select for a quiz only, or a combination course that includes a quiz and a knowledge check.
-
Use Course Completion Select for just a knowledge check. With this option, a Percentage box displays. Enter the percentage of the course the learner must complete in order for tracking to occur.
-
-
(Optional) From the Advanced tab, in the Template Page area, select the template page where the eLearning Toolbar proxy for the course is located. See Adding an eLearning Toolbar Proxy.
-
Click
") to save your work.
to save your work. -
From the Target Editor's local toolbar, click
 . This builds the output for your learning course.
 -
Note Tracking collects data that the LMS uses to determine how effective the course is or how effective the learning efforts are. Data can be used in reports, evaluations, and analytics.
Course Navigation
-
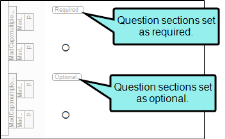
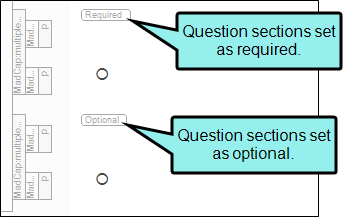
If question sections are marked as "Optional," learners are not required to answer a question before moving forward to the next question. When they complete the test, they might receive a warning on the test results page saying that they have not answered all of the questions. To avoid this, keep question sections marked as "Required." This is a default setting for restricting navigation.
-
If you are designing a combination course, be advised that if you include the progress bar component in the navigation controls, the progress bar displays for the entire course as outlined in the TOC. Meaning that it does not show progress just for the knowledge check, or just for the quiz.
-
For courses that contain a navigation pane (i.e., HTML5 Side Navigation, Top Navigation, or Tripane), learners can potentially skip over the lessons and go directly to the gradable test (if included). In this case, you can "hide" the pane to restrict navigation.
-
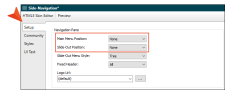
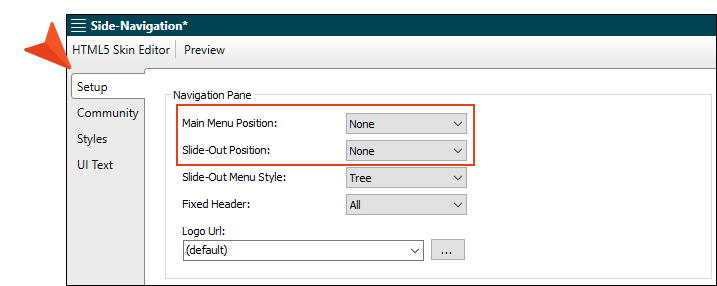
Side Navigation and Top Navigation In the HTML5 Skin Editor, Setup tab, select none for the Main Menu Position and the Slide-Out Position.
-
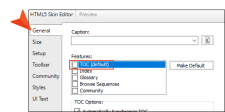
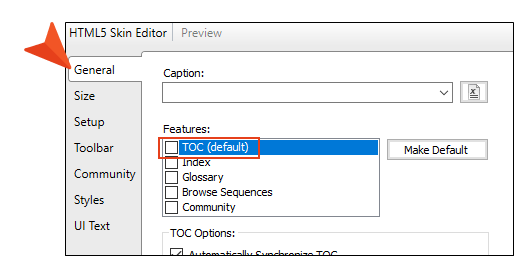
Tripane In the HTML5 Skin Editor, General tab, deselect the TOC feature.
-
-
If the eLearning course uses a full skin, a learner can potentially perform a search on eLearning content in the output. In this case, you can remove the Search bar from showing in the output. You can do this in the following ways:
-
Skinless Output In the Target Editor, select the Skin tab. From the Skin drop-down, select (none).

-
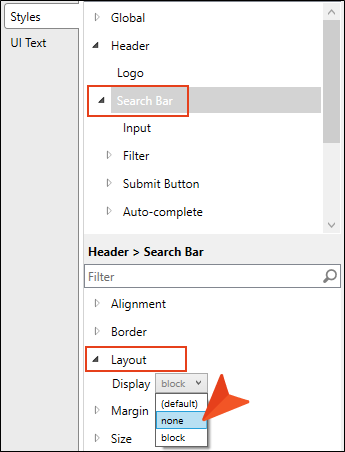
Hide Search If you want to keep skins for the output, you can "hide" the Search bar from displaying in the output. In the HTML5 Skin Editor, select the Styles tab. Expand the Header > Search Bar style group. In the Search Bar properties, expand Layout. From Display, select none. (This option is available in the HTML5 Skin Editor for Side Navigation, Top Navigation, and Tripane.)

-

What’s Next?
If you want to record and share the course using an external LMS, the next step is Uploading eLearning Packages.


