


Note Only HTML5 supports all micro content features (e.g., featured snippets, Knowledge Panel, Knowledge proxy, Promotion proxy, FAQ proxy). The other output formats support only the FAQ proxy.
For HTML5 targets, you can use a full HTML5 skin to edit the look and behavior for all of these micro content elements. Alternatively, for the proxies, you can use separate micro content skin components (FAQ, Knowledge, Promotion) if you want to have different settings for various instances of a proxy in your project. Keep in mind that for non-HTML5 targets (i.e., PDF, Word, Clean XHTML, Eclipse, EPUB, HTML Help), you need to use the FAQ skin component (rather than a full skin) to control the look.
You can also use MadCap-specific styles in your stylesheet to change the look of the containers used for micro content proxies.
Note It is also possible to use complex selectors in your stylesheet to make content look different in micro content search results than it does in topics in the output.
[Menu Proxy — Headings — Online — Depth3 ]
Editing Skins and Skin Components
Following are general steps for editing micro content in a skin or skin component, as well as specific steps for some of the more common tasks.
How to Edit the Look of Micro Content in a Skin—General Steps
- Open an HTML5 skin or micro content skin component.
- Select the Styles tab.
- In the local toolbar, make sure Web Medium is selected.
-
On the left side of the editor, select the Search Results or Topic Proxies styles (if working in a full skin), or expand them to select other nodes. In a micro content skin component, there is only one style (Micro Content Panel) to select or expand.
-
In the properties area at the bottom, complete the necessary fields.
-
Click
") to save your work.
to save your work.Note You can then select one of the other medium buttons (Tablet, Mobile) at the top of the editor and complete settings for smaller screens.
Note For more details about the Skin Editor and the options in it, see HTML5 Skin Styles.
How to Change the View Mode in a Skin
Each micro content container type has a default view mode (Plain Text, Drop-Down, or Truncated). You can select a different mode in the full skin or skin component (for proxies).
Note The styles and properties that are available in the skin can change, depending on the view mode selected for that container type.
-
Open the HTML5 skin or skin component.
-
Select the Setup tab.
-
Click the drop-down next to the appropriate View Mode field (e.g., Knowledge Panel View Mode, FAQ Proxy View Mode), and select one of the options.
-
Plain Text The micro content will be displayed in full.
-
Drop-Down The micro content will be displayed as a drop-down, with the phrase serving as the hotspot and the response showing as the drop-down body.
-
Truncated The micro content will be displayed according to the height set in the skin. If the content is too tall for that area, a drop-down displays so that users can click it to see the rest of the information.
-
- Click to save your work.
How to Change the Size in a Skin
You can change the width (and gap) for a Knowledge Panel. In addition, you can set the maximum height for the response shown for all micro content container types.
Note If you want to change the maximum height property, first make sure it is set to the Truncated view mode
-
Open the HTML5 skin or skin component.
-
Select the Styles tab.
-
On the left side of the editor, navigate to the appropriate node and make changes to the properties.
If using a full HTML5 skin:
-
Featured Snippets Response Go to Search Results > Featured Snippets > Item > Response. In the properties area, expand Size and change the Maximum Height.
-
Knowledge Panel Go to Search Results > Knowledge Panel. In the properties area, expand Side Panel and change the Width and/or Gap.
-
Knowledge Panel Response Go to Search Results > Knowledge Panel > Item > Response. In the properties area, expand Size and change the Maximum Height.
-
FAQ Proxy Response Go to Topic Proxies > FAQ Proxy > Item > Response. In the properties area, expand Size and change the Maximum Height.
-
Knowledge Proxy Response Go to Topic Proxies > Knowledge Proxy > Item > Response. In the properties area, expand Size and change the Maximum Height.
-
Promotion Proxy Response Go to Topic Proxies > Promotion Proxy > Item > Response. In the properties area, expand Size and change the Maximum Height.
If using micro content skin component:
-
FAQ, Knowledge, or Promotion Proxy Response Go to Micro Content Panel > Item > Response. In the properties area, expand Size and change the Maximum Height.
-
- Click to save your work.
How to Change the Box Shadows or Borders in a Skin
By default, you will notice what looks like a border around the micro content containers that you include in output. Actually, what you are seeing is a box shadow. You can adjust or remove this box shadow, and you can also set a border. This can be done for the entire container or different parts of the micro content.
-
Open the HTML5 skin or skin component.
-
Select the Styles tab.
-
On the left side of the editor, navigate to the appropriate node.
If using a full HTML5 skin:
-
Featured Snippets Go to Search Results > Featured Snippets.
-
Knowledge Panel Go to Search Results > Knowledge Panel.
-
FAQ Proxy Go to Topic Proxies > FAQ Proxy.
-
Knowledge Proxy Go to Topic Proxies > Knowledge Proxy.
-
Promotion Proxy Go to Topic Proxies > Promotion Proxy.
If using micro content skin component:
-
FAQ, Knowledge, or Promotion Proxy Go to Micro Content Panel.
-
- You can then navigate to different sub-nodes to change border and box shadow settings. The default box shadow settings can be found on the Item node. After you select a node, you can expand Border or Box Shadow in the properties area and change the settings.
- Click to save your work.
How to Hide or Display the Phrase in a Skin
In some cases, the micro content phrase is displayed, as well as the response. However, you might decide to hide the phrase in the output for some micro content.
Note The Layout node that is used to display or hide the phrase is only available if the element is set to Plain Text or Truncated view mode. The phrase is necessary for Drop-Down view mode (which is the default setting for the FAQ proxy), so the Layout node is not available in the skin in that case; in other words, the phrase will always be shown as the drop-down hotspot.
Note The title for a micro content proxy container can also be hidden. This can be done using similar steps as below in the skin. However, you can also just leave the Title field empty when inserting the proxy.
-
Open the HTML5 skin or skin component.
-
Select the Styles tab.
-
On the left side of the editor, navigate to the appropriate node.
If using a full HTML5 skin:
-
Featured Snippets Go to Search Results > Featured Snippets > Item > Phrase.
-
Knowledge Panel Go to Search Results > Knowledge Panel > Item > Phrase.
-
FAQ Proxy Go to Topic Proxies > FAQ Proxy > Item > Phrase.
-
Knowledge Proxy Go to Topic Proxies > Knowledge Proxy > Item > Phrase.
-
Promotion Proxy Go to Topic Proxies > Promotion Proxy > Item > Phrase.
If using micro content skin component:
-
FAQ, Knowledge, or Promotion Proxy Go to Micro Content Panel > Item > Phrase.
-
- Expand Layout, and set the Display field to none (hidden) or block (displayed).
- Click to save your work.
Micro Content Proxy Styles
You can also use micro content proxy styles to control the look of those containers.
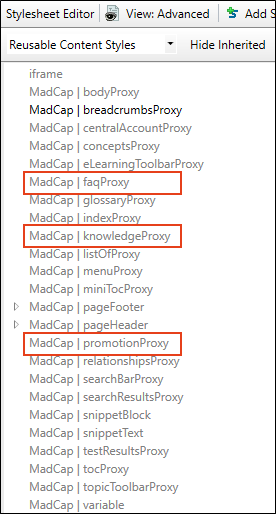
How to Edit Micro Content Proxy Styles
- From the Content Explorer, open the stylesheet that you want to modify.
-
In the local toolbar, make sure the first button displays
 . If the button displays
  instead, then click it.
 - In the upper-left corner of the editor, click in the drop-down field and select
 .
. - On the left side of the editor, find and select one of the expanding text styles:
MadCap | faqProxy Modifies the FAQ proxy container holding micro content.
MadCap | knowledgeProxy Modifies the Knowledge proxy container holding micro content.
MadCap | promotionProxy Modifies the Promotion proxy container holding micro content.
- From the Show drop-down list on the upper-right side of the editor, select
 .
. - (Optional) You can use the toggle button in the local toolbar to show properties below in a group view
 or an alphabetical view
  .
. -
Locate the property you want to change.
-
The area to the right of the property is used for selecting and entering values. If you know how to enter the information correctly, you can click in the value field and type it directly. Otherwise, click the ellipsis button
 to the right of the property. Depending on the type of property, the appropriate controls and options display, allowing you to choose or enter values (e.g., select from a drop-down list, click a button, complete fields in a dialog or popup). If you completed values in a popup, click OK at the bottom of the box.
 - Click to save your work.


