Searching a Microsoft HTML Help System
End users have a variety of options when performing a search in a Microsoft HTML Help system.
[Menu Proxy — Headings — Online — Depth3 ]
Search Experience
A Standard skin
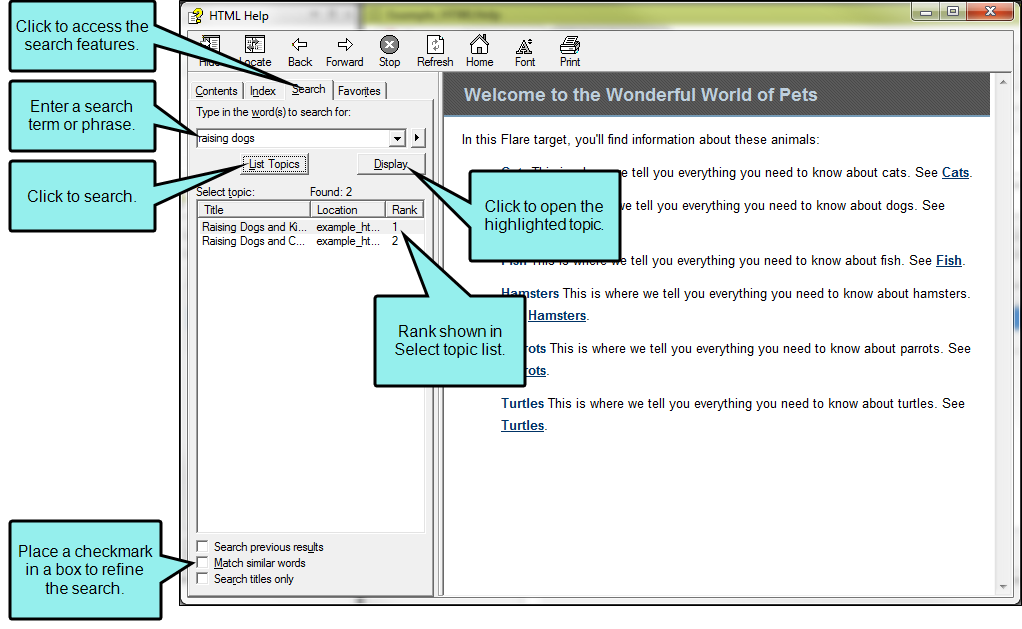
When an end user searches a Microsoft HTML Help system for information, it reveals a list of topics containing the matching term or phrase. The search results shows matches by title, location, and rank. When an end user clicks a topic to open it, the matching terms are highlighted in the topic.
Features and Capabilities
This table details the search features and capabilities of the Microsoft HTML Help system. It also describes the options that you have for customizing the user interface:
|
Feature |
Description |
Content Developer Options… |
|---|---|---|
|
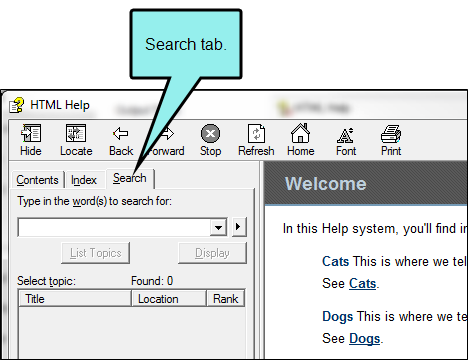
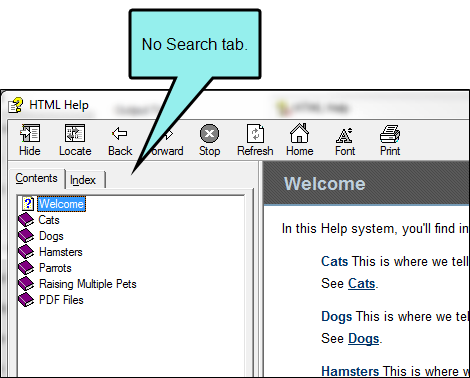
Search Tab |
A tab that reveals the search feature. When enabled, the Search tab appears:
When disabled, no Search tab appears:
|
Enable the search feature using the Skin Editor. See Including Search Bars. |
|
Search Field and Button |
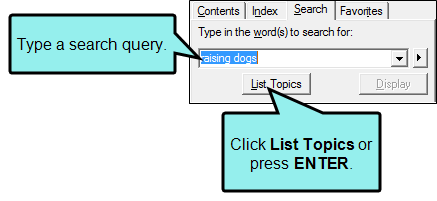
Type a search query. Then click the button or press ENTER to initiate a search.
Note Asterisk (*) wildcard and boolean search capabilities are available. See Search Methods and Syntax. |
Cannot be turned on and off. |
|
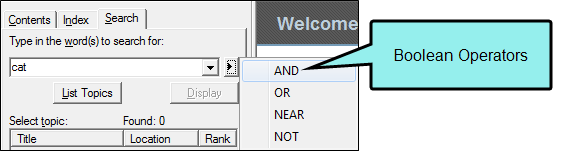
Boolean Operators List |
A drop-down list of boolean operators that can be used with search.
|
Cannot be turned on and off. Supports the listed boolean operators only. See Search Methods and Syntax. |
|
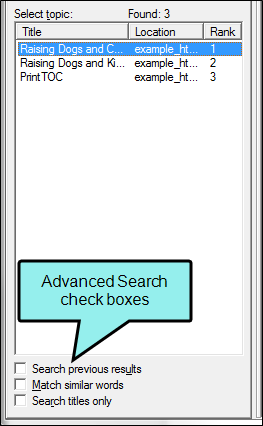
Advanced Search Check Boxes |
A series of three advanced search check boxes:
|
Enable or disable these options in the Skin Editor by clicking the HTML Help Setup tab. Under MiscOptions, place a check mark in theShow Advanced Search box. |
|
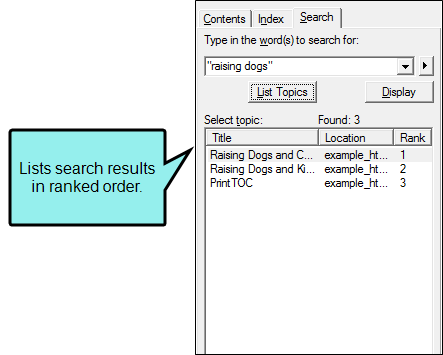
Search Results |
Lists search results in ranked order.
|
Cannot be turned on and off. Optimize topics to improve search results. See Optimizing Search. |
|
Display Button |
Opens the highlighted topic. End users can alternatively double-click a topic to open it.
|
Cannot be turned on and off. |
|
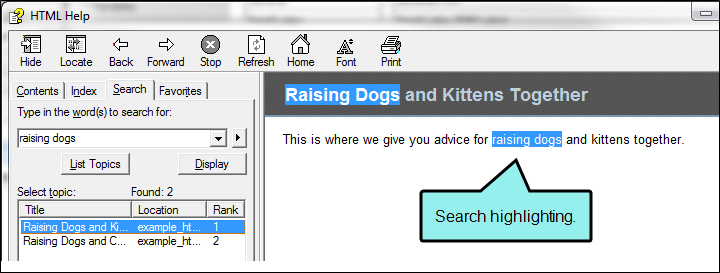
Search Highlighting |
Highlights matching keywords in topics.
|
Cannot modify search highlight color. |

How to Search
- Open the Microsoft HTML Help system.
- In the navigation pane, click the Search tab.
-
Type the search query. Then click List Topics or press ENTER.
Note Searches are not case-sensitive. See Search Methods and Syntax.
Note The search query can include boolean operators or the asterisk (*) wildcard character. See Search Methods and Syntax.
To Use the Advanced Search Options
If you enabled the Advanced Search check boxes, users have option to refine the search query as follows:
- Search Previous Results If you want to search only the topics included in the previous results list, place a check mark in theSearch previous results box.
- Match Similar Words To find words with similar spelling, place a check mark in theMatch similar wordsbox. For example, if you type puppy and select this check box, the search finds "puppy" and "puppies."
- Search Titles Only To search topics only for matches in the topic title, place a check mark in theSearch titles only box.
-
In the search results, open the desired topic using one of these methods:
- Highlight a topic in the list. Then click Display.
- Double-click a topic in the list. Search highlighting reveals the matches in the topic.
Note If you want to remove the highlighting from the active topic, click the Remove all search highlighting button in the Topic toolbar.
Note Unlike other output types, you cannot modify the search highlighting color in Microsoft HTML Help. See Search Highlighting.
Troubleshooting the No Topics Found Issue
A common issue encountered by Microsoft HTML Help developers is when a "No Topics Found" message appears while searching a CHM file.
Typically, this is the result of an unregistered dynamic link library (DLL) file on the computer building the Help file. The DLL is named "itcc.dll" and is a component of Microsoft's CHM specification. Its purpose is to supply the operating system running Flare with the ability to build a CHM file with index and search capabilities.
A variety of software vendors (particularly those that develop Help authoring tools) distribute a copy of the itcc.dll file along with their program installation files. Should you happen to install or uninstall program with a copy of this file (e.g., a Help tool or software program from another vendor or another MadCap software tool that requires this file), it is possible for other copies of the itcc.dll file to become unregistered.
To resolve this issue, the Flare \bin directory contains a batch file named RegisterItcc.bat. You can run this batch file to re-register the DLL in Windows.
Note Users running Windows 7 may need to switch off the computer's User Account Control (UAC) settings before beginning. For instructions, visit this link:
http://windows.microsoft.com/en-us/windows7/products/features/user-account-controlHow to Register the DLL Using the Batch File
-
In Windows Explorer, navigate to the Flare installation's \bin directory. Typically, the path is as follows (where [#]= the Flare version number):
- Windows 7 or 8 (64-bit versions)
-
If you are using Flare 12 or later
C:\Program Files\MadCap Software\MadCap Flare [#]\
Flare.app\Resources\Bin -
If you are using Flare 11 or earlier
C:\Program Files\MadCap Software\MadCap Flare V[#]\
Flare.app\Resources\Bin
-
-
Windows 7 or 8 (32-bit versions)
C:\Program Files (x86)\MadCap Software\MadCap Flare V[#]
\Flare.app\Resources\BinNote The path that you use depends on your specific system configuration. For users running the 64-bit version of Windows, you will see two folders named Program Files on your C: drive. Typically, the folder named "\Program Files (x86)" stores non-native 32-bit applications, and the "\Program Files" folder stores native 64-bit applications, such as Flare. If you installed Flare in a different location, you need to determine the appropriate path to the \bin directory.
- Windows 7 or 8 (64-bit versions)
-
In the bin directory, double-click the file named RegisterItcc.bat.
This runs the batch file. If the registration is successful, a message appears telling you so.
Note If the following error message appears, the account you are using may not have sufficient permissions to run the batch file on the computer.
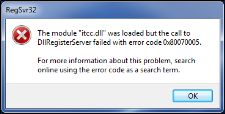
You will need to use your computer's command line utility to register the DLL as described below or contact your Windows administrator for assistance with registering the DLL.

How to Register the DLL Using the Command Line Utility
-
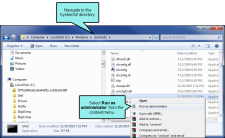
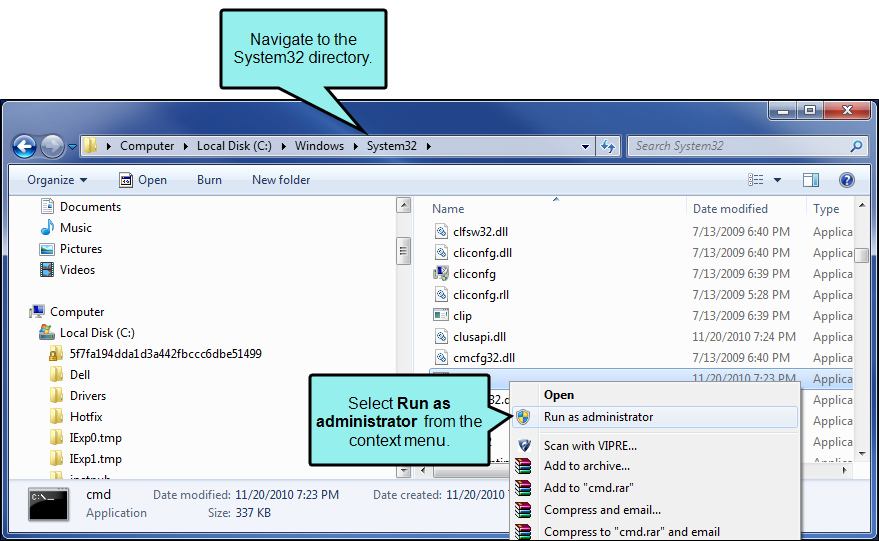
In Windows Explorer, open the computer's System32 directory. The path is C:\Windows\System32.
-
Right-click the application file named cmd.exe and select Run as administrator from the context menu.
-
If the User Account Control message appears, click Yes. This lets you use the command prompt to make changes on the system.
Note In Windows 7, you can use this method to run the command prompt as an administrator when you are using an account that does not have administrative credentials. This typically allows most users to make changes to the itcc.dll file in the Flare \bin directory.
-
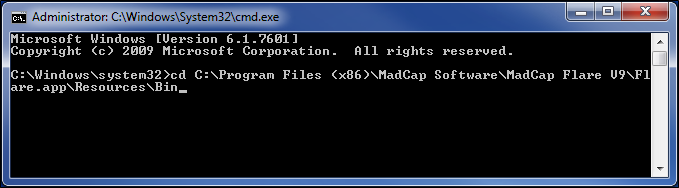
At the command prompt, do the following:
-
Type cd to change directories and press the SPACEBAR. Then type the path to the Flare \bin directory as shown in this example:
Example Use this information to enter the following path, depending on your version of Flare.
If you are using Flare 12 or later
C:\Program Files\MadCap Software\MadCap Flare [#]\
Flare.app\Resources\BinBelow is an example:
C:\Program Files\MadCap Software\MadCap Flare 20\
Flare.app\Resources\Bin
If you are using Flare 11 or earlier
C:\Program Files (x86)\MadCap Software\MadCap Flare V[#]\
Flare.app\Resources\BinWhere [#] appears above, you must enter the correct Flare version number when typing the system path (e.g., V8, V9, V10.). Below is an example:
C:\Program Files (x86)\MadCap Software\MadCap Flare V9\
Flare.app\Resources\Bin
- Press ENTER.
-
-
At the command prompt, type: registeritcc.bat. Then press ENTER. This runs the batch file. If the registration is successful, a message tells you so.
- Click OK to acknowledge the message.
- Close the command prompt.

After registering the DLL, build your Microsoft HTML Help output again. Then retry your search in the output.

