If you have enabled MadCap Feedback for your output, there are some dialogs that people will use for actions such as registering, adding comments, and replying to comments.
How to Specify Style Settings for Dialogs
- Open a Standard skin.
- Select the Styles tab.
-
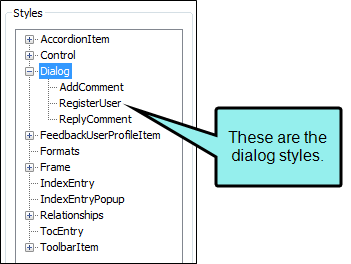
In the Styles section, expand the Dialog node.

-
Select the item that you want to edit. If you want the setting(s) to be applied to all of the items, select the Dialog node itself.
The items under this node represent the different kinds of Feedback dialogs that may be found in your output.
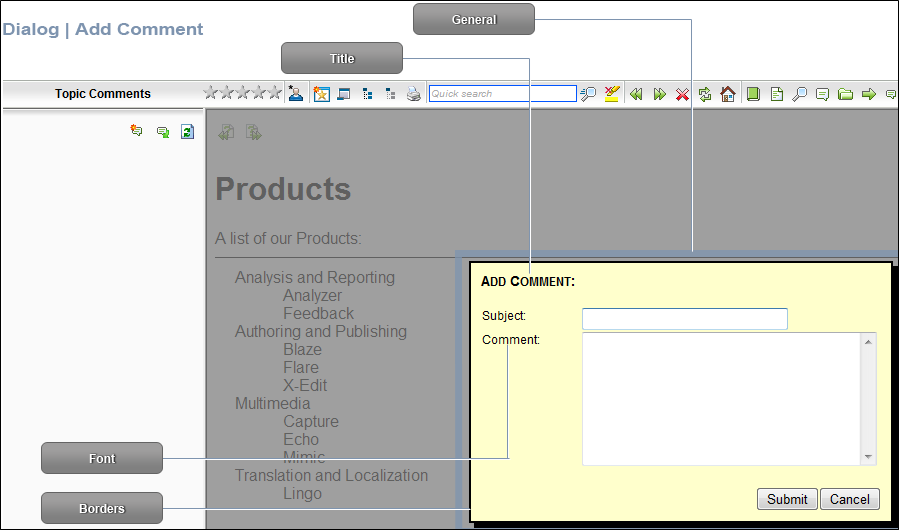
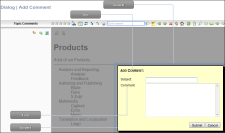
Add Comment
This is the dialog used when people add feedback comments to a topic.
Register User
This is the dialog used when new end users register in order to submit feedback in your output.
Note The "Register User" item lets you modify label text for fields in the Create Feedback Service Profile dialog. However, the "Feedback User Profile Item" node (see Feedback User Profile Items in Standard Skins) does the same thing. So what's the difference? The "Register User" property in this node is the old way to accomplish this; the "Feedback User Profile Item" node is the new way. In order to be backwards compatible with earlier versions, the duplicate properties remain available in the Dialog/Register User node. The software will first look to any settings that you have provided in the Feedback User Profile Item node. Then it will look to settings entered in the Dialog/Register User node.
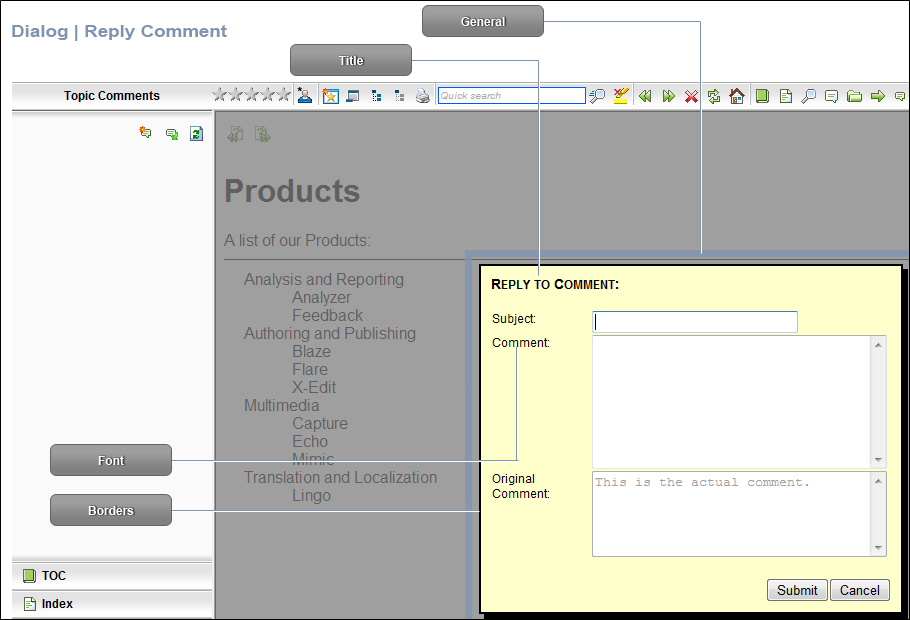
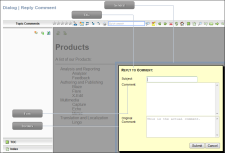
Reply Comment
This is the dialog used when people reply to feedback comments for a topic.
- Select the Property Groups or Alphabetical List option to display the properties for the style item.
-
In the Properties section, set the values for the properties that you want modify.
Background Color
To change the background color of the item:
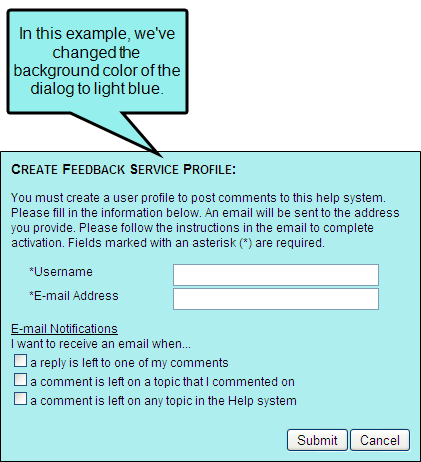
Expand the General property group on the right and change the value in the Background Color field. Click the down arrow to open a color palette window. You can click a color shown, or you can click More colors and select a different color or create a custom color. If you are change the color for a style item that also has a gradient, the gradient properties have precedence over the solid color.
Borders
To add or change borders for the item:
Expand the Borders property group on the right and change the value in any of the fields. Click the down arrow to open a small window. In this window, you can enter the width of the border in the lower-left field. You can select the unit of measurement (e.g., pixels, points, centimeters) using the lower-left drop-down arrow.
Cancel Button Label
To change the text that appears on the "Cancel" button:
Expand the General property group on the right side of the editor and enter new text in the Cancel Button Label field.
Comment Label
To change the text that appears next to the "comment" field:
Expand the Labels property group on the right side of the editor and enter new text in the Comment Label field.
Comment Reply Notification Label
Next to the first email notification check box in the Create Feedback Service Profile dialog, users see the following text:
a reply is left to one of my comments
To change the text:
Expand the Options property group on the right side of the editor and enter new text in the Comment Reply Notification Label field.
Comment Same Topic Notification Label
Next to the second email notification check box in the Create Feedback Service Profile dialog, users see the following text:
a comment is left on a topic that I commented on
To change the text:
Expand the Options property group on the right side of the editor and enter new text in the Comment Same Topic Notification Label field.
Comment Same Help System Notification Label
Next to the third email notification check box in the Create Feedback Service Profile dialog, users see the following text:
a comment is left on any topic in the Help system
To change the text:
Expand the Options property group on the right side of the editor and enter new text in the Comment Same Help System Notification Label field.
Country Label
To change the text that appears next to the "country" field:
Expand the Labels property group on the right side of the editor and enter new text in the Country Label field.
Email Address Label
To change the text that appears next to the "email address" field:
Expand the Labels property group on the right side of the editor and enter new text in the Email Address Label field.
Email Notifications Group Label
At the beginning of the email notification check boxes in the Create Feedback Service Profile dialog, users see the following text:
E-mail Notifications
To change the text:
Expand the Options property group on the right side of the editor and enter new text in the Email Notifications Group Label field.
Email Notifications Heading Label
After the group label, just above the email notification check boxes in the Create Feedback Service Profile dialog, users see the following text:
I want to receive an email when…
To change the text:
Expand the Options property group on the right side of the editor and enter new text in the Email Notifications Heading Label field.
First Name Label
To change the text that appears next to the "first name" field:
Expand the Labels property group on the right side of the editor and enter new text in the First Name Label field.
Font Color
To change the color of the font:
Expand the Font property group on the right and change the value in the Color field. Click the down arrow to open a color palette window. You can click a color shown, or you can click More colors and select a different color or create a custom color. If you are change the color for a style item that also has a gradient, the gradient properties have precedence over the solid color.
Font Family
To select a specific font family (e.g., Arial, Tahoma, Verdana):
Expand the Font property group on the right and change the value in the Font Family field. From the drop-down, select the font family or font set that you want to use.
Font Size
To change the size of the font:
Expand the Font property group on the right and change the value in the Font Size field. Click the down arrow to open a small window. In this window, you can enter the size of the font in the lower-left field (either type a number or use the up and down arrows). You can select the unit of measurement (e.g., pixels, points, centimeters) using the lower-right drop-down arrow.
Font Style
To change the style of the font (e.g., make it italic):
Expand the Font property group on the right and change the value in the Font Style field. Click the down arrow and select either italic or normal.
Font Weight
To change the weight of the font (e.g., make it bold):
Expand the Font property group on the right and change the value in the Font Weight field. Click the down arrow and select either bold or normal.
Gender Label
To change the text that appears next to the "gender" field:
Expand the Labels property group on the right side of the editor and enter new text in the Gender Label field.
Gender Label—Female
To change the text that represents the "female" option in the "gender" drop-down field:
Expand the Labels property group on the right side of the editor and enter new text in the Gender Female Name field.
If you include the Gender option in your registration dialog, you might use this field to localize the text in other languages.
Gender Label—Male
To change the text that represents the "male" option in the "gender" drop-down field:
Expand the Labels property group on the right side of the editor and enter new text in the Gender Male Name field.
If you include the Gender option in your registration dialog, you might use this field to localize the text in other languages.
Last Name Label
To change the text that appears next to the "last name" field:
Expand the Labels property group on the right side of the editor and enter new text in the Last Name Label field.
Message—Comment Length Exceeded
To change the text that appears in the message that users see when their comments are too long:
Expand the Messages property group on the right side of the editor and enter new text in the Comment Length Exceeded field.
Message—Edit Profile Registration
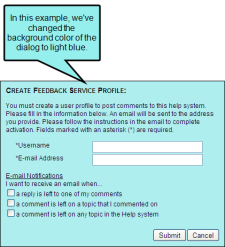
If you configure MadCap Feedback so that users must register before submitting comments, people will see the following message in the dialog when updating their profiles:
You must create a user profile to post comments to this help system. Please fill in the information below. An email will be sent to the address you provide. Please follow the instructions in the email to complete activation.
To change the text for this message:
Expand the Messages property group on the right side of the editor and enter new text in the Edit Profile Registration field.
Message—Missing Required Field
When users fail to complete a required field in the Create Feedback Service Profile dialog, they see a message. If you do not enter text, the default for the message is used. This default text is as follows:
Please enter a value for: [name of field].:
Expand the Messages property group on the right side of the editor and enter new text in the Missing Required Field field.
Message—Registration
If you configure MadCap Feedback so that users must register before submitting comments, certain information is provided to those users, both in the registration dialog and in a popup message that follows. You can modify the text as needed. In the registration dialog, users see the following default text:
You must create a user profile to post comments to this help system. Please fill in the information below. An email will be sent to the address you provide. Please follow the instructions in the email to complete activation.
To change the text for this message:
Expand the Messages property group on the right side of the editor and enter new text in the Registration field.
Message—Registration Submit
In the popup message that follows the initial registration message, users see the following default text:
Your information has been sent to MadCap Software. When the information has been processed, you will receive an email with a link to a verification page. Click this link, or copy and paste the link into your web browser to complete the registration.
To change the text for this message:
Expand the Messages property group on the right side of the editor and enter new text in the Registration Submit field.
Message—Registration Submit Note
In the popup message that follows the initial registration message, users see the following note:
NOTE: Some service providers have email filtering software that may cause the notification email to be sent to your junk email folder. If you do not receive a notification email, please check this folder to see if it has been sent there.
To change the text for this message:
Expand the Messages property group on the right side of the editor and enter new text in the Registration Submit Note field.
Message—Update Success
When users successfully update their Feedback comment profiles, they see a message. If you do not enter text, the default is used. This default text is as follows:
Your profile was updated successfully!
To change the text for this message:
Expand the Messages property group on the right side of the editor and enter new text in the Update Success field.
Original Comment Label
To change the text that appears next to the "original comment" field:
Expand the Labels property group on the right side of the editor and enter new text in the Original Comment Label field.
Postal Code Label
To change the text that appears next to the "postal code" field:
Expand the Labels property group on the right side of the editor and enter new text in the Postal Code Label field.
Shadow Color
To change the color of the shadow for the item:
Expand the General property group on the right and change the value in the Shadow Color field. Click the down arrow to open a color palette window. You can click a color shown, or you can click More colors and select a different color or create a custom color. If you are change the color for a style item that also has a gradient, the gradient properties have precedence over the solid color.
Shadow Distance
To change the distance that the shadow extends from the edge of the item (in pixels):
Expand the General property group on the right and enter a value with the measurement in the Shadow Distance field (e.g., 10 px).
Shadow Opacity
To change the opacity (transparency) of the shadow for the item, ranging between 0 and 100 (the lower the number, the more transparent):
Expand the General property group on the right and enter a value in the Shadow Opacity field (e.g., 65).
Subject Label
To change the text that appears next to the "subject" field:
Expand the Labels property group on the right side of the editor and enter new text in the Subject Label field.
Submit Button Label
To change the text that appears on the "Submit" button:
Expand the General property group on the right side of the editor and enter new text in the Submit Button Label field.
Title Font Color
To change the color of the font used for the title:
Expand the Title property group on the right and change the value in the Title Color field. Click the down arrow to open a color palette window. You can click a color shown, or you can click More colors and select a different color or create a custom color. If you are change the color for a style item that also has a gradient, the gradient properties have precedence over the solid color.
Title Font Family
To select a specific font family (e.g., Arial, Tahoma, Verdana) used for the title:
Expand the Title property group on the right and change the value in the Title Font Family field. From the drop-down, select the font family or font set that you want to use.
Title Font Size
To change the size of the font used for the title:
Expand the Title property group on the right and change the value in the Title Font Size field. Click the down arrow to open a small window. In this window, you can enter the size of the font in the lower-left field (either type a number or use the up and down arrows). You can select the unit of measurement (e.g., pixels, points, centimeters) using the lower-right drop-down arrow.
Title Font Style
To change the style of the font (e.g., make it italic) used for the title:
Expand the Title property group on the right and change the value in the Title Font Style field. Click the down arrow and select either italic or normal.
Title Font Variant
To change the variant of the font (e.g., small caps) used for the title:
Expand the Title property group on the right and change the value in the Title Font Variant field. Click the down arrow and select either normal or small-caps.
Title Font Weight
To change the weight of the font (e.g., make it bold) used for the title:
Expand the Title property group on the right and change the value in the Title Font Weight field. Click the down arrow and select either bold or normal.
Title Label
To change the text that appears in the title:
Expand the Title property group on the right side of the editor and enter new text in the Title Label field.
User Name Label
To change the text that appears next to the "user name" field:
Expand the Labels property group on the right side of the editor and enter new text in the Username Label field.
- Click
") to save your work.
to save your work.