Important Feedback is deprecated in Flare, which means that it is slated to be removed in a future version.
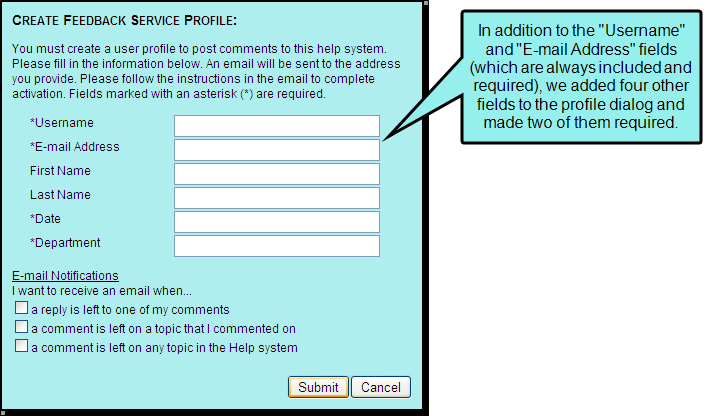
When users submit MadCap Feedback comments, they must complete the Create Feedback Service Profile dialog (unless you have enabled anonymous comments). You can specify which fields are included in this dialog
How to Specify Style Settings for Feedback User Profile Items
- Open a Standard skin.
- Select the Styles tab.
-
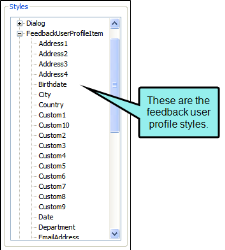
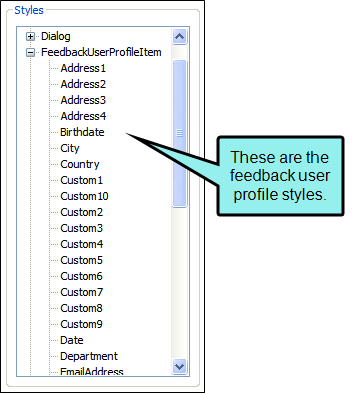
In the Styles section, expand the Feedback User Profile Item node.
-
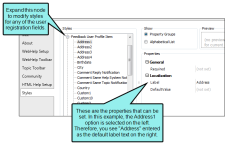
Select the item that you want to edit. If you want the setting(s) to be applied to all of the items, select the Feedback User Profile Item node itself.
The items under this node represent the different fields that can be included in the Create Service Profile dialog. In addition to the many standard fields that can be included (e.g., Address1, City, Department, Occupation), you can add up to 10 custom fields (e.g., Custom1, Custom2, Custom3), which can be used for any kind of field not already available.
- Select the Property Groups or Alphabetical List option to display the properties for the style item.
-
In the Properties section, set the values for the properties that you want modify.
Default Value
To enter a default value for the item—the user will see this text in the field initially (e.g., perhaps you would enter "United States" as the default value for the Country field):
Expand the General property group on the right side of the editor and enter new text in the DefaultValue field.
Gender Label—Female
To change the text that represents the "female" option in the "gender" drop-down field (this property displays only if you have selected the "Gender" style first):
Expand the General property group on the right side of the editor and enter new text in the Gender Female Name field.
If you include the gender option in your registration dialog, you might use this field to localize the text in other languages.
Gender Label—Male
To change the text that represents the "male" option in the "gender" drop-down field (this property displays only if you have selected the "Gender" style first):
Expand the General property group on the right side of the editor and enter new text in the Gender Male Name field.
If you include the gender option in your registration dialog, you might use this field to localize the text in other languages.
Label
To change the text that appears on the item:
Expand the General property group on the right side of the editor and enter new text in the Label field.
Required
To specify whether the field should be required (i.e., end users must complete the field to move on):
Expand the General property group on the right and change the value in the Required field. Click the down arrow and select either false (not required) or true (required).
- Click
") to save your work.
to save your work.

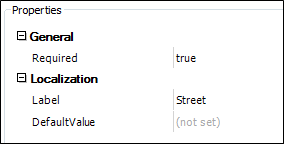
Example You have already used the Feedback User Profile tab in the Skin Editor to add several fields to your Feedback registration dialog, including the Address1 field. Maybe you want to change the label text that is displayed next to that field in the dialog. In that case, you can click to the right of the Label field and type something else (e.g., Street).
In addition, let's say that you want the Address1 field to be required; end users must complete it in order to move on. In that case, you can click to the right of the Required field and select true.
When you are finished, it would look like this:
Note In order to be backwards compatible with earlier versions, some properties are also still available in the Dialog/Register User node (see Dialogs in Standard Skins). The software will first look to any settings that you have provided in the Feedback User Profile Item node. Then it will look to settings entered in the Dialog/Register User node.
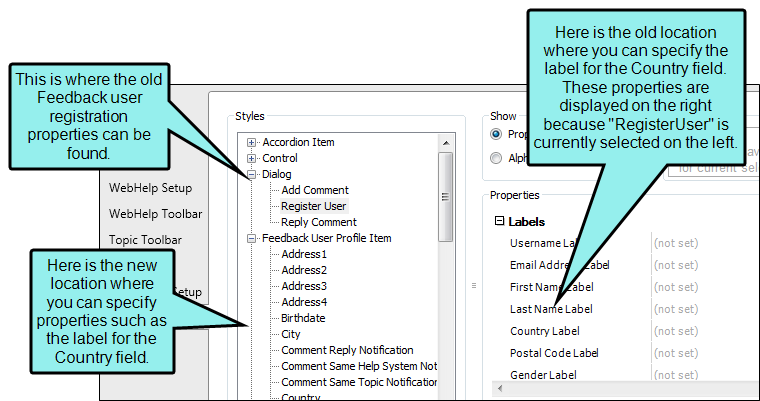
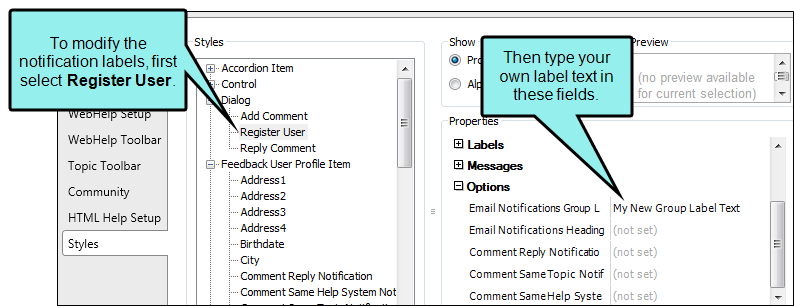
If you want to modify the labels next to the email notification fields in the Create Feedback Service Profile dialog, you need to expand the Dialog node and then select Register User. In the Properties section on the right, expand the Options group and change any of the values for the email notification fields.