The import process will require less work overall if you prepare your files before you start. Just to be safe, make a backup of all FrameMaker files first.
[Menu Proxy — Headings — Online — Depth3 ]
Special Markers
If you are used to importing your FrameMaker documents into Quadralay WebWorks, you may have used special markers in FrameMaker when doing so. You can continue doing the same for importing into Flare. All special markers supported by WebWorks are also supported by Flare. The following are some of the more common types of markers.
-
Filename This marker lets you control the file names given to the new topics that are created from the imported documents. It is highly recommended that you use this marker. See Specifying Custom File Names for FrameMaker Imports.
Example You have a place in a FrameMaker document that is using the Heading 1 style and contains the text "All About Rabbits." You want a new topic to be created at that point when you import the document. However, you also want to make sure that the file name for that new topic is simply "Rabbits." Therefore, you open the FrameMaker document and insert a filename marker at that heading, using the text "Rabbits" for the marker.
When you import the FrameMaker document, you select to split new topics on certain styles, including the Heading 1 style. After the import is finished, one of the topics created is named "Rabbits.htm."
- Hyperlink If you are importing Adobe FrameMaker documents and you have created hyperlinks by using "Specify Named Destination" and "Jump to Named Destination" markers, Flare will automatically convert them to links in your project. See Creating Hyperlinks in FrameMaker Source Documents.
- Topic Alias A topic alias marker is a special marker that you can insert into your FrameMaker source content wherever you want a new context-sensitive Help (CSH) identifier to be created in Flare (after you import the FrameMaker document). After the developer "hooks" the CSH identifier with the appropriate user interface element in the application, that imported FrameMaker content will display when a user opens the CSH in the application's user interface. See Creating Topic Alias Markers in FrameMaker for CSH.
Cleanly Formatted FrameMaker Files With No Style Overrides
The more your FrameMaker files consistently use defined styles, the more smoothly the import process will be. Use character, paragraph, and table formats consistently and with no manual overrides.
Character Tags
If you hand-bolded text throughout your book, but the bold isn't a character style, it may be worth your while to create a Bold character style and apply it to all instances of hand-bolded text.
Paragraph Tags—Numbered Lists
FrameMaker requires you to create two distinct paragraph tags to handle numbered lists. Because Flare uses standard HTML code for ordered lists and list items, content developers frequently choose not to take the extra steps to create distinct paragraph styles to handle list numbering. Because FrameMaker handles list numbering using paragraph tags, Flare converts those tags to the to the standard p style during the import. You then apply the desired ordered list and list item tags to the existing numbered steps in Flare.
Example In FrameMaker, you must create two distinct paragraph tags to handle automatic list numbering—one tag to apply to the first step in the list and another tag to apply to the remaining steps.

Because Flare uses standard HTML code (where an ordered list starts with the <ol> tag and each list item starts with the <li> tag), there is no need to create distinct paragraph styles to handle list numbering. You simply apply the desired numbered list format using the quick list drop-down menu shown below.

Once the list numbering is set, you don't need worry about it again. The example below shows you a simple numbered list in the Flare XML Editor:

The Flare Text Editor lets you see how ordered lists and list items are formatted in HTML:

If you want to map numbered lists from FrameMaker to a paragraph style in Flare, the option is available. Before importing your FrameMaker document into Flare, create comparable p styles in the Flare stylesheet and ensure that those styles are set to use the appropriate mc-auto-number-format command
|
Create This Style in Flare |
mc-auto-number-format |
To Map It to This FrameMaker Paragraph Tag |
|---|---|---|
|
p.Step1 |
{n=1} |
Step1 (or your equivalent) |
|
p.StepNext |
{n+} |
StepNext (or your equivalent) |
The next step is to import your FrameMaker document into Flare. During the import process, you can map your FrameMaker paragraph tags to the corresponding tags in Flare
Note The import process does not support mapping numbered lists from FrameMaker to CSS list item li styles.
Logically Structured FrameMaker Files
The more logically you structure the information in your FrameMaker files, the easier the information will be to work with in Flare.
Example The information tagged Heading 1 should all share the same kind of information.
Let's say you have the following:
H1: Opening Files
H3: Editing Files
H2: Saving Files
H4: Printing Files
H3: Archiving Files
These are probably all first-level headings and should be moved to be at the same level. You can do this in FrameMaker or you can use an outlining FrameMaker utility called Enhance, available at http://www.sandybrook.com.
Consistently Use and Apply Paragraph, Character, and Table Formats
Over time, it's easy for FrameMaker files to include many formats, some used and some not. It's also easy to have several formats that look identical and serve the same purpose. This can cause confusion after importing into Flare.
You should delete the unused formats in your FrameMaker files. You can do this manually, or use tools like the following to help.
|
To Delete |
Use This Tool |
Available From |
|---|---|---|
|
Unused Character Formats |
Character Tools |
|
|
Unused Paragraph Formats |
Paragraph Tools |
|
|
Unused Table Formats |
Table Tools |
Make sure you understand how your files were designed. It's possible that you or someone else tagged different kinds of information with tags that look identical. You may not want to undo this.
If you have a lot of identical formats in your FrameMaker files and they serve no purpose, you should consolidate these.
To help you identify identical tags, it might be useful to list all tag settings. Table tools, Character Tools, and Paragraph Tools, listed above, will create these lists.
After you identify the formats you want to change, you can go to the following website and get FindChangeSpecial:
http://www.frameexpert.com/plugins/findchangespecial/index.htm
You can find and change format names in FrameMaker, so this tool is not essential, but it makes the process faster.
After the import process, you may still need to clean up the formats in Flare. If so, you should utilize Flare's analysis tool. It can show you unused styles, identical styles, and other issues in your stylesheets. You can delete, rename, and modify your imported files based on the analysis.
All Cross-References and Referenced Files Need Targets
To import your files, Flare (and FrameMaker) should be able to find all the files used. In FrameMaker, this is pretty easy—generate/update your book so it finds all the files the book. Even if you're only going to import one file from a book, this lets FrameMaker know where everything is and how to find it.
If FrameMaker reports it cannot find files or cross-references, sort this out before you start your import in Flare.
Update TOCs
If you are importing a book file that has a book-level table of contents (TOC), the TOC is used to create a Flare TOC
Before you start the import in Flare, make sure the FrameMaker book-level TOC includes the headings you want in the eventual Flare TOC. After you import into Flare, you can add topics to the Flare TOC, but making sure the FrameMaker TOC is correct saves you work after the import.
Distiller Settings for Importing Graphics
Selecting the right import options in Flare is half the process in getting graphics that look good. The other half is selecting the correct Adobe Distiller options.
Why the correct Distiller options? Because Flare uses Distiller to convert graphics from FrameMaker. This ensures the best quality graphics when you import into Flare. Therefore, it’s important to get the settings right in Distiller before you start the import process.
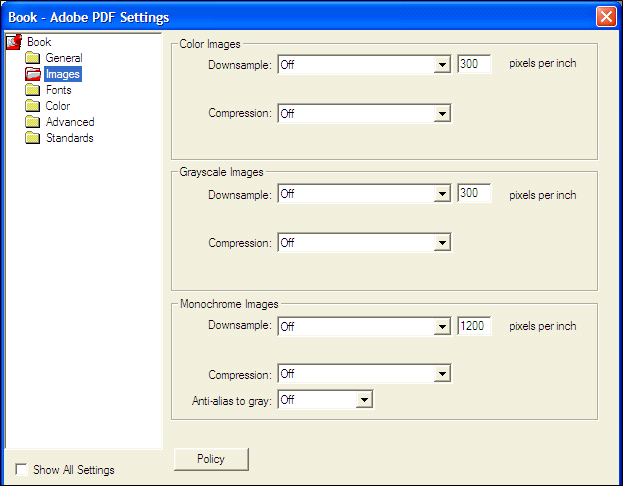
Open Distiller on your computer, find the Images settings, and set all Downsampling to Off or None. This prevents the Distiller from reducing the number of pixels in your graphics, making the resulting graphic look much cleaner. The following example shows Distiller 8 but the same settings can be found in other versions of Distiller. For more information about Distiller, please refer to its documentation.
When you’re done, save the Distiller settings as a .joboptions file. When you return to the Distiller interface, make sure you select the .joboption file that you just created.
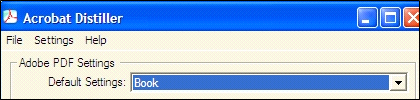
When you close Distiller, it automatically uses the settings last selected when it was closed. So make sure you select the .joboption file that you created before you close it.

