Use the following steps if you have already created a Lingo project and want to bind ("connect") it to Git. You can also automatically detect existing source control bindings if your project has been previously connected to Git.
When using Git for source control, every Lingo project will have a local repository. So after you bind a Lingo project to Git, you will see a folder named ".git" alongside your other project folders in Windows Explorer. You will see a .gitignore file, which prevents unnecessary folders and files from being included in the source control processes.
As you work in your project, changes can be committed to your local repository. Then, you would periodically synchronize (i.e., pull, push) files with your remote repository. This allows other people on your team to get your changes, and it lets you get their changes as well.
Note The following steps show how to bind a project using the Lingo interface. It is also possible to bind a project outside of Lingo (e.g., using Git Bash). If you decide to do this, you should be aware of some additional aspects of source control, such as bind detection and disabling providers.
Note Each project bound to Git must have its own source control repository. Also, when first binding a project to Git, the repository must be empty. For example, if you are using a third-party solution such as GitHub to create a remote repository, you might initially be presented with options (such as README or .gitignore) that add files to your new repository. If you select any of these options and then attempt to bind the project to Git, you will experience an error that looks something like this: "Destination already in use by another project. Please push to an empty remote."
Therefore, you should avoid selecting any such options when creating your remote repository. After you bind the project to the remote Git repository, you can then return to that repository and add the README or other files as necessary.
[Menu Proxy — Headings — Online — Depth3 ]
How to Bind a Project Using the Project Properties Dialog
- Select File > Project Properties.
- Select the Source Control tab.
- Click Bind Project. The Bind Project dialog opens.
-
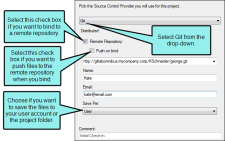
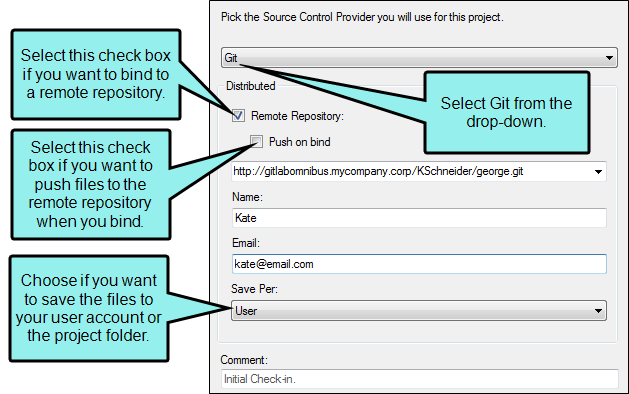
From the drop-down, select Git.
-
If you are going to bind to a remote repository, select Remote Repository, then enter the address of the repository in the field. If you want to work locally, you can leave this box unselected. You can enter an HTTP URL or an SSH URL.
Note You may need to obtain this information from your system administrator.
- If you want to push to the remote repository when you bind the project, select the Push on bind check box. This will push the initial project files to the repository when you bind the project.
- In the Name field, enter your name.
- In the Email field, enter your email address.
-
From the Save Per drop-down, select how you want to save your files.
- User Saves the files in your local folder. Select this option if you are working with other tools (e.g., Tortoise) or if you want to use the same user identity across multiple projects.
- Project Saves the files locally to your project. Select this option if you want to use different identities for each project.
- (Optional) In the Comment field, you can enter any internal comments.
- In the Bind Project dialog, click OK.
- In the Project Properties dialog, click OK.
- (Optional) If you entered an HTTP address, enter your user name and password in the Log In dialog. Click OK when you are finished.
-
(Optional) If you entered an SSH URL, the Certificate Specification dialog opens. In the dialog, do the following and click OK when you are finished:
- In the Public key field, enter your public SSH key, or use
 to browse for the key on your network.
 - In the Private key field, enter your private SSH key, or use to browse for the key on your network.
-
If you want Lingo to remember your key information so you do not need to enter it again later, select the check box next to Save certificate information.
Note SSH keys allow you to establish a secure connection between your computer and your Git source control provider (likewise, using an SSH URL is more secure than an HTTP URL; you need to use SSH keys if you want to use an SSH URL). If you do not have a public and private SSH key, your can generate these keys using your Git source control provider (e.g., Gitlab). Follow the directions provided by your source control provider to add these keys to your Git account. Once you generate these keys, they are typically found in the C:\Users\[username]\.ssh folder on your computer.
Public keys typically have a .pub extension. Private keys use the same file name as the public key, but without the file extension.
Example Use the following as guides when setting up your URLs and keys.
SSH URL
Copygit@gitlabomnibus.mycompany.corp:MyUserName/myproject.gitHTTP URL
Copyhttp://gitlabomnibus.mycompany.corp/MyUserName/myproject.gitSSH Private Key
CopymycompanySSHkey_id_rsaSSH Public Key
CopymycompanySSHkey_id_rsa.pub
- In the Public key field, enter your public SSH key, or use
How to Bind a Project Using the Explorer
- Select View > Source Control Explorer. The Source Control Explorer opens.
-
From the drop-down or the Home pane, select Settings. The Settings pane opens.
- Click Bind. The Bind Project dialog opens.
-
From the drop-down, select Git.
-
If you are going to bind to a remote repository, select Remote Repository, then enter the address of the repository in the field. If you want to work locally, you can leave this box unselected. You can enter an HTTP URL or an SSH URL.
Note You may need to obtain this information from your system administrator.
- If you want to push to the remote repository when you bind the project, select the Push on bind check box. This will push the initial project files to the repository when you bind the project.
- In the Name field, enter your name.
- In the Email field, enter your email address.
-
From the Save Per drop-down, select how you want to save your files.
- User Saves the files in your local folder. Select this option if you are working with other tools (e.g., Tortoise) or if you want to use the same user identity across multiple projects.
- Project Saves the files locally to your project. Select this option if you want to use different identities for each project.
- (Optional) In the Comment field, you can enter any internal comments.
- In the Bind Project dialog, click OK.
- In the Project Properties dialog, click OK.
- (Optional) If you entered an HTTP address, enter your user name and password in the Log In dialog. Click OK when you are finished.
-
(Optional) If you entered an SSH URL, the Certificate Specification dialog opens. In the dialog, do the following and click OK when you are finished:
- In the Public key field, enter your public SSH key, or use to browse for the key on your network.
- In the Private key field, enter your private SSH key, or use to browse for the key on your network.
-
If you want Lingo to remember your key information so you do not need to enter it again later, select the check box next to Save certificate information.
Note SSH keys allow you to establish a secure connection between your computer and your Git source control provider (likewise, using an SSH URL is more secure than an HTTP URL; you need to use SSH keys if you want to use an SSH URL). If you do not have a public and private SSH key, your can generate these keys using your Git source control provider (e.g., Gitlab). Follow the directions provided by your source control provider to add these keys to your Git account. Once you generate these keys, they are typically found in the C:\Users\[username]\.ssh folder on your computer.
Public keys typically have a .pub extension. Private keys use the same file name as the public key, but without the file extension.
Example Use the following as guides when setting up your URLs and keys.
SSH URL
Copygit@gitlabomnibus.mycompany.corp:MyUserName/myproject.gitHTTP URL
Copyhttp://gitlabomnibus.mycompany.corp/MyUserName/myproject.gitSSH Private Key
CopymycompanySSHkey_id_rsaSSH Public Key
CopymycompanySSHkey_id_rsa.pub
- In the Public key field, enter your public SSH key, or use
What’s Noteworthy?
Tip If you are having difficulty binding your project, try binding to a brand new directory in your source control provider. You should also ensure that the directory on your local machine (and its parent directories) is not already mapped to source control, as this may cause issues with binding.
Note You can also bind a new Lingo project to source control while creating it.
Note When you bind a project to
