Adding Keyframes
Whenever you add an object to a frame, you have the option to set up keyframes. Additionally, you can set some types of keyframes on clip effects that have been applied to objects. When viewing the Object or Effect Properties window pane, object and clip effect attributes (e.g., size, position) that can include keyframes are indicated by a yellow diamond button  . Objects and clip effects can include more than one keyframe type.
[Menu Proxy — Headings — Online — Depth3 ]
How to Add Keyframes to Objects
- Open a movie that contains objects, or add an object to a frame.
- Double-click the object. The Object Properties window pane opens.
-
In the Timeline window pane (View > Timeline), do one of the following:
- For all standard object types, click Frame View. Any action objects converted to objects will also be in this view.
- For action object types, click Action View. Any objects converted to action objects will also be in this view.
-
Add one of the following keyframe types:
Opacity
Altering the object opacity within keyframes can make an object appear to fade in or out of a frame.
- In the Object Properties window pane, expand the Object Appearance section.
- Drag the Opacity slider to the level of transparency that you want the object to start at. For example, if you pick 100%, the object will start out with a completely opaque look.
-
From beside the Opacity slider, click
.In the Timeline, an opacity keyframe bar will nest under the object.
- In the Timeline, drag the playhead to the point of time when the first opacity transition should begin.
-
Drag the Opacity slider to the desired percentage.
Once you select the desired opacity, a new keyframe will automatically appear in the opacity keyframe bar. You do not need to click
again. -
(Optional) Repeat steps d and e as needed.
Tip If you want to make an object gradually go from 0-100% opacity (or the other way around), you really only have to set two keyframes. Set the first one at the beginning of the object, then set the final state at the very end of the object. The object is automatically set to have a linear interpolation, so the transition will happen gradually over the duration of the object's time span.
Color
A timed, subtle change to an object's color can redirect attention to that object when the transition begins.
- In the Object Properties window pane, expand the Object Appearance section.
- In the Background section, set the starting color (solid will have one color field, gradient will have two) for the object. To see advanced color options, select
 . You can also click
  to pick a color from your screen.
 -
From beside the color field (first color field if you are using a gradient), click
.In the Timeline, a background keyframe bar will nest under the object.
- In the Timeline, drag the playhead to the point of time when the first color transition should begin.
-
In the Background section, set the next color (solid will have one color field, gradient will have two) for the object.
Once you select the desired color, a new keyframe will automatically appear in the background keyframe bar. You do not need to click
again. -
(Optional) Repeat steps d and e to add more background color keyframes.
Tip If you want a gradient to display for one or more keyframes but want a solid color for the rest of the object's keyframes, choose one of the gradient background types for the object. For the keyframes you want to remain solid, pick the same color for both gradient fields.
Position
When you create keyframes in order to move the position of an object, a trajectory is automatically shown in the Frame Editor. Each movement point is indicated by a blue circle on the trajectory's dotted line.
- In the Object Properties window pane, expand the Object Layout section.
-
Manually set the starting position of the object by dragging it to the desired location in the Frame Editor, or set it using the Position fields in the Object Properties window pane:
- In the first Position field, select the starting horizontal position for the object. Increase the number to move the object to the right, or decrease the number to move the object to the left.
- In the second Position field, select the starting vertical position for the object. increase the number to move the object down, or decrease the number to move the object up.
-
From beside the Position fields, click
.In the Timeline, a position keyframe bar will nest under the object. Additionally, a small blue circle will appear beside the object in the Frame Editor. As you add position keyframes, these circles will represent each new position, and a dotted path will form between them, showing you the object motion.
- In the Timeline, drag the playhead to the point of time when the first position transition should begin.
-
Manually set the starting position of the object by dragging it to the desired location in the Frame Editor, or set it using the Position fields in the Object Properties window pane:
- In the first Position field, select the next horizontal position for the object. Increase the number to move the object to the right, or decrease the number to move the object to the left.
-
In the second Position field, select the next vertical position for the object. increase the number to move the object down, or decrease the number to move the object up.
Once you set one of the positions, a new keyframe will automatically appear in the position keyframe bar. You do not need to click
again.
- (Optional) Repeat step d and e to continue adding position keyframes.
Size
You might want to show an object becoming smaller to accommodate other objects taking over the focal point of the frame.
- In the Object Properties window pane, expand the Object Layout section.
-
Manually set the starting size of the object by clicking and dragging the small blue handles on the object, or set it using the Size fields in the Object Layout section:
- In the first Size field, increase the number to add width, or decrease the number to shrink the width to set the starting size of object.
- In the second Size field, increase the number to add length, or decrease the number to shorten the object to set the starting size of object.
-
From beside the Size fields, click
.In the Timeline, a size keyframe bar will nest under the object.
- In the Timeline, drag the playhead to the point of time when the first size transition should begin.
-
Manually set the next size of the object by clicking and dragging the small blue handles around the object, or set it using the Size fields in the Object Layout section:
- In the first Size field, select the next width for the object.
-
In the second Size field, select the next height for the object.
Once you resize the object, a new keyframe will automatically appear in the size keyframe bar. You do not need to click
again.
- (Optional) Repeat steps e-g to continue adding size keyframes.
Note Size keyframes are not available for arrows, bubbles, polygons, and polylines.
Rotation
Rotating an object on the frame will create a spinning effect.
- In the Object Properties window pane, expand the Object Layout section.
-
Rotate the object by clicking and dragging the large blue handle on the object, or by changing the number in the Rotation field to set the starting look for the object.
-
From beside the Rotation field, click
.In the Timeline, the Rotation keyframe bar will nest under the object.
- In the Timeline, drag the playhead to the point of time when the first rotation transition should begin.
-
Rotate the object by clicking and dragging the large blue handle on the object, or by changing the number in the Rotation field.
Once you change the rotation, a new keyframe will automatically appear in the Rotation keyframe bar. You do not need to click
again. - (Optional) Repeat steps d and e to create adding rotation keyframes.
Text
Changing the text on an object lets you reuse that object.
- In the Object Properties window pane, expand the Text section.
- Click on the object and start typing, or in the Text field, enter the starting text for the object.
-
From beside the Text field, click
.In the Timeline, the Text keyframe bar will nest under the object.
- In the Timeline, drag the playhead to the point of time when the first text transition should begin.
-
Click on the object and start typing, or in the Text field, enter the next text you want the object to show.
Once you change the contents of the Text field, a new keyframe will automatically appear in the Text keyframe bar. You do not need to click
again. - (Optional) Repeat steps d and e to continue adding text keyframes.
Note All objects do not have the same keyframe options. For example, cursor objects do not have a rotation property.
- Continue adding keyframes as needed.
-
Click
") to save your work.
to save your work.
How to Add Keyframes to Clip Effects
You can apply keyframes to clip effects.
- Open a movie that contains an object to which a clip effect has been applied.
-
In the Timeline window pane (View > Timeline), do one of the following:
- For all standard object types, click Frame View. Any action objects converted to objects will also be in this view.
- For action object types, click Action View. Any objects converted to action objects will also be in this view.
-
In the Timeline, right-click the effect bar and select Properties.
The Effect Properties window pane opens.
-
Add one of the following keyframe types:
Position
When you create keyframes in order to move the position of a clip effect, a trajectory is automatically shown in the Frame Editor. Each movement point is indicated by a blue circle on the trajectory's dotted line.
- In the Effect Properties window pane, expand the Object Layout section.
-
Manually set the starting position of the clip effect area by dragging the red effect frame to the desired location in the Frame Editor, or set it using the Position fields in the Effect Properties window pane:
- In the first Position field, select the starting horizontal position for the effect area. Increase the number to move the effect area to the right, or decrease the number to move the effect area to the left.
- In the second Position field, select the starting vertical position for the effect area. increase the number to move the effect area down, or decrease the number to move the effect area up.
-
From beside the Position fields, click
.In the Timeline, a position keyframe bar will nest under the effect bar. Additionally, a small blue circle will appear beside the red effect frame in the Frame Editor. As you add position keyframes, these circles will represent each new position, and a dotted path will form between them, showing you the effect area motion.
- In the Timeline, drag the playhead to the point of time when the first position transition should begin.
-
Manually set the starting position of the effect area by dragging the red effect area frame to the desired location in the Frame Editor, or set it using the Position fields in the Effect Properties window pane:
- In the first Position field, select the next horizontal position for the effect area. Increase the number to move the effect area to the right, or decrease the number to move the effect area to the left.
-
In the second Position field, select the next vertical position for the effect area. increase the number to move the effect area down, or decrease the number to move the effect area up.
Once you set one of the positions, a new keyframe will automatically appear in the position keyframe bar. You do not need to click
again.
- (Optional) Repeat step d and e to continue adding position keyframes.
Size
You might want an effect area to increase to create the feeling of a big reveal, or decrease to closing in on important information.
- In the Effect Properties window pane, expand the Object Layout section.
-
Manually set the starting size of the object by clicking and dragging the red effect area frame, or set it using the Size fields in the Object Layout section:
- In the first Size field, increase the number to add width, or decrease the number to shrink the width to set the starting size of the effect area.
- In the second Size field, increase the number to add length, or decrease the number to shorten the height to set the starting size of the effect area.
-
From beside the Size fields, click
.In the Timeline, the Size keyframe bar will nest under the effect bar.
- In the Timeline, drag the playhead to the point of time when the first size transition should begin.
-
Manually set the next size of the effect area by clicking and dragging the red effect area frame, or set it using the Size fields in the Object Layout section:
- In the first Size field, select the next width for the effect area.
-
In the second Size field, select the next height for the effect area.
Once you resize the effect area, a new keyframe will automatically appear in the size keyframe bar. You do not need to click
again.
- (Optional) Repeat steps e-g to continue adding size keyframes.
- Continue adding keyframes as needed.
-
Click
to save your work.
Examples
Example
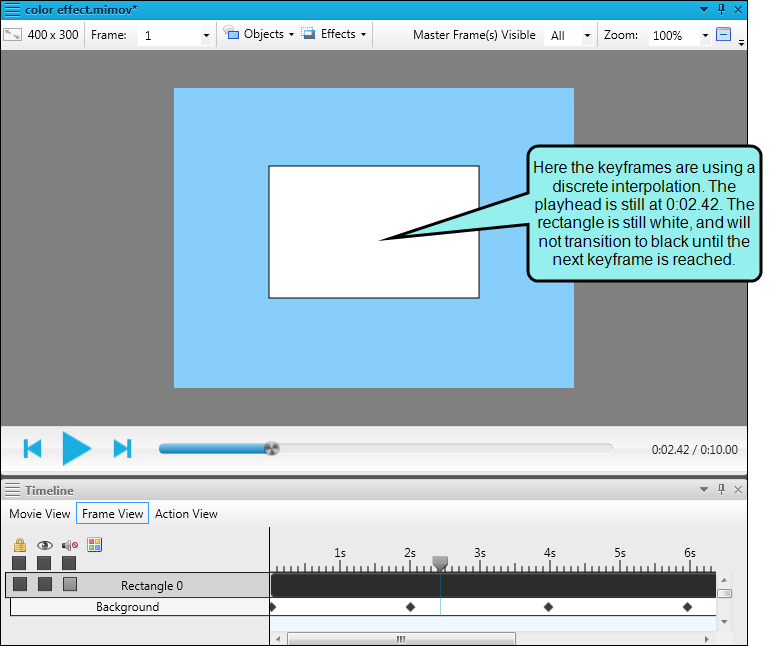
This frame contains a black rectangle object. Right now, the object is opaque. However, we want it to change between black and white during the course of the frame. To do this, we will add a series of background keyframes by using the Keyframe button in the Object Properties window pane.
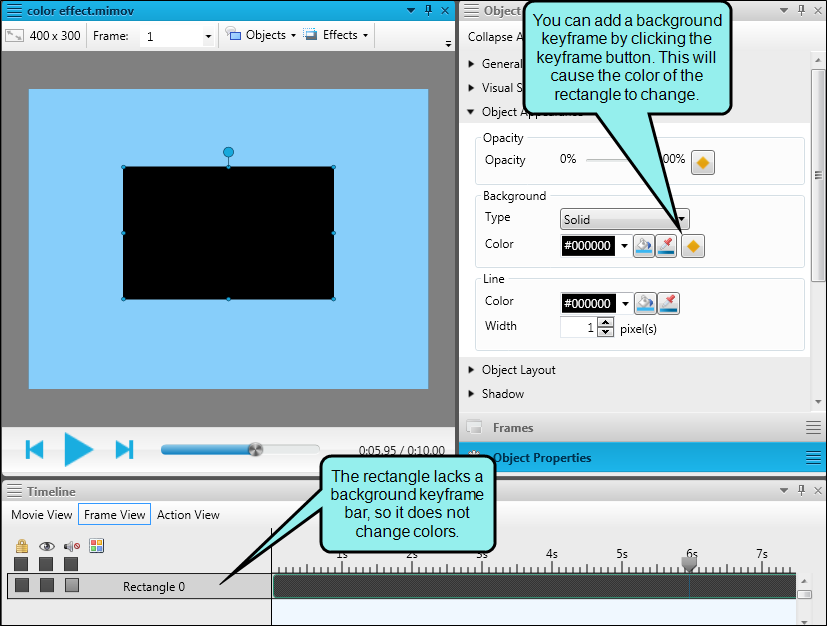
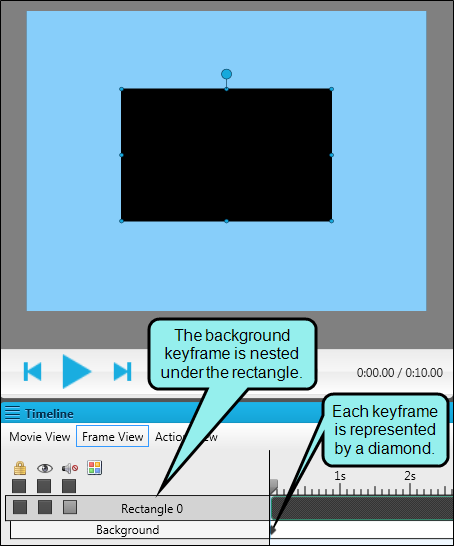
When the object is at the starting point of the transition—in other words, when we first want the object to change color—click the keyframe button next to the Color property in the Object Properties window pane. Once the first keyframe has been added, the background keyframe type bar is added to the object. Each keyframe is indicated by diamond on the keyframe type bar.
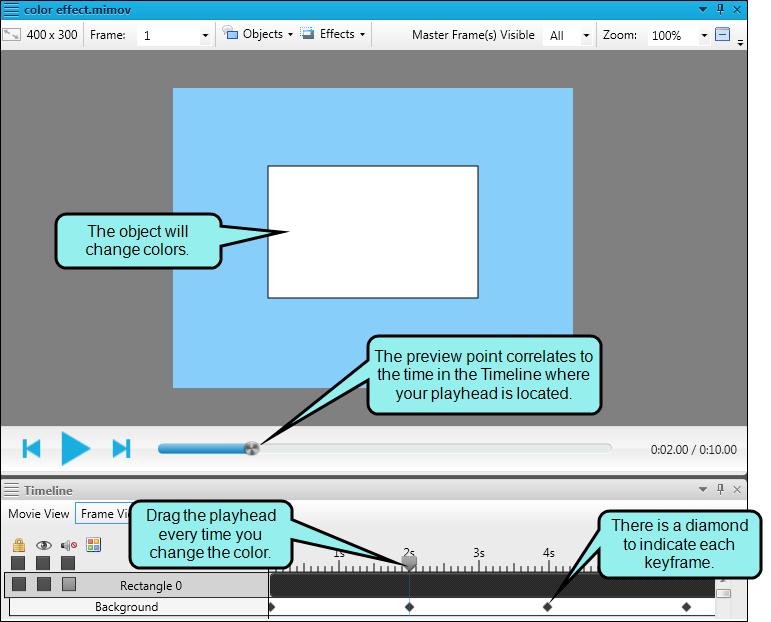
For each new color setting, drag the playhead to the time at which the object should change color, then select a new color from the Object Appearance section in the Object Properties window pane. A new keyframe diamond is automatically added to the Timeline.
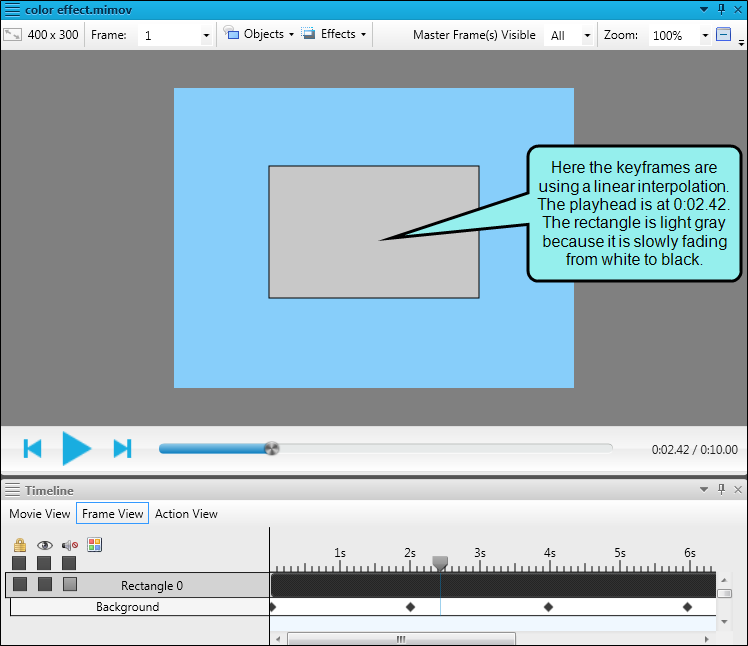
Additionally, you can set an interpolation option when creating keyframes. This changes the type of transition between each keyframe. To do this, click the keyframe diamond, then select an option from the Interpolation drop-down in the Keyframe Properties window pane. In this case, you can pick linear or discrete interpolation. A linear interpolation causes a gradual fade between each color, while a discrete interpolation causes a distinct change between the colors precisely when the keyframe is reached.
Example
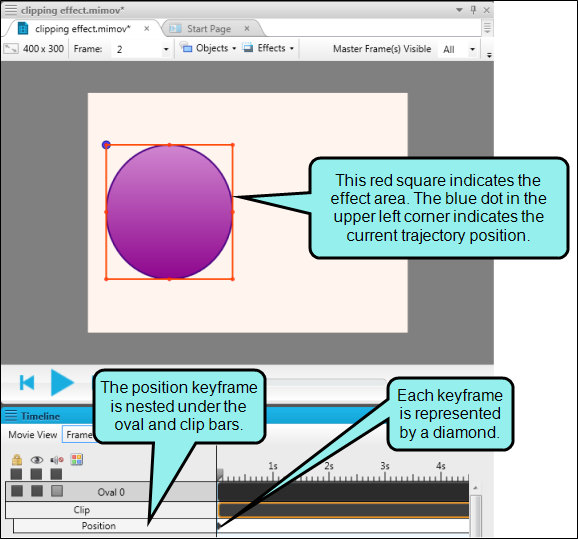
This frame contains an oval object to which a clip effect has been applied. Right now, the effect covers the entire object, so you can see the entire oval. However, we want the effect to gradually move off the oval, so the oval disappears from the frame. To do this, we can add a series of position keyframes by using the Keyframe button in the Effect Properties window pane.

When the object is at the starting point of the effect, in other words, when the entire oval is contained in the clip effect area rectangle, click the position keyframe button. Once the first keyframe has been added, the position keyframe type bar is added to the clip effect bar, and each keyframe is indicated by diamond on the keyframe type bar. Additionally, a blue trajectory dot is added to the frame to indicate the current location of the effect.
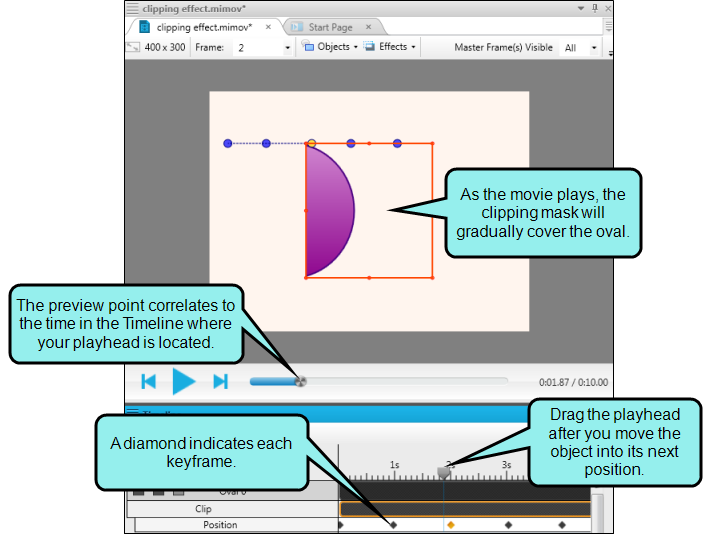
For each position, drag the playhead to the time at which the effect should move, then drag the effect rectangle to the right of the oval. A new keyframe diamond is automatically added to the Timeline, and the trajectory updates.
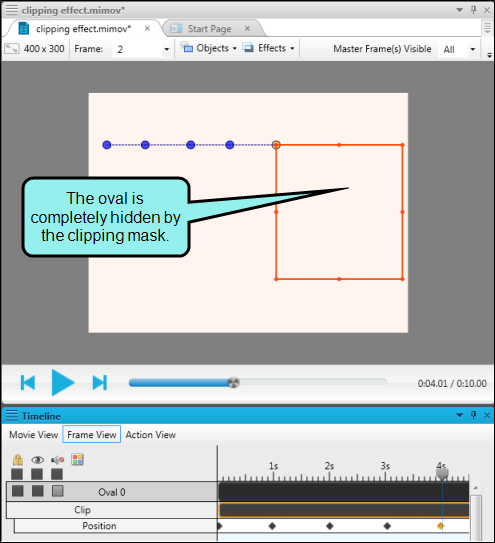
Continue to add position keyframes until the entire oval has disappeared.
What’s Noteworthy?
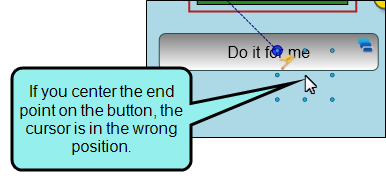
Tip When applying position keyframes to an object or effect, the position keyframe location is placed at the upper left corner of the object. Depending on the type of path you are drawing, you may want to slightly adjust the object's trajectory to account for the space between the upper left corner of the object and the middle of the object.
For example, if you have a cursor object and you need it to "click" a button, you may want to position the trajectory slightly above and to the left of the button, so it appears that the cursor is in the middle of the button.

Note The "Snap to Keyframe" option below the Timeline window pane lets you precisely move the playhead to a keyframe for an object. When this option is enabled and you drag the playhead, it "snaps" like a magnet to the nearest keyframe. If you attempt to align the playhead on a keyframe without this option, you might find that you are slightly off target.
Note You can add size and position keyframes to clip effects. Clip is the only effect that supports keyframes. Note that the opacity keyframe (which can be applied to any object) is not the same as an opacity effect (which can only be applied to image objects).
Note If you set a shape's opacity to 0% (fully transparent), it will be hidden on the frame. This lets you prevent users from clicking on or selecting a shape accidentally.
Note You can copy an object that contains keyframes to a different frame, and the keyframes will be retained. However, if the new frame is shorter than the original frame, some keyframes may not be played (because they occur after the frame has ended). If you want all of the keyframes to play, you may need to move them to fit within the duration of the new frame.
Note When you are creating another keyframe within the same object or clip effect and keyframe type, you do not need to click the keyframe button again. Any keyframes added after the first are automatically created when the property is changed.
Note If you want to change the way the keyframe transitions from one state to the next, you will need to edit each keyframe. This includes editing the trajectory (position keyframes). See Editing Keyframes.
Note If you add an object that contains keyframes to a palette, it will retain those keyframes.
What's Next?
After you add keyframes, you can make changes to the transition effects between them. See Editing Keyframes.

