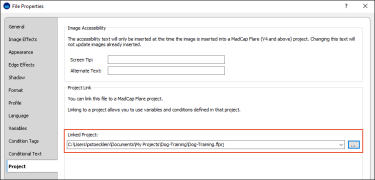
You can link an image to a MadCap Flare project. This lets you automatically have access to any variables or condition tags found in that Flare project.
This link occurs automatically if you insert the image into the Flare project. However, if you have not done that, you can use the following steps to manually link a MadCap Capture image to a Flare project.
[Menu Proxy — Headings — Online — Depth3 ]
How to Link to a Flare Project
- Open the image.
- Double-click the image. The File Properties dialog opens.
- Select the Project tab.
- Click the browse button
 .
. - In the dialog that opens, select and double-click the Flare project to which you want to link.
- In the File Properties dialog, click OK.
- Click
 to save your work.
Example
Example
You open an image that is already part of a MadCap Flare project. All of the variables from that Flare project automatically become available for you to use in your image (i.e., they are project link variables, as described above). Suppose that you want to use a variable called "ProductName." The definition that you have provided for that variable name in Flare is "OurSoftware Version 1." So within your image, you might add a bubble callout and add text to it (e.g., "Welcome to"). Then you select the ProductName variable. The callout now displays the text you typed, plus the definition of the variable (e.g., "Welcome to OurSoftware Version 1").
Now let's say that it is a year later and your company has created another version of the software, called "OurSoftware Version 2." You need to change this name everywhere in your Flare project, as well as everywhere it has been used in an image callout. If you had not used a variable, you would need to manually find and replace the old name with the new name. Fortunately, you used a variable, so all you need to do is change the definition in one place. If you had created the variable within Capture, you would edit the definition in Capture's File Properties dialog. However, in this example, you used a variable from your Flare project. Therefore, you would modify the variable definition from within the Flare project. After you do so, the definition is changed everywhere that the variable was inserted (including within the callout in your image).
What’s Noteworthy?
Note After you link a Flare project to your image, you can select the newly linked condition tag or variable set (for example, the "Default" condition tag set or the "System" variable set) in the File Properties dialog.
If you link an image to a Flare project and you don't see your linked condition and variable sets, you may need to close the image and reopen it to refresh the available sets.
What’s Next?
After you link to a Flare project, you can insert variables or apply condition tags from that project. See Inserting Variables Into Objects and Applying Conditions.

