
For
Important At this time, custom list formats are supported only in PDF output. After browsers begin to support the CSS3 marker element that makes custom list formats possible, this feature will automatically be supported in browser-based outputs as well. Until then, if you want to generate a browser-based output, you should use the standard method for creating lists instead.
[Menu Proxy — Headings — Online — Depth3 ]
How to Create a Custom List Format
- Place your cursor in the document where you want to create a list.
-
Select Home >
 (down arrow) and choose Custom List Format > Create Custom Format.
 -
Use the Create New List Format dialog to specify the type of counter (e.g., decimals, upper-roman, lower-alpha), custom characters and images, and the look for each level of the list format. (You can use only one counter per level in the format.)
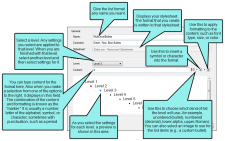
- Name Give your custom list format a name.
- Comment You can add an internal comment, such as the purpose of the list format.
- Stylesheet
- Level Select the level of the list that you want to work on. When a level is selected, any settings you choose are applied only to that level.
-
Content This field becomes populated based on settings you choose using the buttons next to this field. It is a good idea to begin by clicking the first button to the right (i.e.,
) and selecting a list type or image first (see below). Then use the other options as necessary.You can also type directly into this field.
Note Any text typed directly in this field is supported only in PDF output. If you enter any text, the default list markers (e.g., bullets, numbers) are instead displayed in non-PDF outputs.
-
Select the type of list. If you click the down arrow, you can select any of the following:
Type of List
What is Added to the Content Field?

Bullet list
Nothing

Numbered list
{n}.

Lower-alpha numbered list
{a}.

Upper-alpha numbered list
{A}.

Lower-Roman numbered list
{r}.

Upper-Roman numbered list
{R}.

Select custom bullet image
The path to the image file
-
 You can click this button to insert a special character or symbol.
 Note Custom list characters are supported only in PDF output. If you add characters or symbols to the Content field, the default list markers (e.g., bullets, numbers) are instead displayed in non-PDF outputs. However, custom bullet images are supported in all output formats.
-
 You can click this button to open the Font Properties dialog. This lets you change the look of the list marker, such as the font size or type, color, and effects.
- Click OK. The dialog closes and a list is started with the first level shown. Whenever you press Tab or click the indent button
 , the next level is created in the list. You can click the outdent button
  in the Home ribbon to move back out to higher levels in the list.
 - Click
") to save your work.
to save your work.

Custom List Formats and Styles
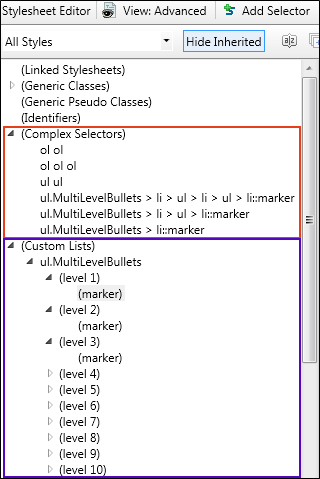
When you create a custom list format, a complex selector (a special type of style) is added to your stylesheet. In the Stylesheet Editor, you can see your custom list formats under (Complex Selectors), as well as under (Custom Lists). See Stylesheet Editor.
A custom list format might look something like the following when looking at the stylesheet in the Internal Text Editor. See Internal Text Editor.
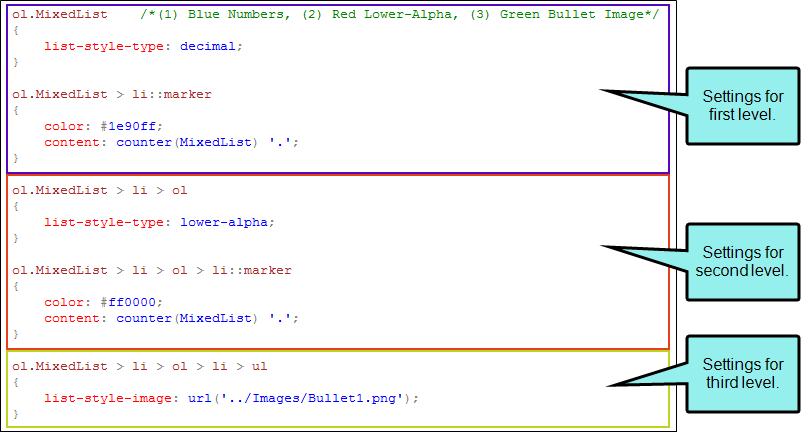
You can edit these styles whenever you like. See Editing Custom List Formats.
Applying Custom List Formats
After you create a custom list format, you can open a topic or snippet in the XML Editor and select that format when creating a new list.
You can also change an existing list to another custom format by right-clicking the ol (ordered list) or ul (unordered) structure bar and choosing the format from the context menu. See Applying Styles to Content.
