There are specific Doc-To-Help ribbons that are accessible in Word templates and documents associated with a Doc-To-Help project.
You can add multiple Microsoft® Word source documents to your project, and within those you can add many kinds of elements and objects. Some features (e.g., images, lists, tables) are built into Word and therefore always available, whether the document is part of a Doc-To-Help project or not.
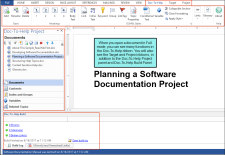
But there are other features that are unique to Doc-To-Help (e.g., conditions, image maps, inline text, variables). When you open a Word source document that is part of a Doc-To-Help project, you will notice three additional ribbons displayed for using the unique elements of Doc-To-Help: Doc-To-Help, Target, and the Project ribbons.
Depending on the source template you used to create the document, a ribbon called "Doc-To-Help Special Formatting" may also be available.
Note If you want to use the Special Formatting ribbon in your source document, be sure to select the D2H_SMAL.dotx, D2H_SMAL_A4.dotx, D2H_NORM.dotx, or D2H_NORM_A4.dotx template when creating a new document. If your source document is using a different template, and you switch to one of these four templates, the Special Formatting ribbon will not be available.
For documents where this ribbon is not available, use the Bullet, Numbering, and Table buttons in Word's native ribbons.
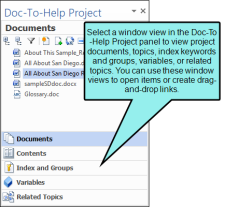
In addition to Doc-To-Help's special Word ribbons, the Doc-To-Help Project panel lets you add other unique elements to your source documents, such as links to variables, keywords, and topics.
When you open a document in Word, Doc-To-Help uses an add-in to determine what commands are necessary for the type of document you opened. Depending on what kind of document you opened, Doc-To-Help's Word add-in will open in one of three different modes. The Doc-To-Help ribbon adjusts dynamically based on your document type and you will only see the functionality applicable to the document you are working on.
The add-in will search for the document in Doc-To-Help projects and then open in one of the following modes:
- No Features This mode is used for templates; new, unsaved documents; and documents with an unsupported format.
- Basic This mode is used when the document is not included in any Doc-To-Help project, the add-in is disabled, or the add-in cannot find the Doc-To-Help project associated with the document. This mode is also used for final output.
- Full This mode is used for all documents included in a Doc-To-Help project.
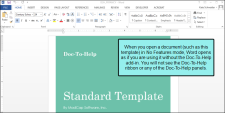
Example — No Features Mode
This document is a template. You do not need Doc-To-Help functionality for this document, so the Doc-To-Help Word add-in opens in No Features mode. It is the same as if you opened Word without using the Doc-To-Help add-in.
Example — Basic Mode
This document was opened in Word but is not included in a Doc-To-Help project. The Doc-To-Help Word add-in opens in Basic mode, so you can make simple changes to the document using the Doc-To-Help ribbon.
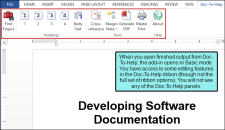
Example — Basic Mode, Project Output
This document is a finished Manual output built from Doc-To-Help. The Doc-To-Help Word add-in opens in Basic mode. This is because you do not want to do heavy editing in the finished output, but you might want to make some minor changes or notes using the features in the Doc-To-Help ribbon. You can also create PDF output from the Word document using the Doc-To-Help ribbon.
Note The Word add-in will search for projects in the following locations, in this order:
- Open Doc-To-Help projects
- Existing Doc-To-Help projects in the same folder as the opened document
- Existing Doc-To-Help projects in the parent folder as the opened document
If more than one project is found, a dialog will open and you can select the appropriate project. The project you select will be remembered as the default for the document.
If you open a document from the SharePoint server (not the local copy), the Doc-To-Help project won't be found automatically. You must open the document separately for Doc-To-Help to find the project.
Note When an existing document is added to a project, the Word add-in will run in Basic mode or Full mode, depending on the settings you choose. By default, the document is copied into the project folder; if you leave this recommended default setting, the Word add-in in the original document will still run in Basic mode, and the copied document now in your project will run in Full mode. If you do not select to copy the document to the project folder (i.e., you leave the document in its original location), the add-in in the original document will switch to Full mode.
If an existing document is removed from a project, the Word add-in automatically switches to Basic mode.
Note If you rename (Save As) a document in Word, the add-in will try to find a Doc-To-Help project that contains a file with that name. If it cannot find a project, the add-in will switch to Basic mode.
Note The Special Formatting ribbon is only available in Full mode.
Note The Word add-in is supported by Word 2010 and higher. It supports *.doc, *.docx, *.docm, and *.rtf files.
Note If the add-in is disabled, you will not be able to use the Doc-To-Help ribbon. A prompt will alert you if the add-in becomes disabled. You can turn this prompt on or off from the Options dialog.
The following commands are available in the Doc-To-Help ribbon when it is opened in Full mode (see Dynamic Add-In Modes).
|
|
Rename or delete an existing topic in a document, or add a new topic. |
|
|
Apply the Heading 1, 2, 3, 4, or Body Text style to the selected text in the source document. |
|
|
Create a hotspot link to topics containing the selected keywords, to a group of topics, to a bookmark in a document, or to a link tag. |
|
|
Create a hotspot that will display additional text on the same line, in a dropdown, or in a popup. |
|
|
Designates a hotspot as an index keyword. |
|
|
Designates a hotspot as a member of a group. |
|
|
Designates a hotspot as a link target. |
|
|
Sets a subset of the topic properties. |
|
|
Used to mark text as conditional by platform, target, attribute, or any combination of all three. |
|
|
Creates a hotspot to a text or rich content variable. |
|
|
Creates a section that is either collapsed or expanded by default. |
|
Removes custom formatting created in the selected text. |
|
|
Apply a Doc-To-Help style on the selected text. |
|
|
|
Insert a note or image in the left margin of a printed target. The margin note can be displayed as a popup in online outputs if desired. |
|
|
In online outputs, use the Image Map Editor to create hyperlinks within an image. |
|
|
You may insert multimedia (video and audio) into online outputs. |
|
|
Insert HTML Help ActiveX Controls into your Word documents. |
|
|
Insert cross-references that will appear as page numbers in printed outputs and hyperlinks in online outputs. |
|
|
Add terms to your glossary from any Word source document. |
|
|
View the current Doc-To-Help version number. |
The Special Formatting ribbon is only available in Full mode when using the D2H_SMAL.dotx, D2H_SMAL_A4.dotx, D2H_NORM.dotx, or D2H_NORM_A4.dotx templates.
Note If you want to use the Special Formatting ribbon in your source document, be sure to select the D2H_SMAL.dotx, D2H_SMAL_A4.dotx, D2H_NORM.dotx, or D2H_NORM_A4.dotx template when creating a new document. If your source document is using a different template, and you switch to one of these four templates, the Special Formatting ribbon will not be available.
|
Apply a list style to the selected text in the Word source document. |
|
Insert a table in your Doc-To-Help project. |
Targets can be added, built, and published within this ribbon.
The Active Target for your Doc-To-Help project can be set to any target that you have already created in your project. The Target Properties button lets you add, edit or delete any targets.
The targets can be built ad-hoc or by scheduling a build. You can also Rebuild your target or schedule your target to be rebuilt. The build of the active target can be viewed, or you can cancel an ongoing build. Once the target has been built, you can view the Build Log, or Publish to SharePoint.
The default themes of your targets can be modified. You can also add a new theme using the Wizard or Designer.
Your Templates are also managed in this ribbon. Use the Target Template button to change your default template of your project. You can also Add, Edit, or Remove templates.
The following functions can be performed on the Target ribbon:
Settings for your Doc-To-Help project can be modified in this ribbon. You can also apply attributes and styles to your Doc-To-Help project.
The Topics Panel is displayed through the Project ribbon. When you click on this button, it displays each of the topics.
Templates are now added and managed through the Project ribbon.
The Team Authoring functions are available once your Doc-To-Help project has been committed to a shared repository such as TFS, a file system repository, or web repository.
The following functions can be performed on your Doc-To-Help project through the Project ribbon:

Open the Doc-To-Help Project panel. You can use this panel to access some of Doc-To-Help's most frequently used functions without having to leave Word. This panel includes five window panes: Documents, Contents, Index and Groups, Variables, and Related Topics. |

Use this button to select a project that contains the active document. Or you can add the active document to another Doc-To-Help project. |

Review and configure your existing settings of your Doc-To-Help project. |

Click this button to display the Topics window. You can also click this button to hide this window. |

Set an attribute-based condition for the selected document. The document will be included or excluded when creating conditional builds (e.g., internal or external.) Use the Attributes dialog to create custom attributes. |

Customize the default window display types. |

Modify the default paragraph and character styles as currently set by your source template. |

Automatically create the index based on one or more topic types or styles. Open the drop-down menu to set preferences. |
|
Create or add existing documents to your Doc-To-Help project. |
|
The template currently selected for the open Word source document is displayed at the bottom of this section. You can change the look of the output, edit, or remove the source template. |
|
Use this section to share or synchronize a Doc-To-Help project bound to a repository. |


