


You can create tag expressions (i.e., instructions for including or excluding conditions) when performing any of the following tasks:
- Associating Conditions to a File While Editing
- Associating Conditions With Targets
- Exporting Projects
- Global Project Linking—Importing Files From Other Projects
- Previewing Topics
- Reimporting Files From Other Projects
- Sending Files for Review in Contributor or Flare
- Using Snippet Conditions
Note Most of these tasks have to do with condition tags. However, when exporting projects, you can also create expressions based on file tags. The process for creating file tag expressions is essentially the same as that for condition tag expressions. The following information describes condition tag expressions, but you can simply substitute file tags wherever condition tags are mentioned.
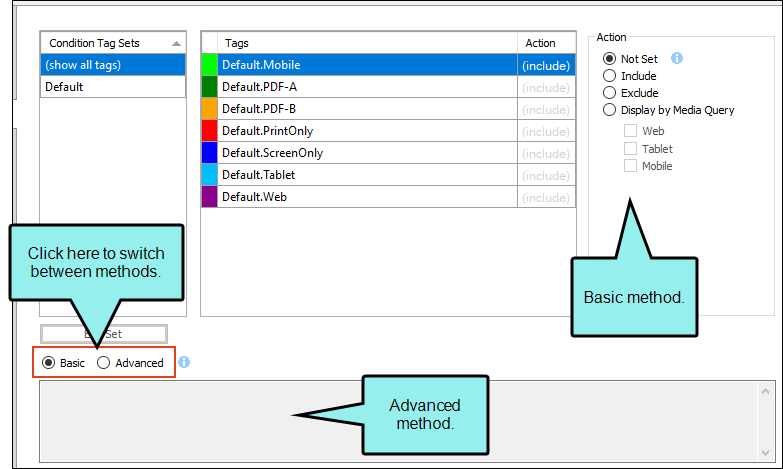
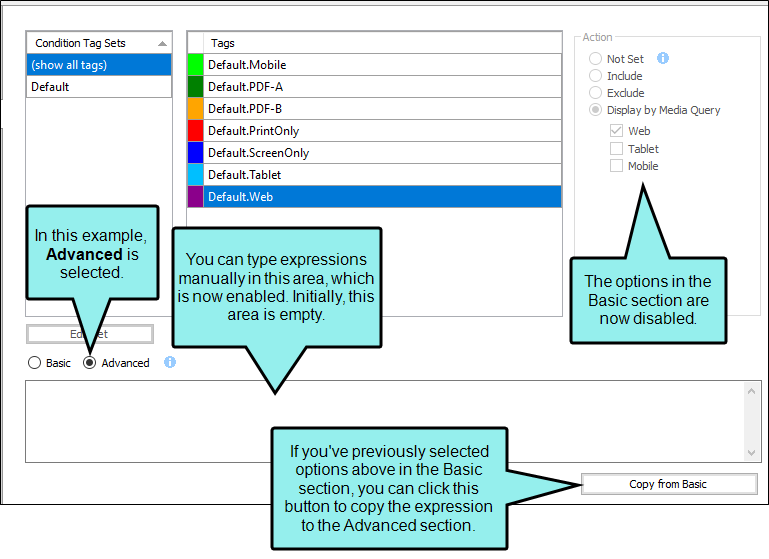
When you create tag expressions, you have the choice of working with conditions in Basic or Advanced mode. You can switch between the two modes by clicking Basic or Advanced in the user interface. You can use Basic if you are newer to condition tag expressions, or you can use the Advanced mode if you are experienced at writing condition tag expressions by hand. While the Basic section is easier for most people to use, it is also more limited in the type of expressions it can create.
With the Basic method, all of your work is done in the top half of the user interface, by just selecting options. On the other hand, with the Advanced method, most of your work is done in the bottom portion of the user interface.
Note If you are an experienced user and want to use the Advanced mode, you might find it helpful to begin with the Basic mode to create the initial expression and then switch to Advanced when you are ready.
The following instructions are based on the task Associating Conditions With Targets, but the same principles apply to the other tasks. The only real difference is that this task affects the content that is included in the output. For example, the Previewing Topics task does not affect the output; it is merely a way to see temporarily how different condition tag settings would change a particular topic. And the Global Project Linking tasks affect which files are imported into a project, based on condition tag settings.
[Menu Proxy — Headings — Online — Depth3 ]
Instructions for Basic Conditions
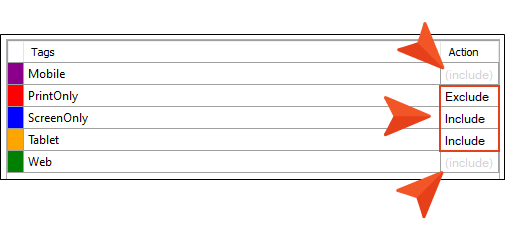
In the Condition Tag Sets area, you can choose to view tags for all condition tag sets or you can select a specific set. The tags associated with the selected set are shown to the right, with their associated colors. An Action cell appears next to each condition tag. When Basic is selected, the Action cell is shown and the Advanced section below is disabled. In the Tags area, select a condition tag in the grid to set its action. (You can also hold down the SHIFT or CTRL key and choose multiple rows to set the same action on all of them at once.)
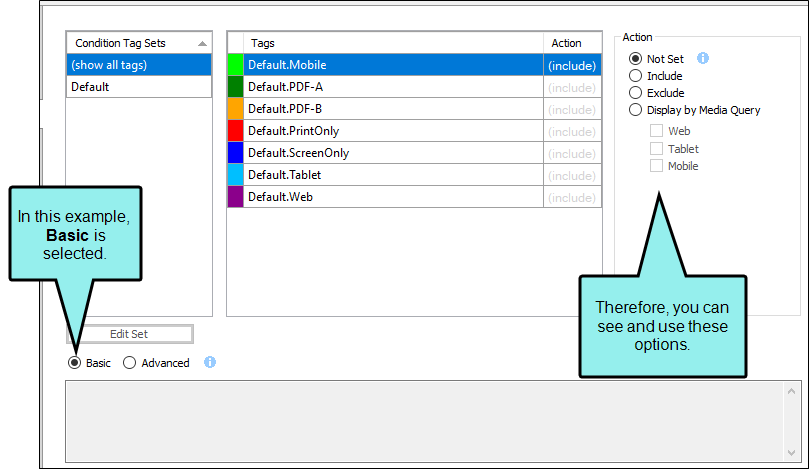
The Action cell in the grid indicates the current setting for the condition. The text is gray if you have not explicitly chosen an option. To change the setting, choose one of the options in the area to the right.
Example You have two condition tags—one called "Beginner" and another called "Advanced." Let's say that you have a topic containing three paragraphs. You apply the Advanced tag to the first two paragraphs, and you apply the Beginner tag to the last two paragraphs.
You have created a target called "Advanced Set Up." For this target, you obviously want to include all content associated with the Advanced tag, but you want to exclude content associated with the Beginner tag.
By default, Flare will include content associated with both tags, unless you tell it not to. So you tell Flare to exclude the content associated with the Beginner tag. The problem is the middle paragraph from the topic mentioned above. It is associated with both tags. You have told Flare to exclude content associated with the Beginner tag, and it will do so, overriding the default. But you want to make sure that paragraph is included in the "Advanced Set Up" output. That is why you need to make sure you select the Include option next to the Advanced tag.
When you select options in the Basic section, you are creating expressions with "or" statements (e.g., "include this condition tag or that one"). And when you do this, you can see the resulting expression displayed in the Advanced section below.
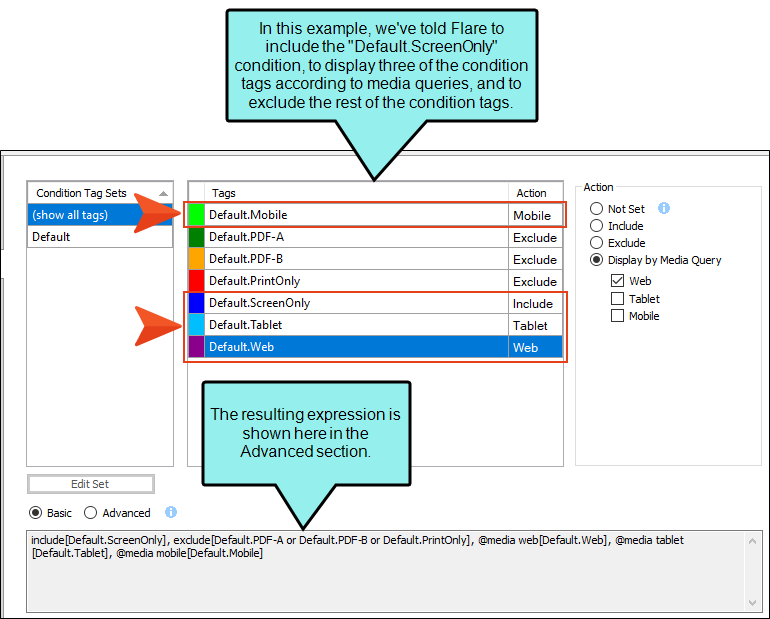
Inclusive System for Including and Excluding Conditions
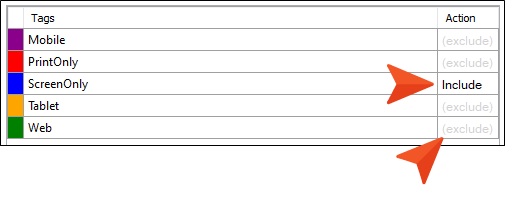
The condition feature is an inclusive system. If you do not select any options, all of the tags will automatically be included, as indicated by the gray text in the Action cell. If you include only some tags and exclude others, any remaining tags without options specifically set will automatically be included. However, if you select Include for any of the tags (even just one) and do not select Exclude for any tags, all of the other tags that do not have the Include option set explicitly will automatically be excluded. If you have not explicitly set an option for a condition tag, make sure you look at the gray text in the Action cell to know what will happen for that tag in the output.
Instructions for Advanced Conditions
If you are a more experienced user, you may decide to use the Advanced section to write expressions manually, rather than clicking check boxes. You can type the names of the condition tags as well as any of the following tokens: OR, AND, NOT, (). This lets you produce more complex, robust expressions to control your output (i.e., "and" statements, as well as "or" statements).
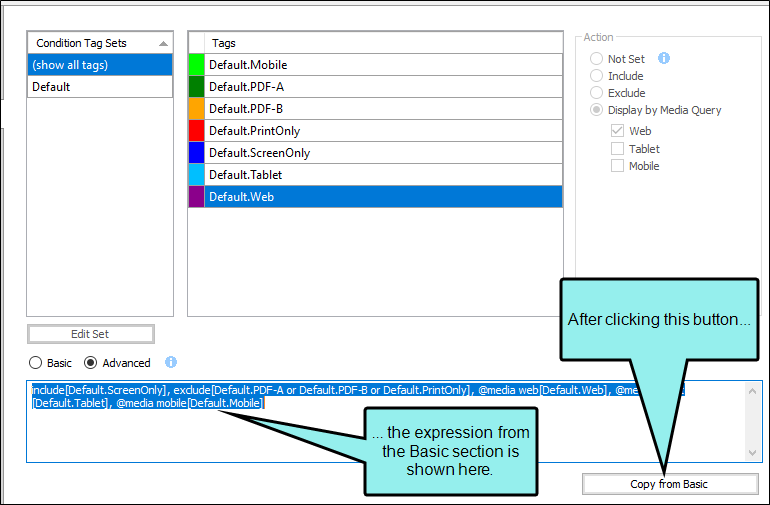
Copy From Basic
When you select Advanced for the first time, the Basic section becomes disabled (i.e., the options are disabled), and the Advanced section is enabled but empty (even if you've previously selected conditions in the Basic section). However, you can copy the expression from the Basic section to the Advanced section. This is a quick and easy way to create an initial expression and then adjust it with "and" statements.
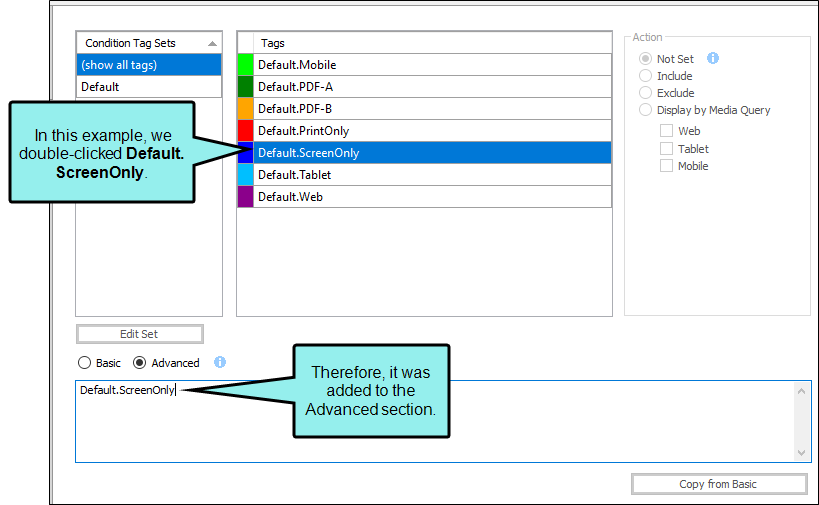
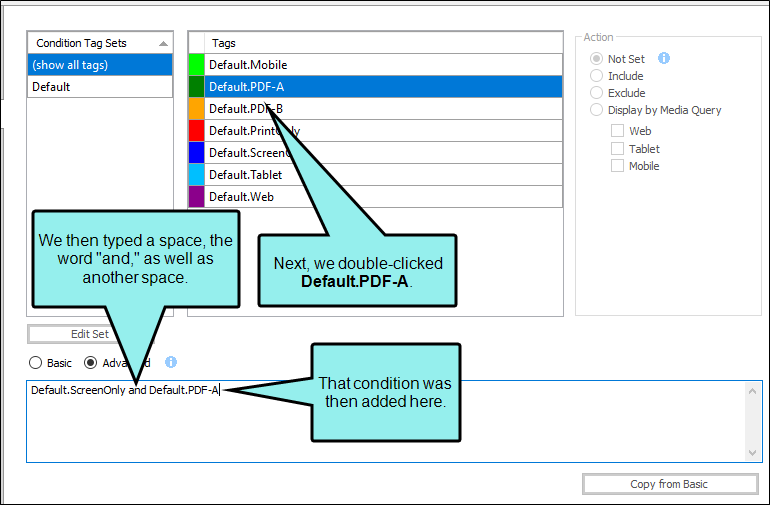
Double-Click Tags
Another trick you can use while working in the Advanced section is to double-click any tag from the Basic section. This adds the condition to the Advanced section so you do not have to type it. Just make sure your cursor has been placed in the Advanced section before double-clicking a condition tag. If you don't click in the Advanced section first, the newly added condition tag will overwrite all of the text you've entered previously in the Advanced section.
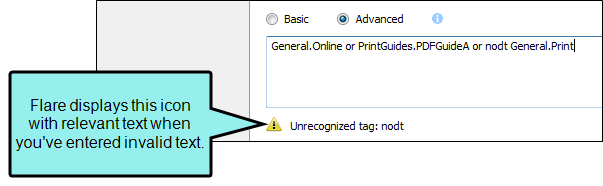
Warning Icon
When you type in the Advanced section, a yellow warning icon displays with relevant text if you have typed an error.
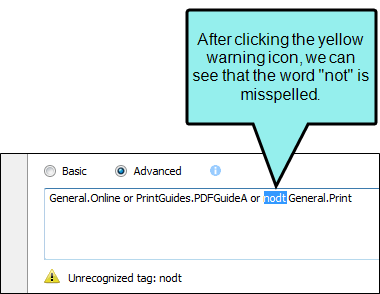
You can expect to see this icon quickly appear and then disappear as you type. However, if the icon remains after you finish, you can click it. The error will then be highlighted in the text below.
Examples of Condition Expressions
Following are some examples of condition expression strings.
Example — or
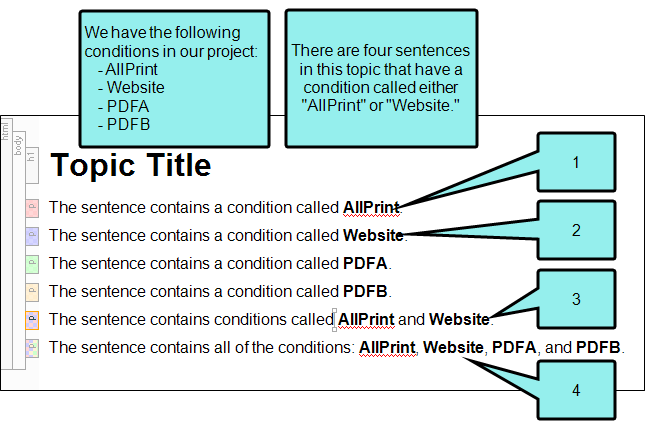
Primary.Website OR Primary.AllPrint
This is a simple expression that includes content that has either Website or AllPrint conditions applied to it.
So let's say you have a topic that looks like this.
In the output, you will see this.
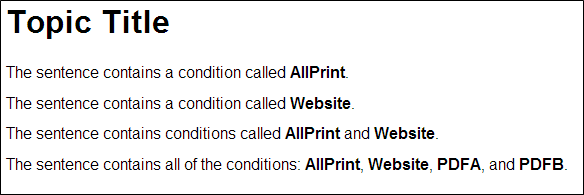
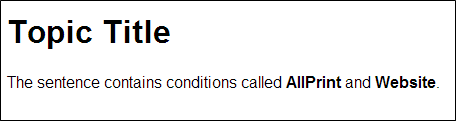
Example — and
Primary.Website AND Primary.AllPrint
This expression includes content that has Website and AllPrint conditions applied to it. However, the output can also include other conditions not listed in the expression, since they are not explicitly excluded.
So let's say you have a topic that looks like this.
In the output, you will see this.
Notice that the second sentence is included even though it contains not only the AllPrint and Website conditions, but also the PDFA and PDFB conditions.
Example — and/and not
Primary.Website AND Primary.AllPrint AND NOT Primary.PDFA
This expression includes content that has Website and AllPrint conditions applied to it. In addition, it specifically excludes content with the PDFA condition.
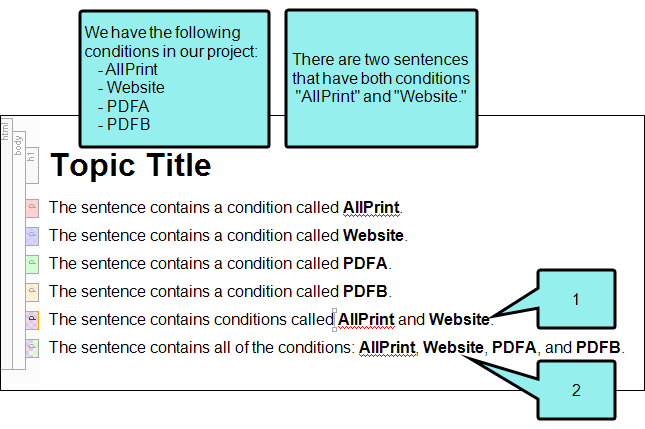
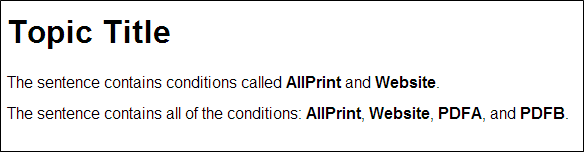
So let's say you have a topic that looks like this.
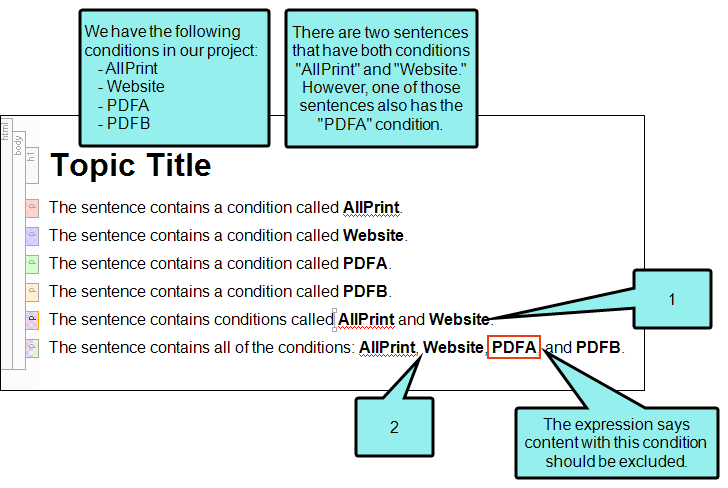
In the output, you will see this.
The second sentence with both Website and AllPrint does not display in the output because the PDFA condition is in that sentence too, and it was set to be excluded.
Example — and not (and)
Primary.Website AND NOT (Primary.AllPrint AND Primary.PDFB)
This expression includes any content with the Website condition applied to it. In addition, it specifically excludes content with both the AllPrint and PDFB conditions.
So let's say you have a topic that looks like this.
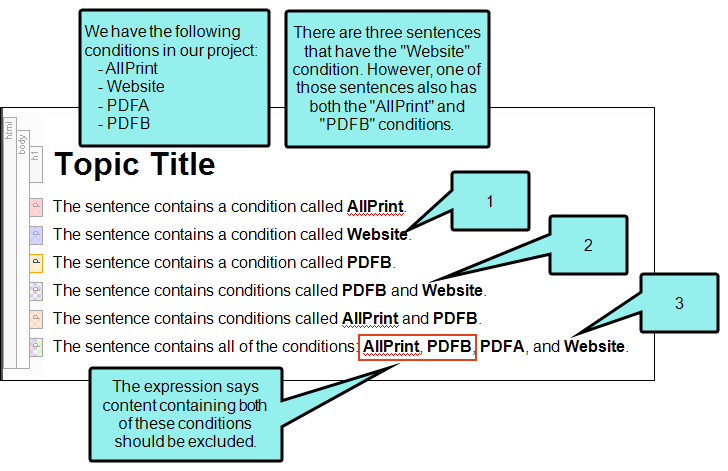
In the output, you will see this.
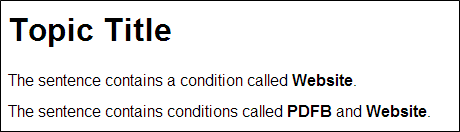
The sentence that had both the AllPrint and PDFB conditions was excluded. However, another sentence that has the Website and PDFB conditions was included. That's because the exclusion only occurs if both the AllPrint and PDFB conditions have been applied to the sentence.
What’s Noteworthy?
Warning When you switch between the Basic and the Advanced view, your work is preserved independently in both. However, be cautious when using the copy button. Because of the way this feature is designed, it is a best practice to use either the Basic section or the Advanced section in the long term, but not both. Although it is possible to copy expressions from the Basic to the Advanced section, and this can save you lots of time, you should not try to switch between sections over time. The reason for this is that every time you make changes in the Basic section and click the button to copy the expression to the Advanced area, your previous advanced expression will be overwritten.
Note When you generate the target, Flare uses the expression from the section that is selected—Basic or Advanced.


